Mobile lab
I’ve always tried to have a decent home lab setup and have been happily using various mixes of HP Microservers, Intel NUCs, Mac Minis and various white box systems. Of course, each of these systems have their particularities and limitations notably in terms of memory, number of NICs, size, power, etc.
But a few things keep happening and quite often the home lab ends up running bits and pieces of my home “production” network, so I’m finally going all in on a new lab setup. I spend a lot of time working with companies on high availability designs, including multi site setups and am looking more and more into the new generation of scale out storage systems so I needed to go a little larger than the usual 3-4 NUCs.
I’ve also been running into issues when giving courses at various engineering schools where I’d really like to have my own mobile infrastructure that I control completely the entire stack, and being able to mock up a fully configured infrastructure. This is of particular importance with schools where the equipment can be older or constrained in frustrating ways.
I’ve been tempted for a while by the beautifully designed solutions from Tranquil PC, especially the original Orange Box, which is sadly hitting end of life, to be replaced by the new V4N Cluster. They’re both lovely, but you pay for that quality engineering and didn’t quite fit a few of my more exotic requirements.
A recent article by Steve Atwood tipped me off to a new sales channel for various types of Mini PCs that come much closer to my ideal systems than any of the previous options, with the added bonus that they’re very inexpensive for what you get. With this new source in hand, I’m stepping out into building a complete mobile lab setup with 8 lab servers & one deployment box. My first planned lab is setting up a simulated two site environment with 3 bare metal ScaleIO nodes per site, feeding two ESXi servers. This pretty much defined the minimum requirements in terms of the number of machines. This design also drove the choice to go with two separate switches, so I can do mean things like shut off all connectivity to a site and see the results, or just cut the inter site connection and so on. This should give me much more insight into the various potential failure modes.
Shopping list
So the basic shopping list is for:
-
9 Mini PCs
Add ons:
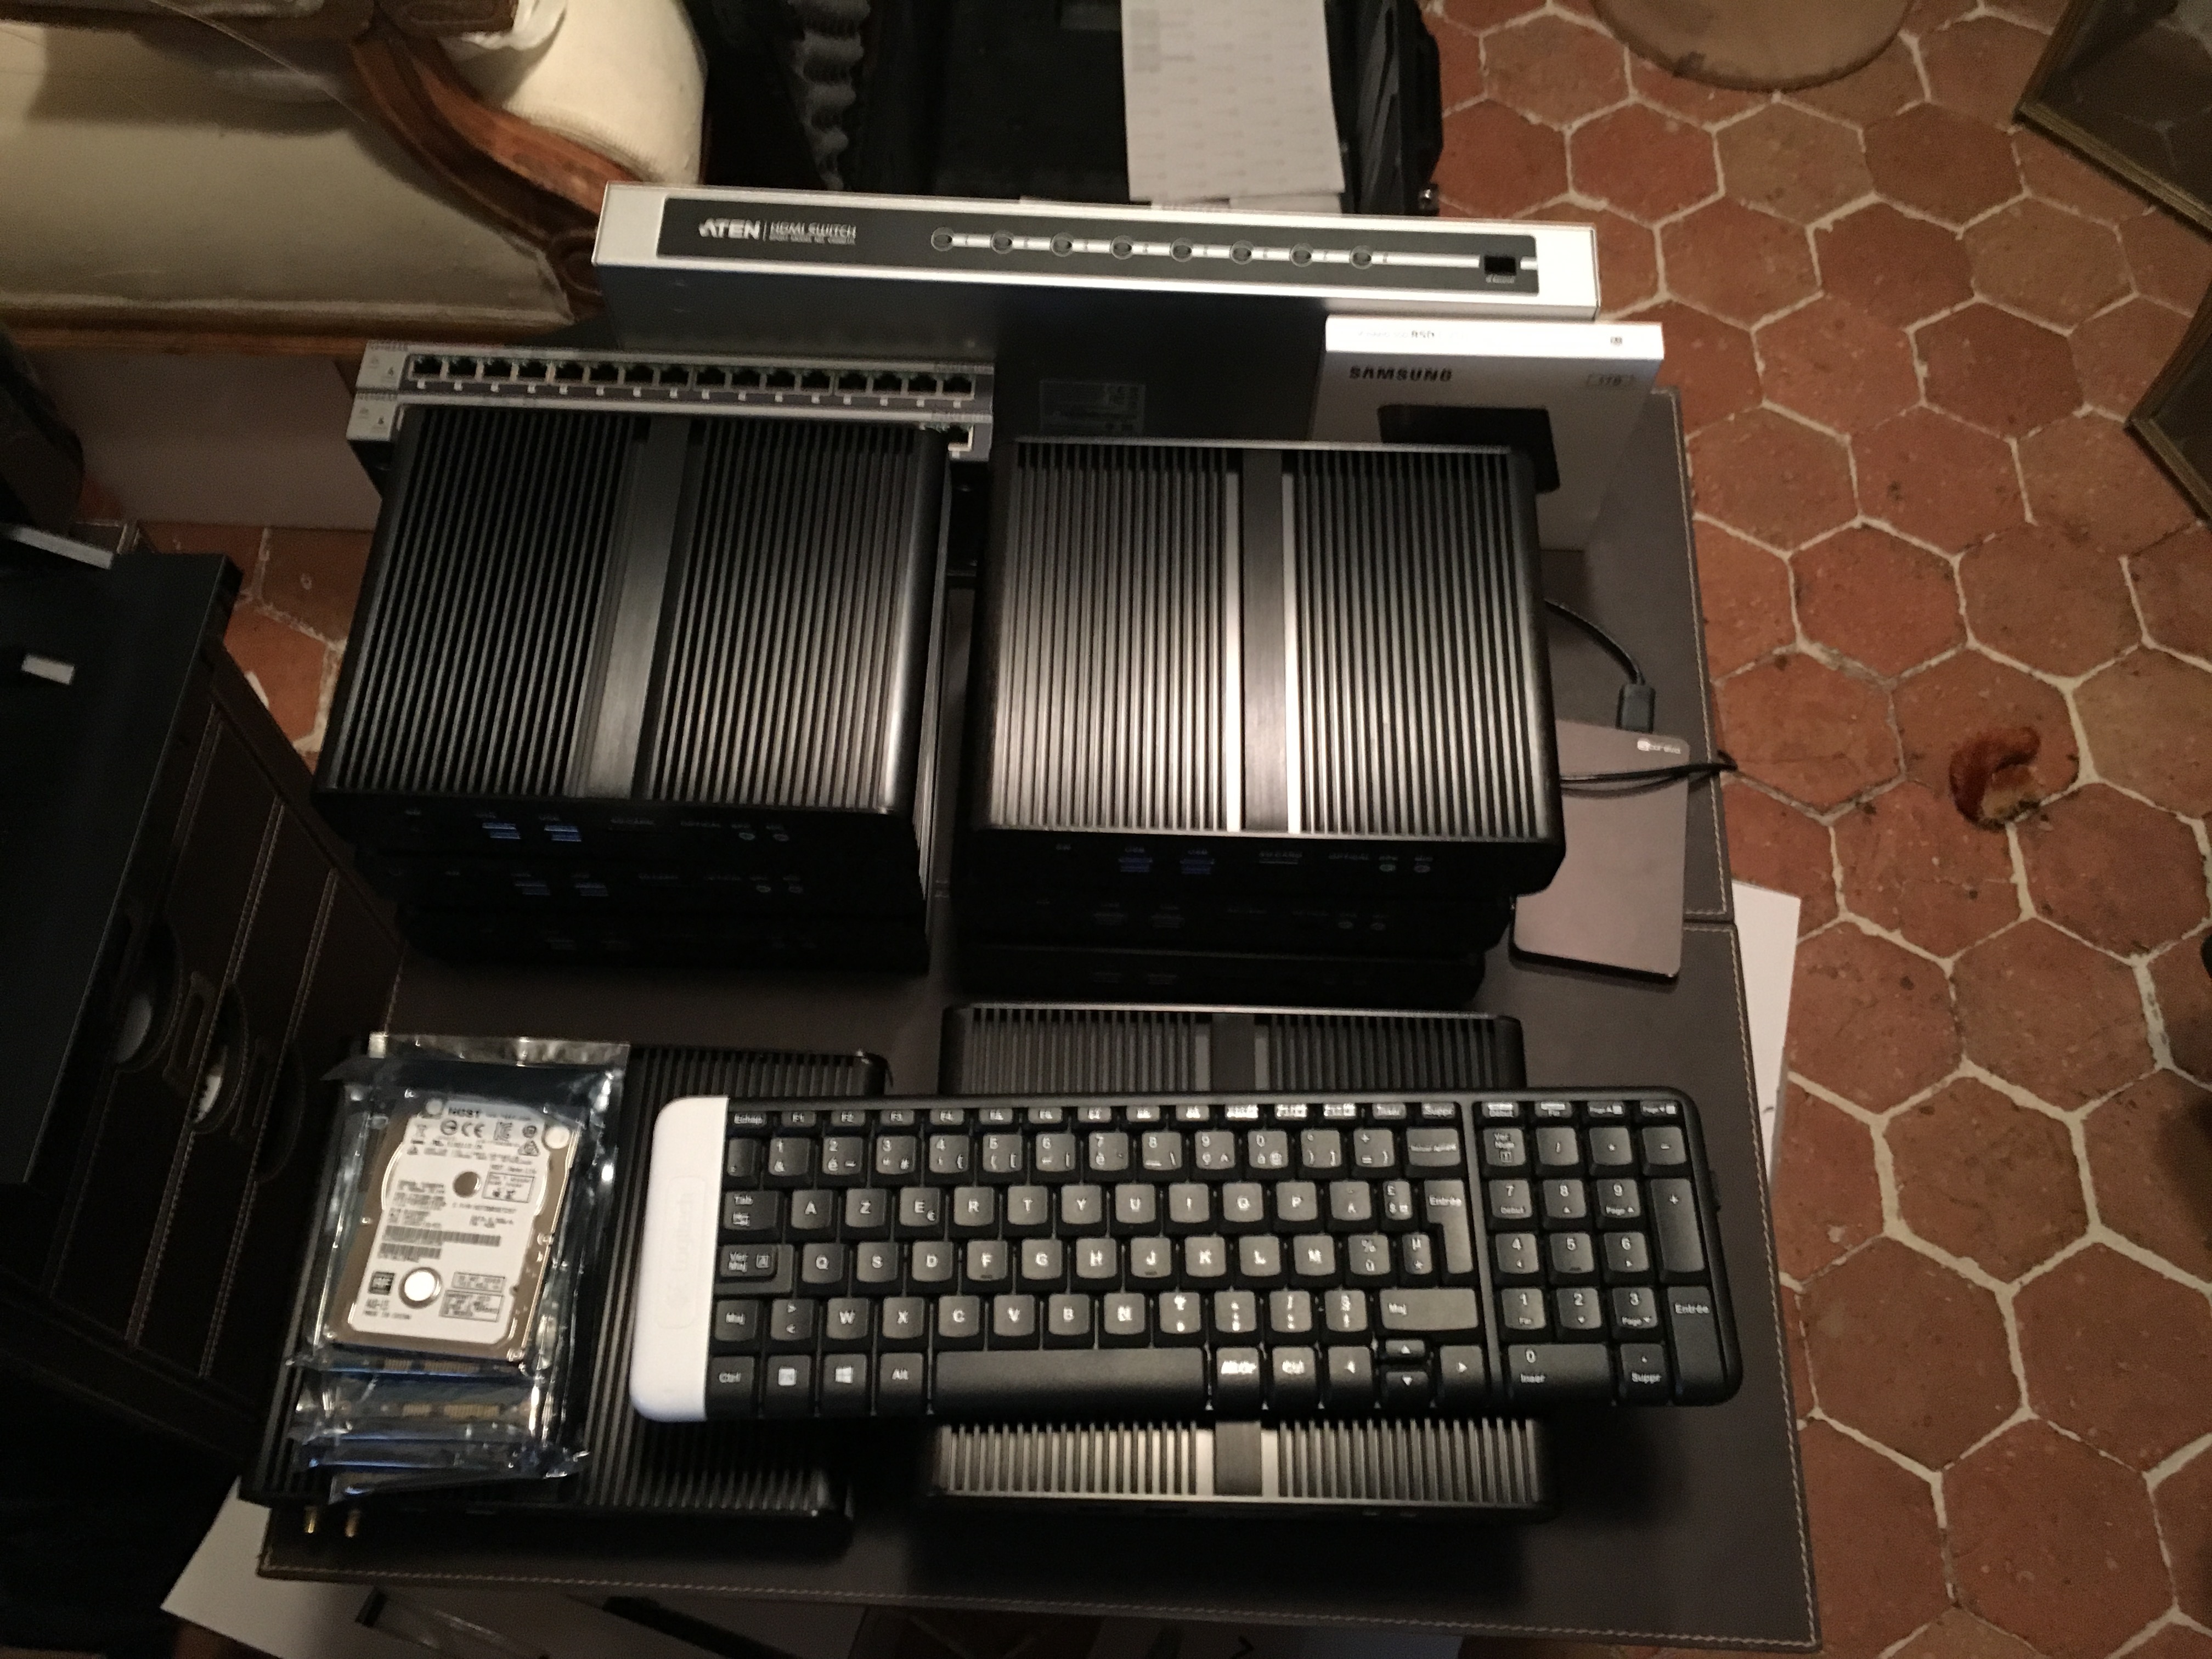
Equipment arrived
Mini PC Configuration
The basic configuration is 16Gb of RAM (still waiting for Skylake to push this to 32, but for lab purposes, it’s fine, and less expensive than 16Gb DIMMs), a 128Gb SATA mSATA drive and a 2.5” 7200 RPM 500Gb spinning disk. There is still an available mSATA slot for another short card if I need later. The 2.5” drives didn’t come with the PCs as I ordered them, so I filled these in myself.
I went with the i5 5200U since it had the fastest baseline frequency of the available options from the particular vendor I chose. I won’t be needing much in the way of multithreading or powerful graphics in the lab (sorry to my colleagues who want to borrow it for VDI testing).
The model I selected has dual Ethernet NICs, so I can properly set up redundant connections and load balancing as required. Unfortunately they are Realtek cards so I’m going to have to do some tweaking to the ESXi image I use since they are unsupported by VMware.
Preparation
The idea of this project is to have a lab that can quickly be repurposed for different types of environments, so the first steps involve working out the details for the master auto deployment server, tweaking the images and doing some basic burnin on the servers and getting all of the BIOS settings just right.
So the theory (that I have, which is mine) is that one server will be running ESXi, with the necessary VMs to make this work. First up will be a pfSense instance to manage the networking, both so I can plug into the local network and get internet access for the various boxes for stuff like downloading packages and so on.
Burn in and stuff
Here’s where I ran into my first set of roadblocks. I had imagined at the beginning that I’d be doing PXE installs to USB keys and also doing some manual configuration with building custom USB keys for various configurations. I had not accounted for the strangeness of the BIOS settings around UEFI and the tweaks necessary to get this going reliably.
I started by booting a USB key with the installer for Ubuntu 15 which booted just fine. I installed onto a SANDisk USB key and the install process went just fine. At this point however, no combination of configuration options would let me boot from this key. Thinking ahead to the future, I realized that this was going to be a right royal PITA if I had to find methods of tweaking every install configuration.
After a quick tour of the market it turns out that there are 32Gb mSATA SSDs available for not much more than a 32Gb USB key, and there are two slots in the boxes, so I ordered a batch of Transcend mSATA 32 Go SSDs to give me a stable environment that will be visible as /dev/sda or C: for my OS installs.
Why would I want to do this? The main reason is that there are a number of products that I want to test out that will leverage a SSD device for data tiering or caching, but generally, they want use a dedicated physical device for this role (can you say VSAN?) so I wanted a dedicated boot volume, a reasonably sized dedicated SSD and a spinning drive for the bulk storage back-end.
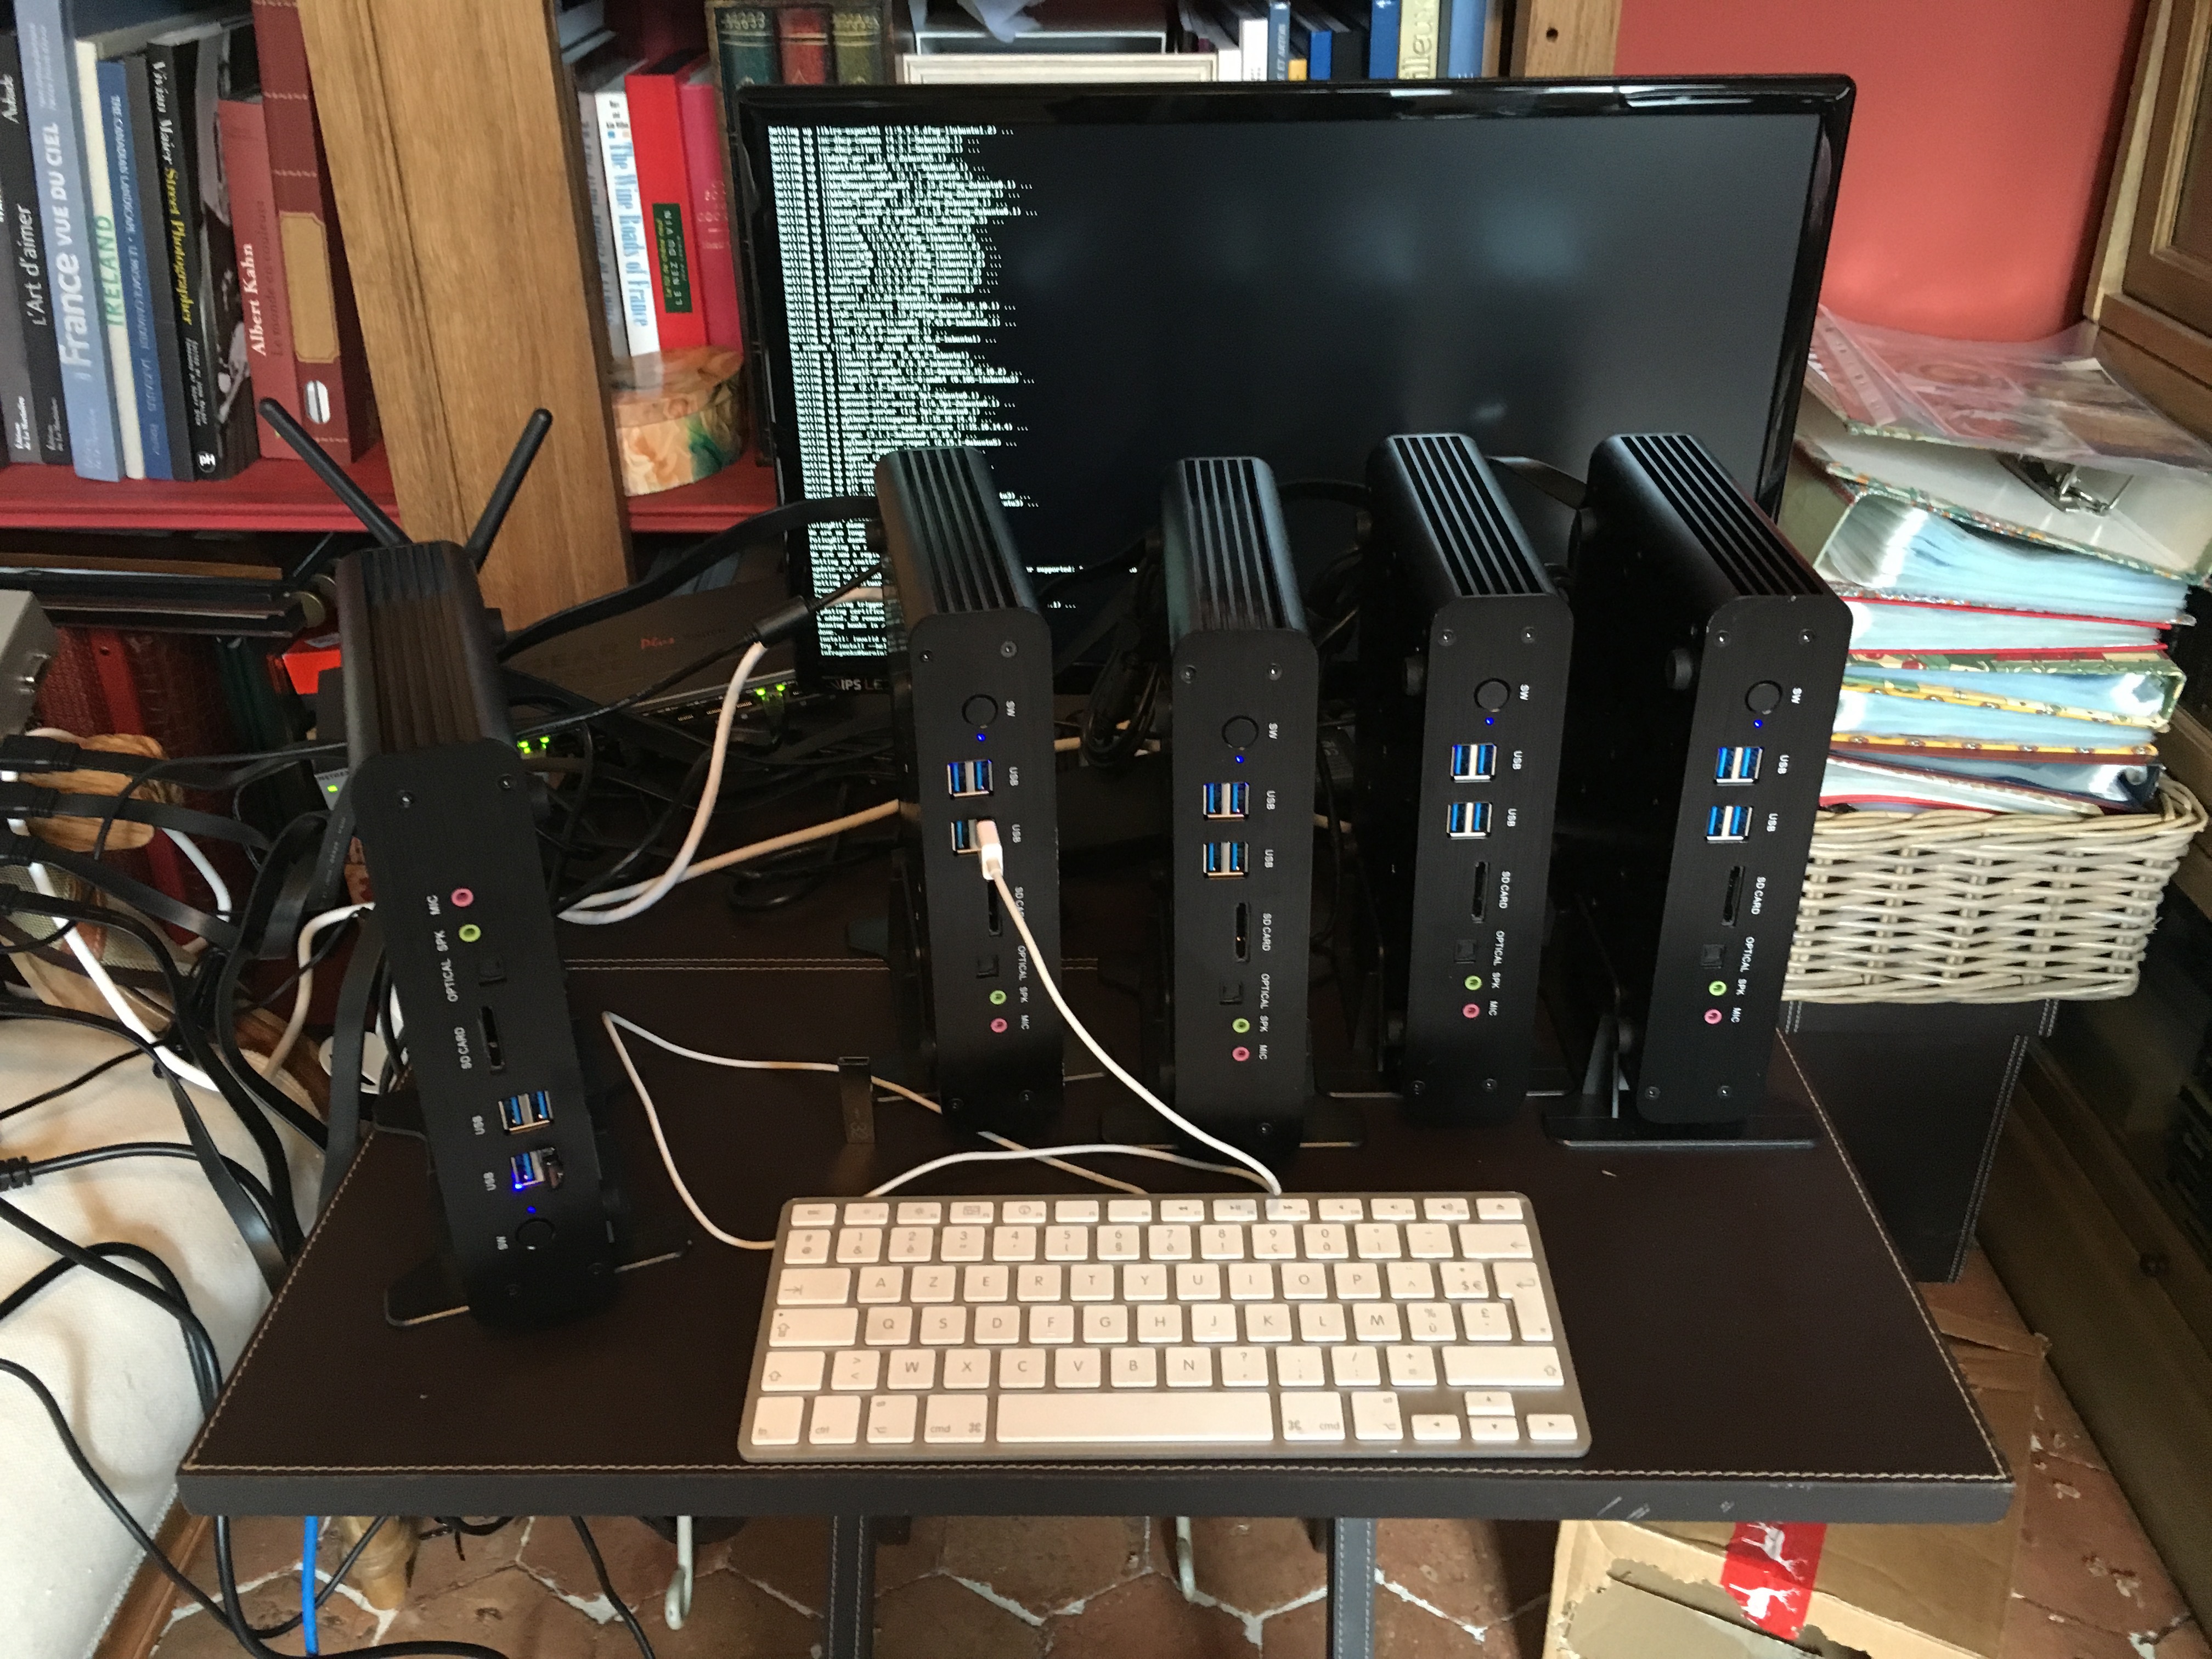
In the meantime, while waiting for that order to arrive, I went ahead and started installing Ubuntu onto the existing internal SSDs and started firing up mprime to push the boxes and ensure that they are all in good shape and to get a real world idea of just how much power they will be drawing under maximum stress.
My general impressions of the machines are that they are larger than I had imagined, as I had for some reason pictured them being closer in size to a Mac Mini. But they are solid and well built and with the passive cooling they are pretty heavy.
Results
I’m using the Elgato Eve HomeKit plugs for measuring power consumption during these tests and for the machines that don’t yet have the internal hard drives installed, they were peaking briefly at 23W until the thermal protection kicked in and pulled it back down to 22W.
From a performance standpoint, the processors were able to maintain a slight Turbo effect and were running continually at about 2.4Ghz instead of their rated 2.2Ghz. This worked fine with the servers mounted vertically which is close to the planned configuration. For fun, I did one run of 8 hours with the servers stacked on top of each other. In this setup, the speed dropped significantly (down to 1.8 Ghz) as the bottom box just couldn’t get rid of heat fast enough, but the thermal regulation kicked in as expected and despite the slow down, nothing ever crashed or misbehaved.
The other useful thing I noted at this stage is that the power supplies are passing 12v. This means that I can clean up the physical installation a lot by getting a single ATX PSU and wiring the DC adaptor cables out of there. This will make the whole thing a lot cleaner since the included power bricks are fairly large and come with heavy cables.
Observations
One interesting thing that turns out to work well for me is that unlike many systems, the front facing USB3 ports do allow booting. In my experience, many systems will only boot from USB2 ports. This has allowed me to revisit my initial assumptions about the physical installation in the box. Given that I can now boot from the front facing USB ports as required, I can now run all of the cables underneath and have easy access to the power button (something that was troubling me) and the USB3 ports. But given that I’m going to be using the 32Gb internal SSD, I won’t be needing these ports very often anyway, but it’s nice to know the option is there if I keep a bag of preconfigured USB keys nearby.
The other thing that I was able to test after having some issues with a SANDisk USB key that I was using for the ESXi installation on the master node (configuration changes were not getting saved), I swapped it out for an SD card which is working much better and is bootable. I may go back and revisit the install configurations on the other nodes using SD cards once I get the whole system up and running. Although I still think that for most stuff, an internal 32Gb SSD will be more reliable and perform better.
But I also like the SD card for quick backups. I plug it into my MacBook and a quick:
dd if=/dev/rdisk6 of=masteresxi.backup bs=1m
Physical installation
This was a bit of a tough one. I started with the following constraints in mind:
-
I wanted a Pelican case since they are tough and on an overall weight/size to content ratio better than building a traditional mobile rack solution.
-
I also wanted a model that was closer to a carry on bag than a big suitcase. My workshop is much more oriented towards woodworking than plastic or metalwork, but I’ve got a hacksaw and a cheap drill press so I figured I had the basics necessary to finding ways to mount all of this stuff into a case. Between Amazon, a few specialty stores and the local hardware store I figured I could build something fairly solid.
I spent a lot of time fiddling in 123D Design to see just how I could arrange all of the various components in the smallest reasonable size Pelican case. My love for symmetry was stymied by the dimensions of the various components and desire to stick to a rolling case that was closer to carry-on size rather than a full-on mobile rack. So after many different attempts, I ended up with this as the basic layout :
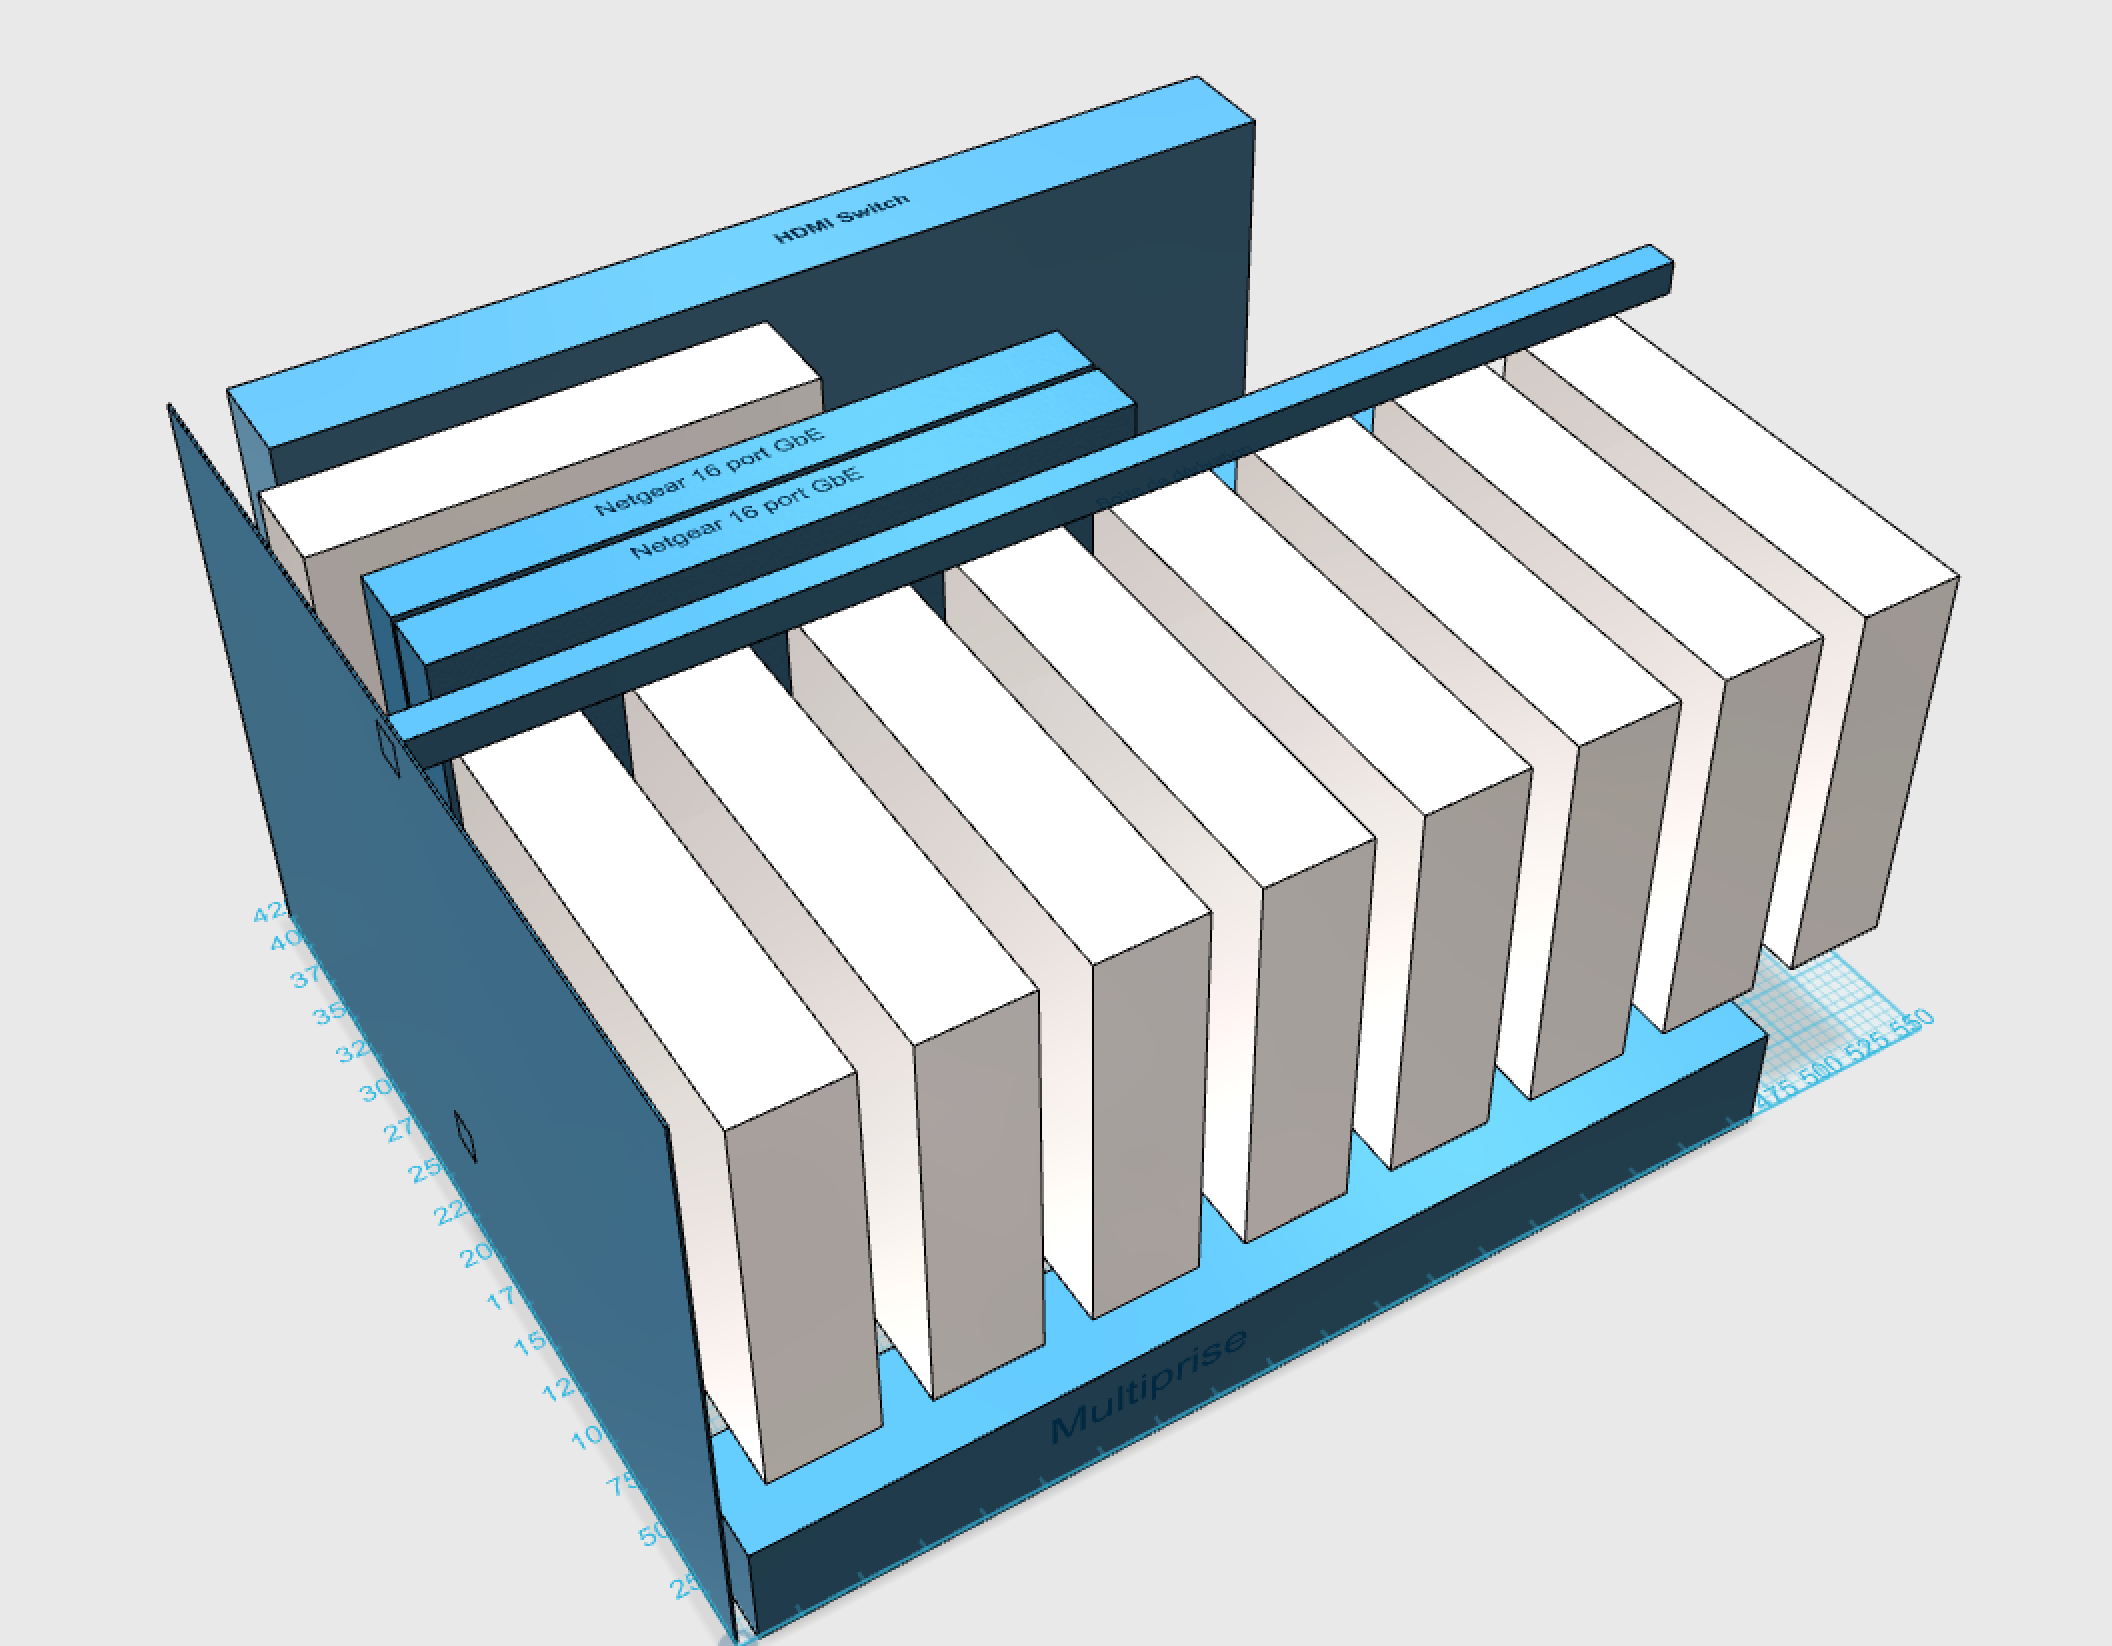
I also realized that I’ll be voiding the Pelican waterproof warranty since I’ll need to drill a few holes for some of the supports where glue won’t do the job. But the amount of time this box will be out in inclement weather should be relatively short and I’ll try and put appropriate washers on the exposed spots.
But after checking out the local hardware stores, I ended up checking into one of the shops that had a proper metalworking shop attached to the store and they do custom work, so I dragged over the box, a few servers, the switches and asked for a design quote.
For a reasonable price, they designed and built a complete setup that will also be removeable so if I need to pull it all out and rewire stuff, this will give me access to the backs of the servers and should make cabling much easier. Their idea was to build a flat plate supported by rubber mount isolated feet to give me the space for the cabling, cutouts for passing cables underneath and bent plates that attach to the VESA mounts.
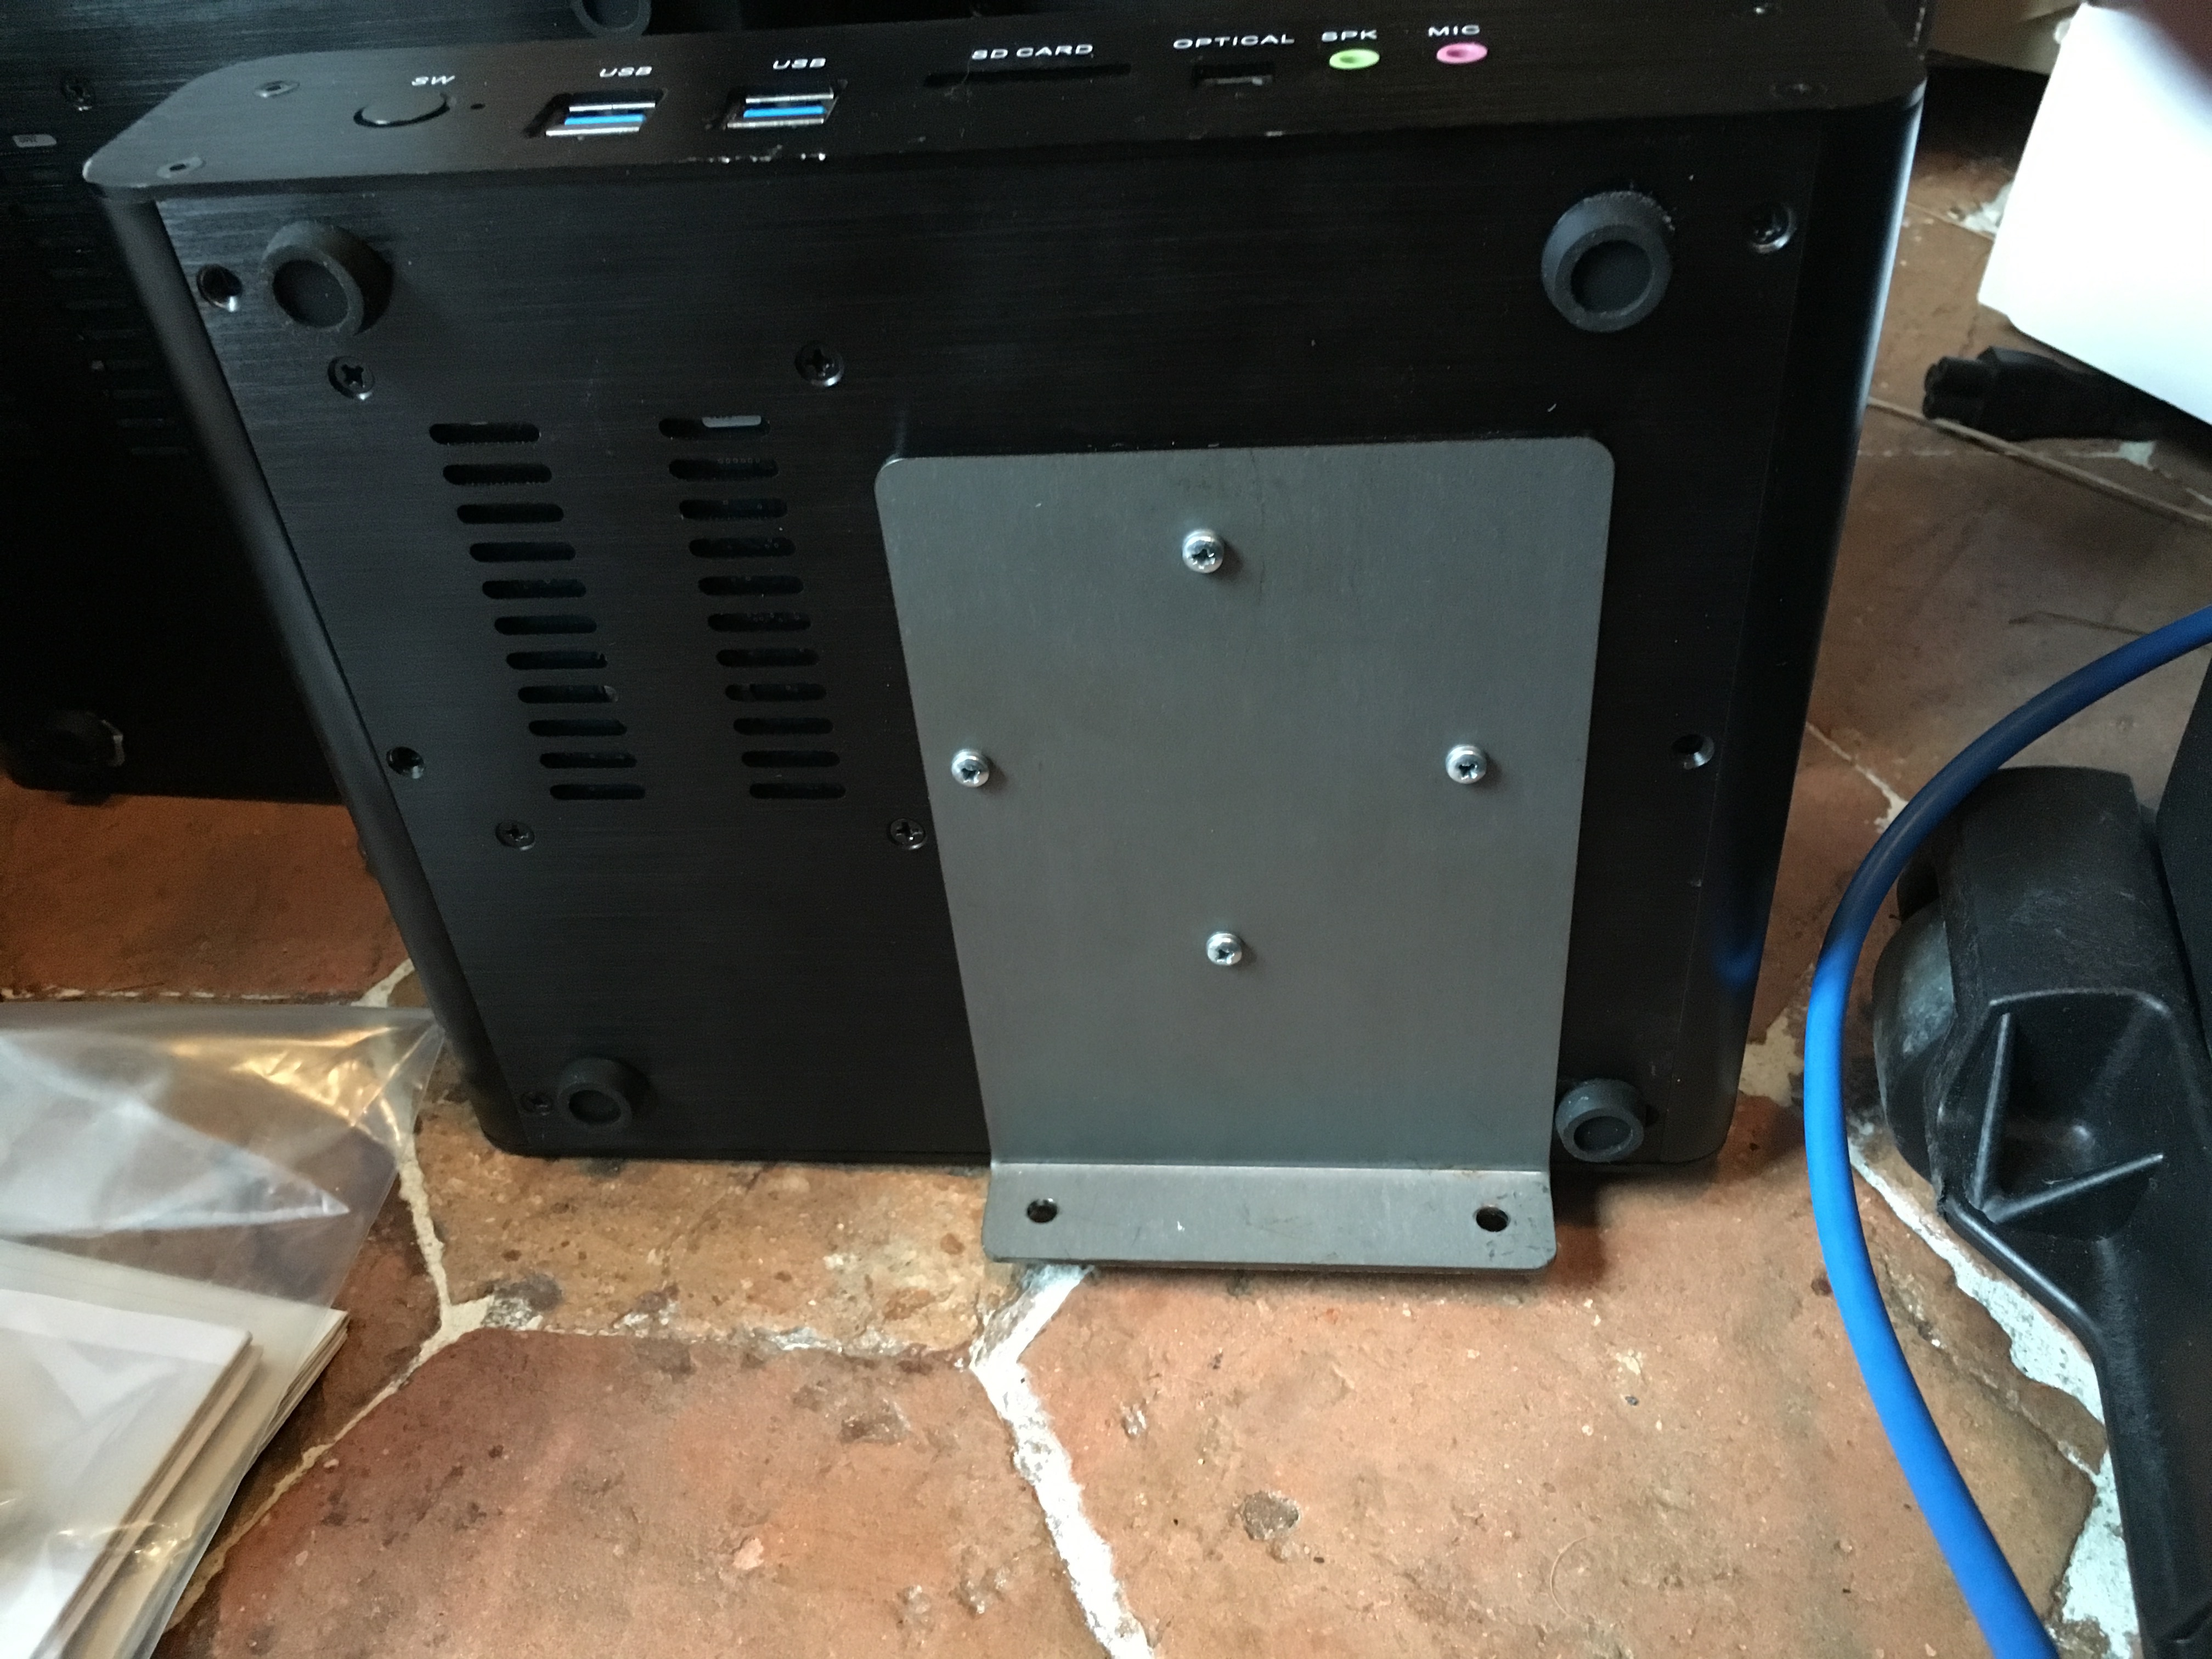
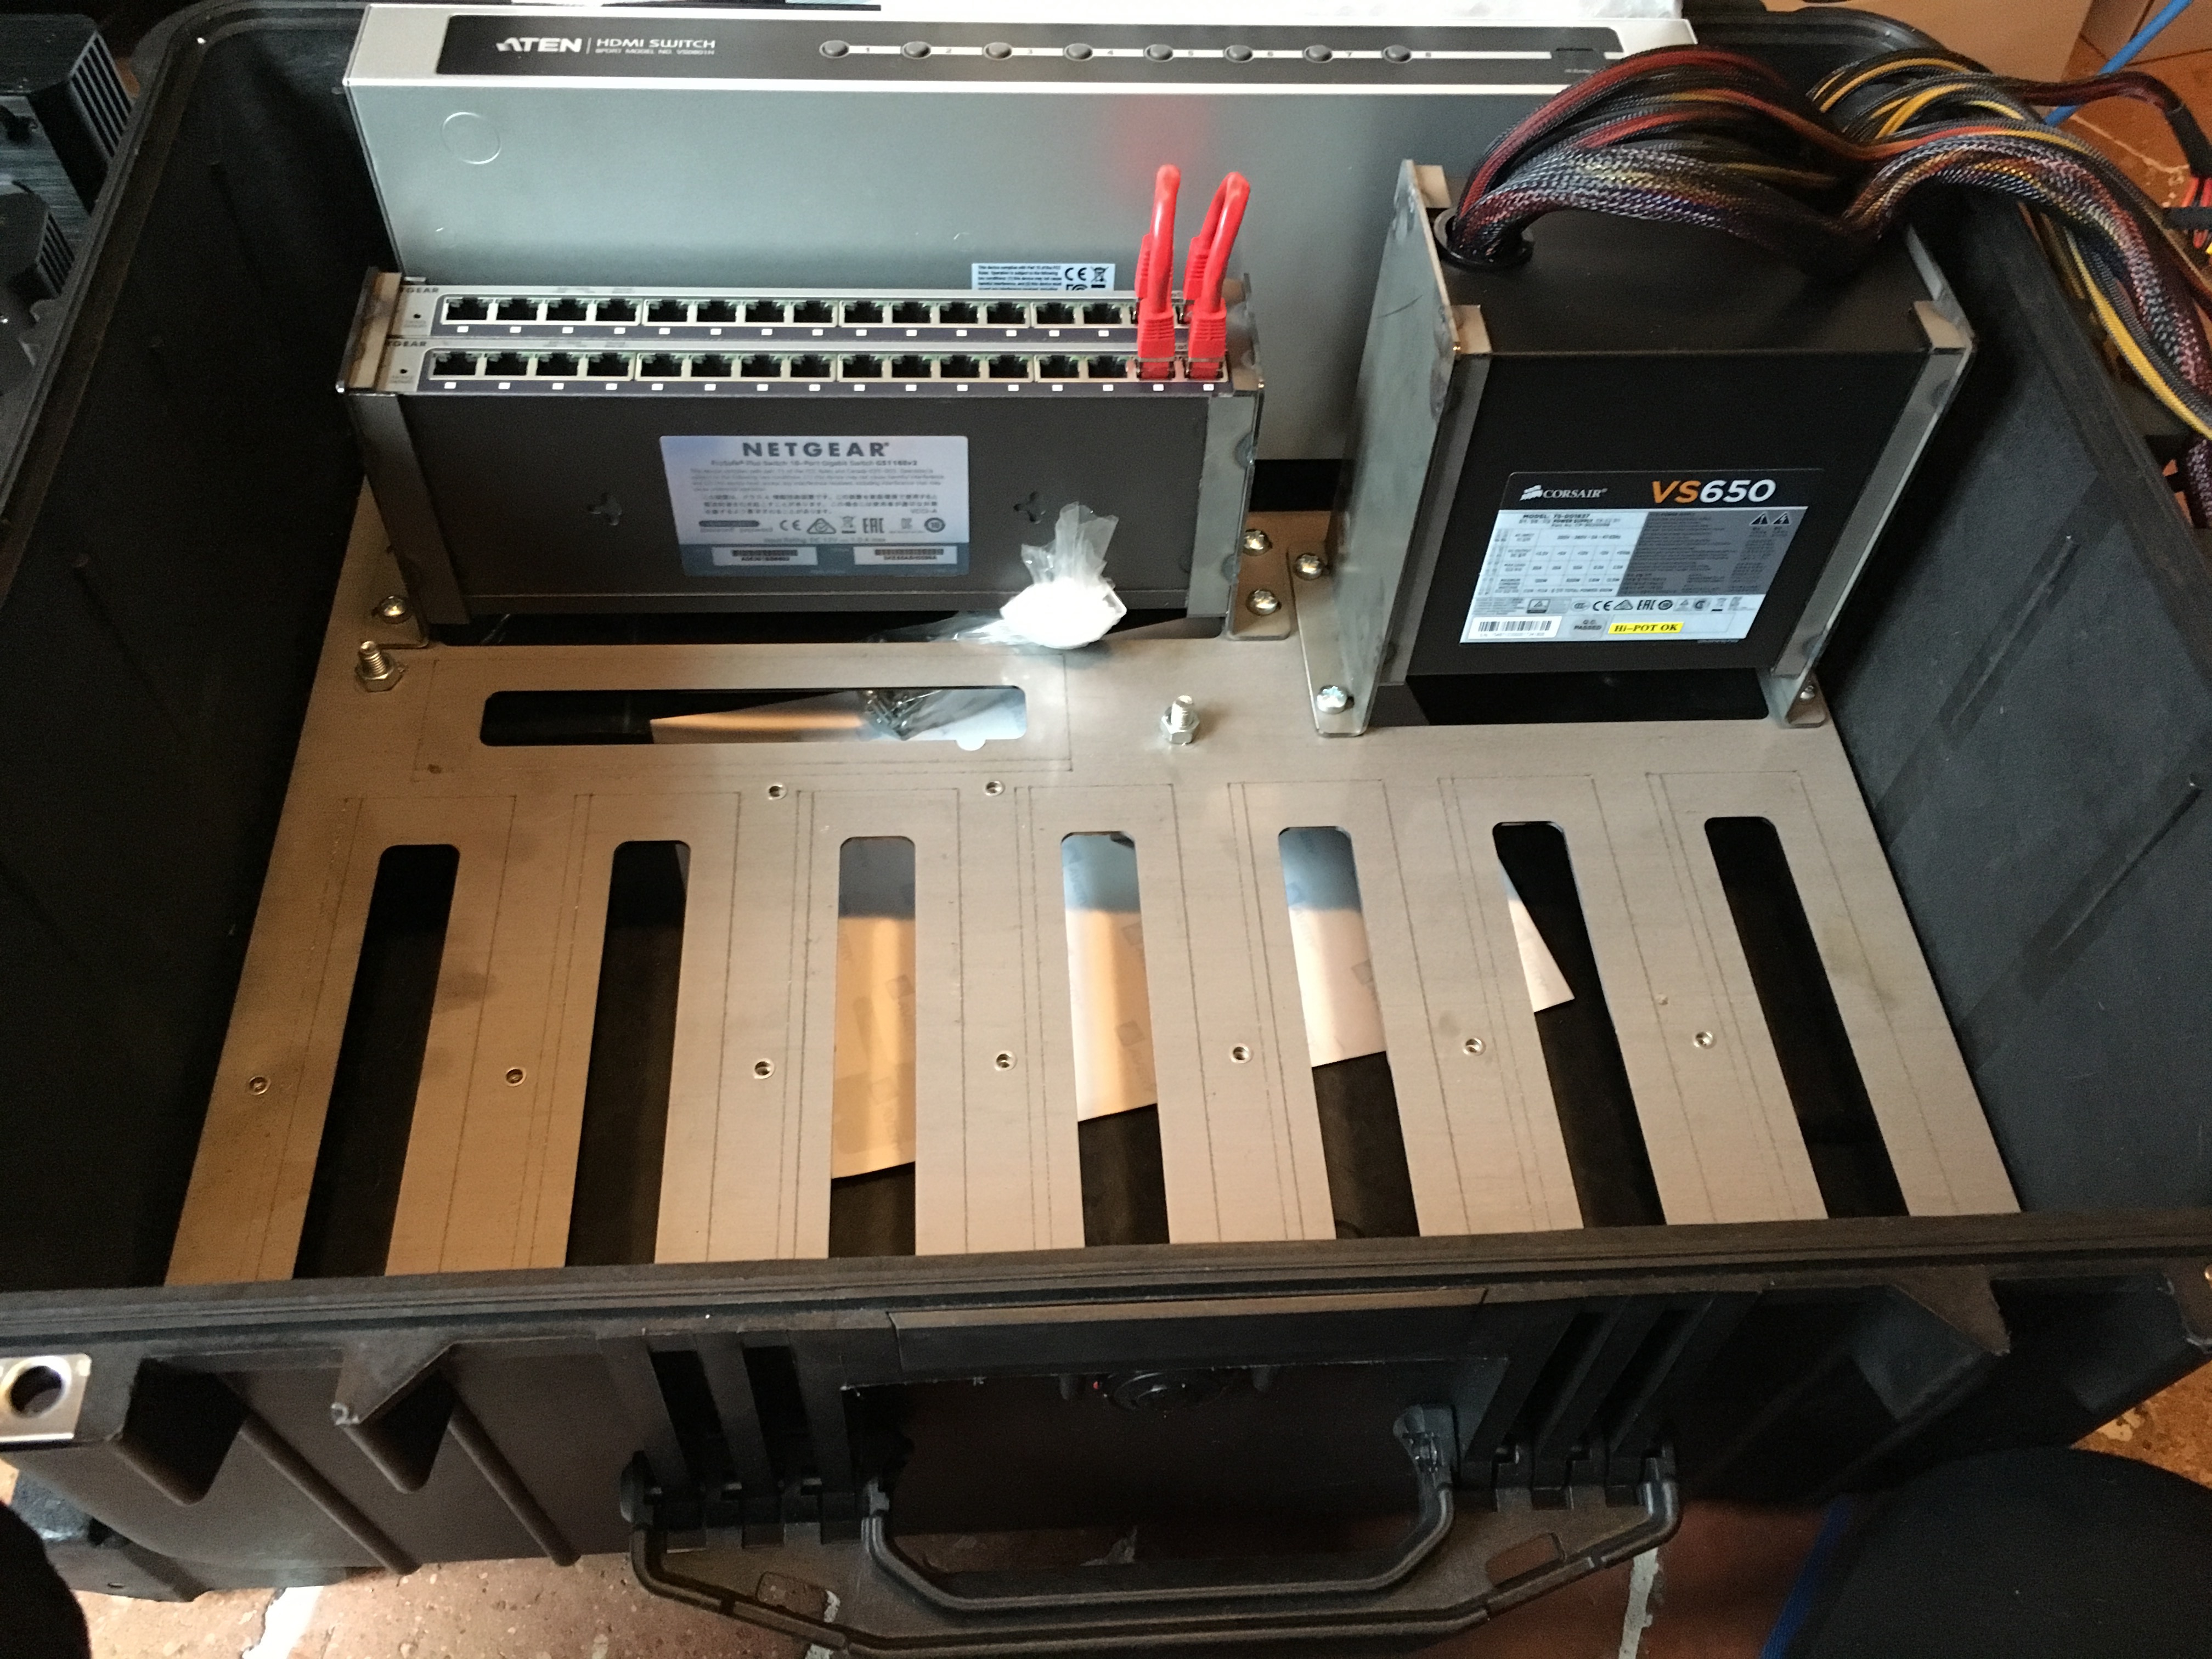
I goofed on the original design description and he heard that there were 8 machines in total rather than the 8 plus the one master on the side, so I had to go back and get the plate redone, but since he’d already done the bulk of the design work, it was just configuring the laser cutter for another run and adding the screw mounts back on. Here’s the naked original version of the baseplate:
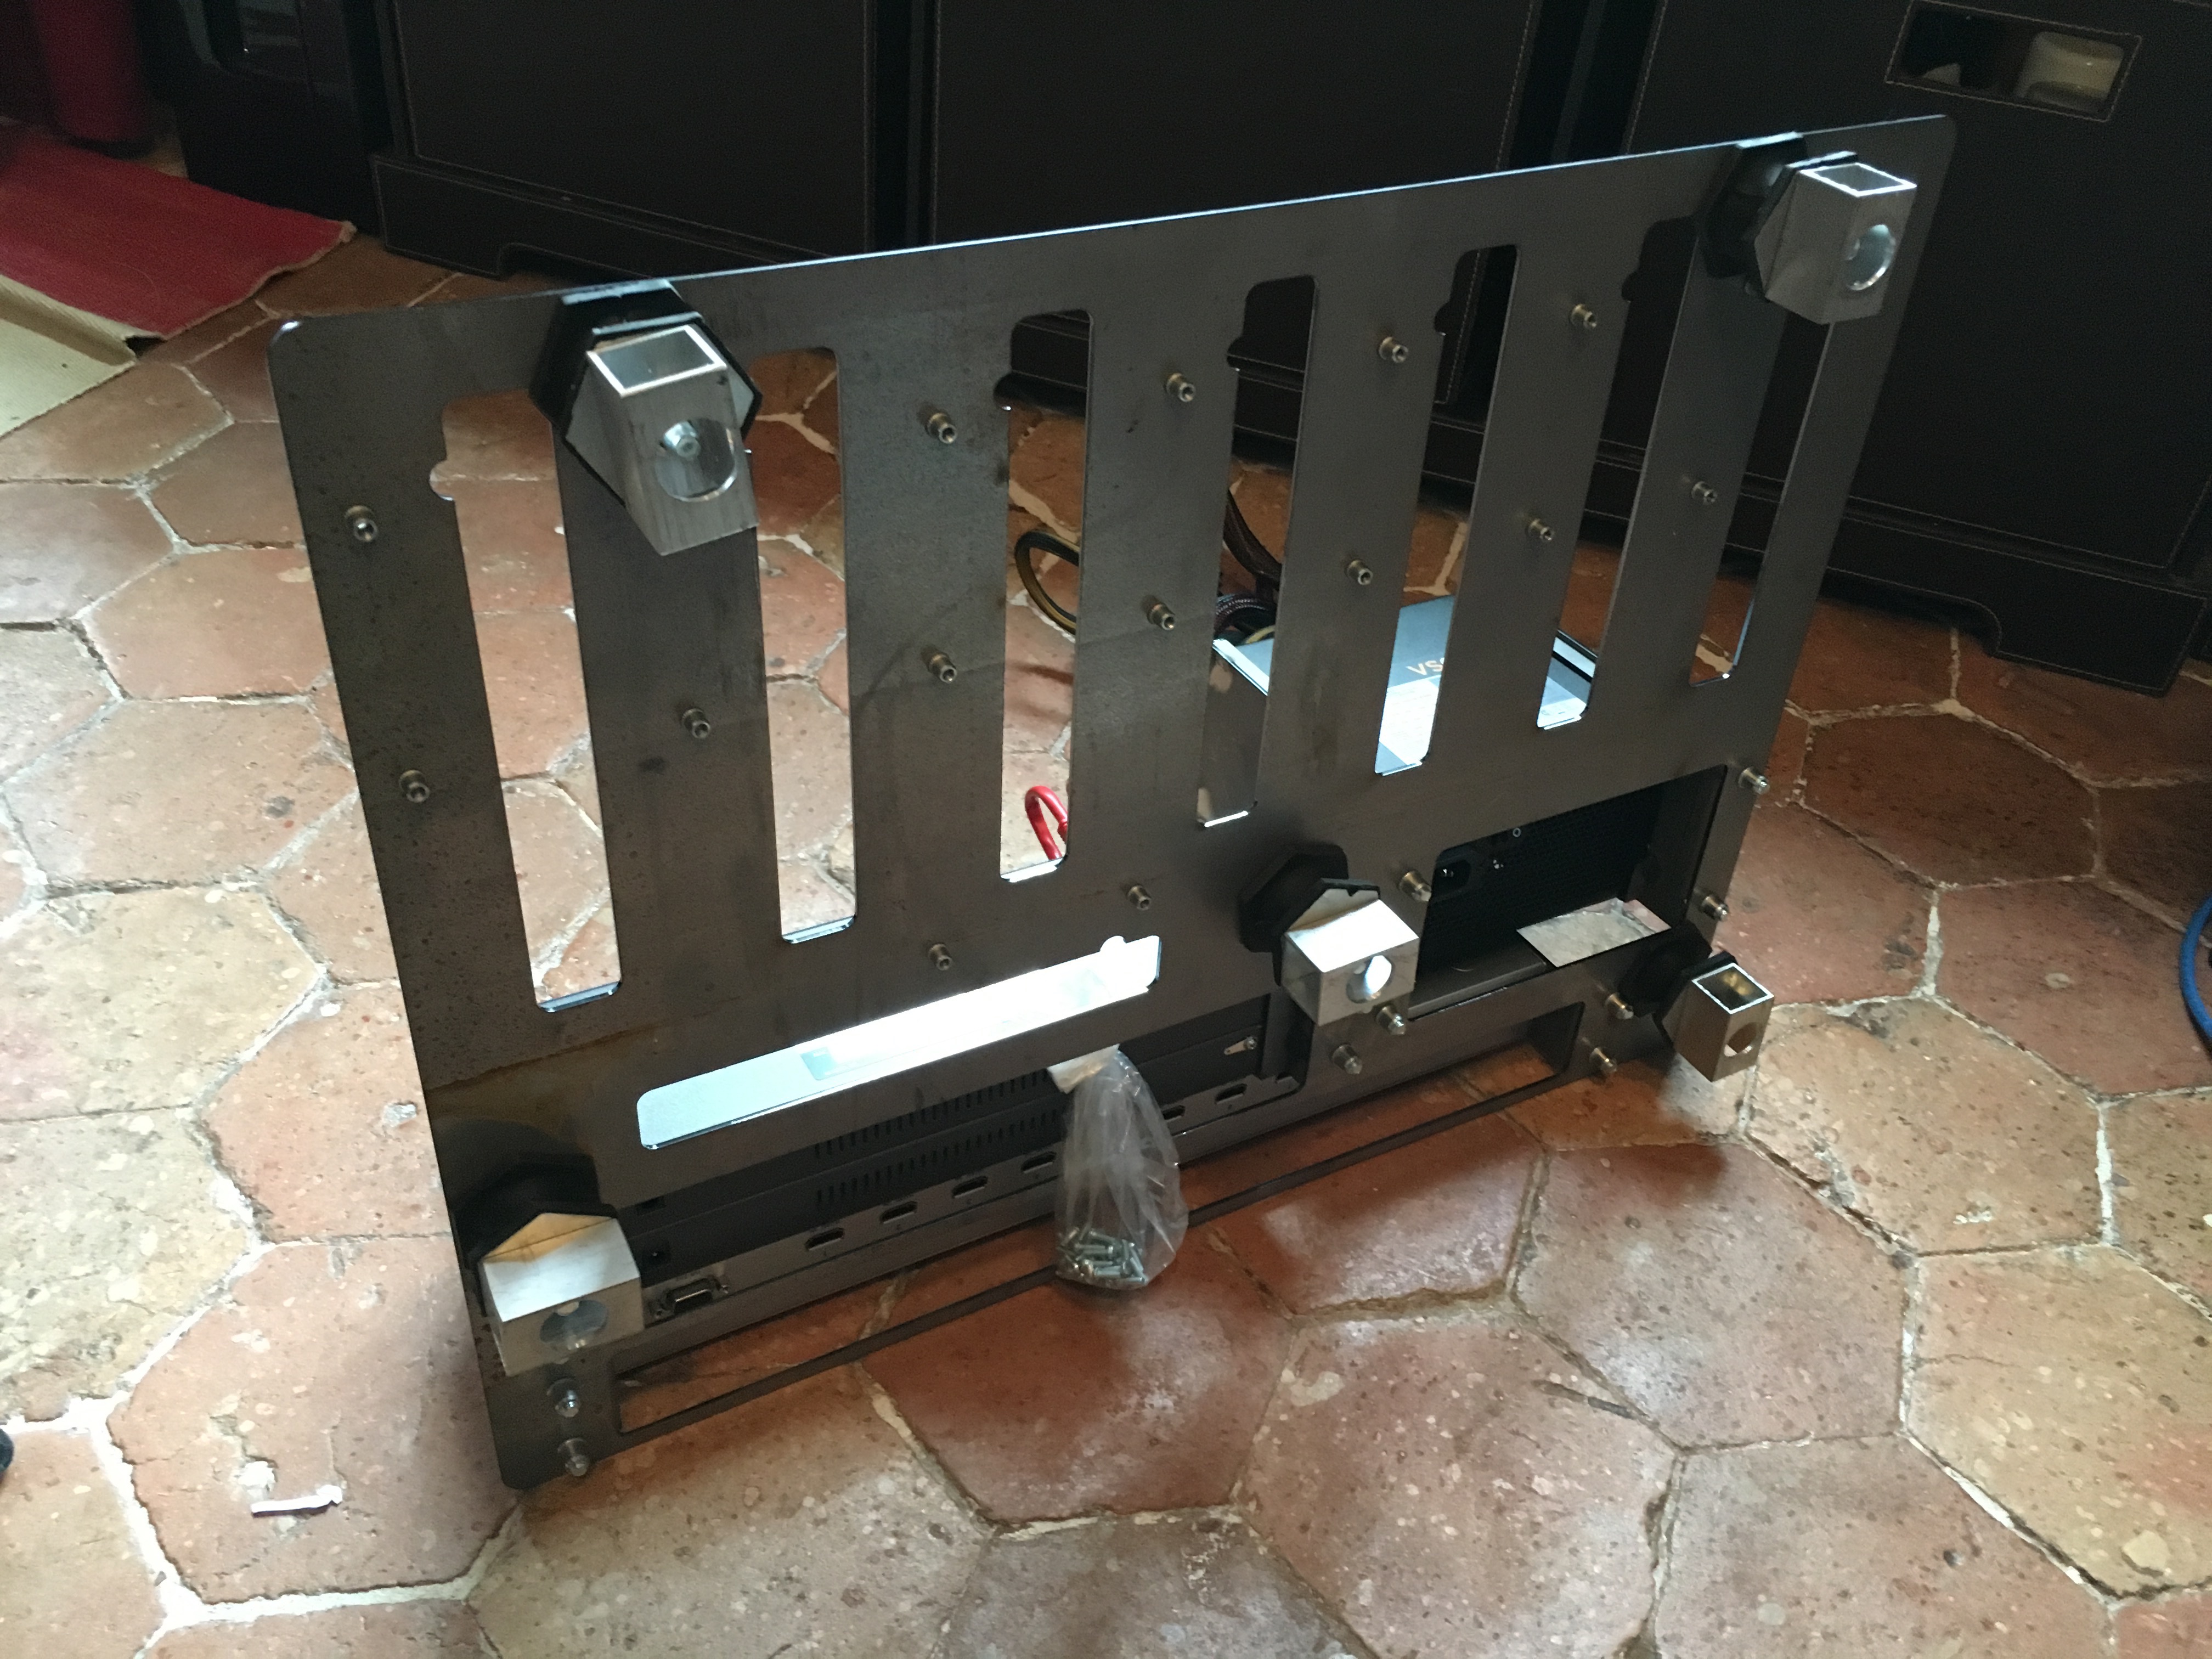
From the top:
Power issues
My original design estimations were way optimistic on the amount of space that the power plugs and cables were going to take, so I was very happy to discover that the servers all run off 12V (some PCs in this space use 19V input, notably many of the Intel NUCs). With this in mind, I figured that I should be able to convert an ATX PSU to feed all of the servers. I ended up ordering a from Amazon as it’s complete overkill at 600W on 12V (28*9 = 252), but it had the following things going for it:
-
it’s not ugly :-)
-
it’s reasonably efficient
-
it’s quiet
-
and most importantly, uses a single 12V rail so cutting out the cables will be a little easier and I don’t have to keep track of which circuit they’re on
And a quick tour of the web and I found lots of tutorials on how to take a PSU and rework it for use as a generic 12V power supply, so back to the hardware store to order a soldering iron (my plumbing oriented torch is a little overkill for this kind of work). The upshot is that you need to short circuit two wires so it thinks that there’s a motherboard connected and the switches are always on so there’s a minimum draw as soon as it turns on.
Then I spent ages scouring the web to try and find the right sized DC connectors that fit into the back of the machines.
As it turns out there are two pretty standard designs that are 5.5mm outside and either 2.1 or 2.5mm for the internal post. The Netgear switches take the 5.5/2.1 sized ones that are also used widely for POE cameras so that was no problem. The initial batch of cables I got for the PCs were also of this lineage which turned out to be an issue since the cables were far too thin to support the draw from the PCs. This resulted in my first power-on test being followed by gently smoking plastic about 10 minutes later.
So I look around further and found a store that supplied just the barrel connectors themselves and I went back and soldered these directly onto the wires coming out of the PSU.
Note: soldering this kind of barrel connector is a right royal PITA, I highly recommend getting them preinstalled on wires if you can find them. It’s a lot easier.
So after reworking all of the power cabling, I fired it up again and this time, no smoke. With all the machines running, but not doing much the power draw on the entire system is about 130W. With the machines in the box, they are warm, but not hot to the touch. I haven’t yet dared firing up a full mprime run on all of them simultaneously yet to see how hot it gets. Since all of the machines are passively cooled, the only noise they make is the spinning hard drive which is pretty well damped by the heavy chassis. The PSU fan is not a noiseless model but for practical purposes, it’s very quiet.
The only power issue that is still bothering me is that the HDMI switch requires 5.3V and it’s pretty picky about it. I tried driving it from the 5V rail on the PSU, but that didn’t work, so for the moment, I still have the power adaptor for that one hanging around. If someone wants to point me to an electronics kit that can take 12V in and output regulated 5.3V, I’m all ears since it’s the only thing in the case that’s not powered off the PSU.
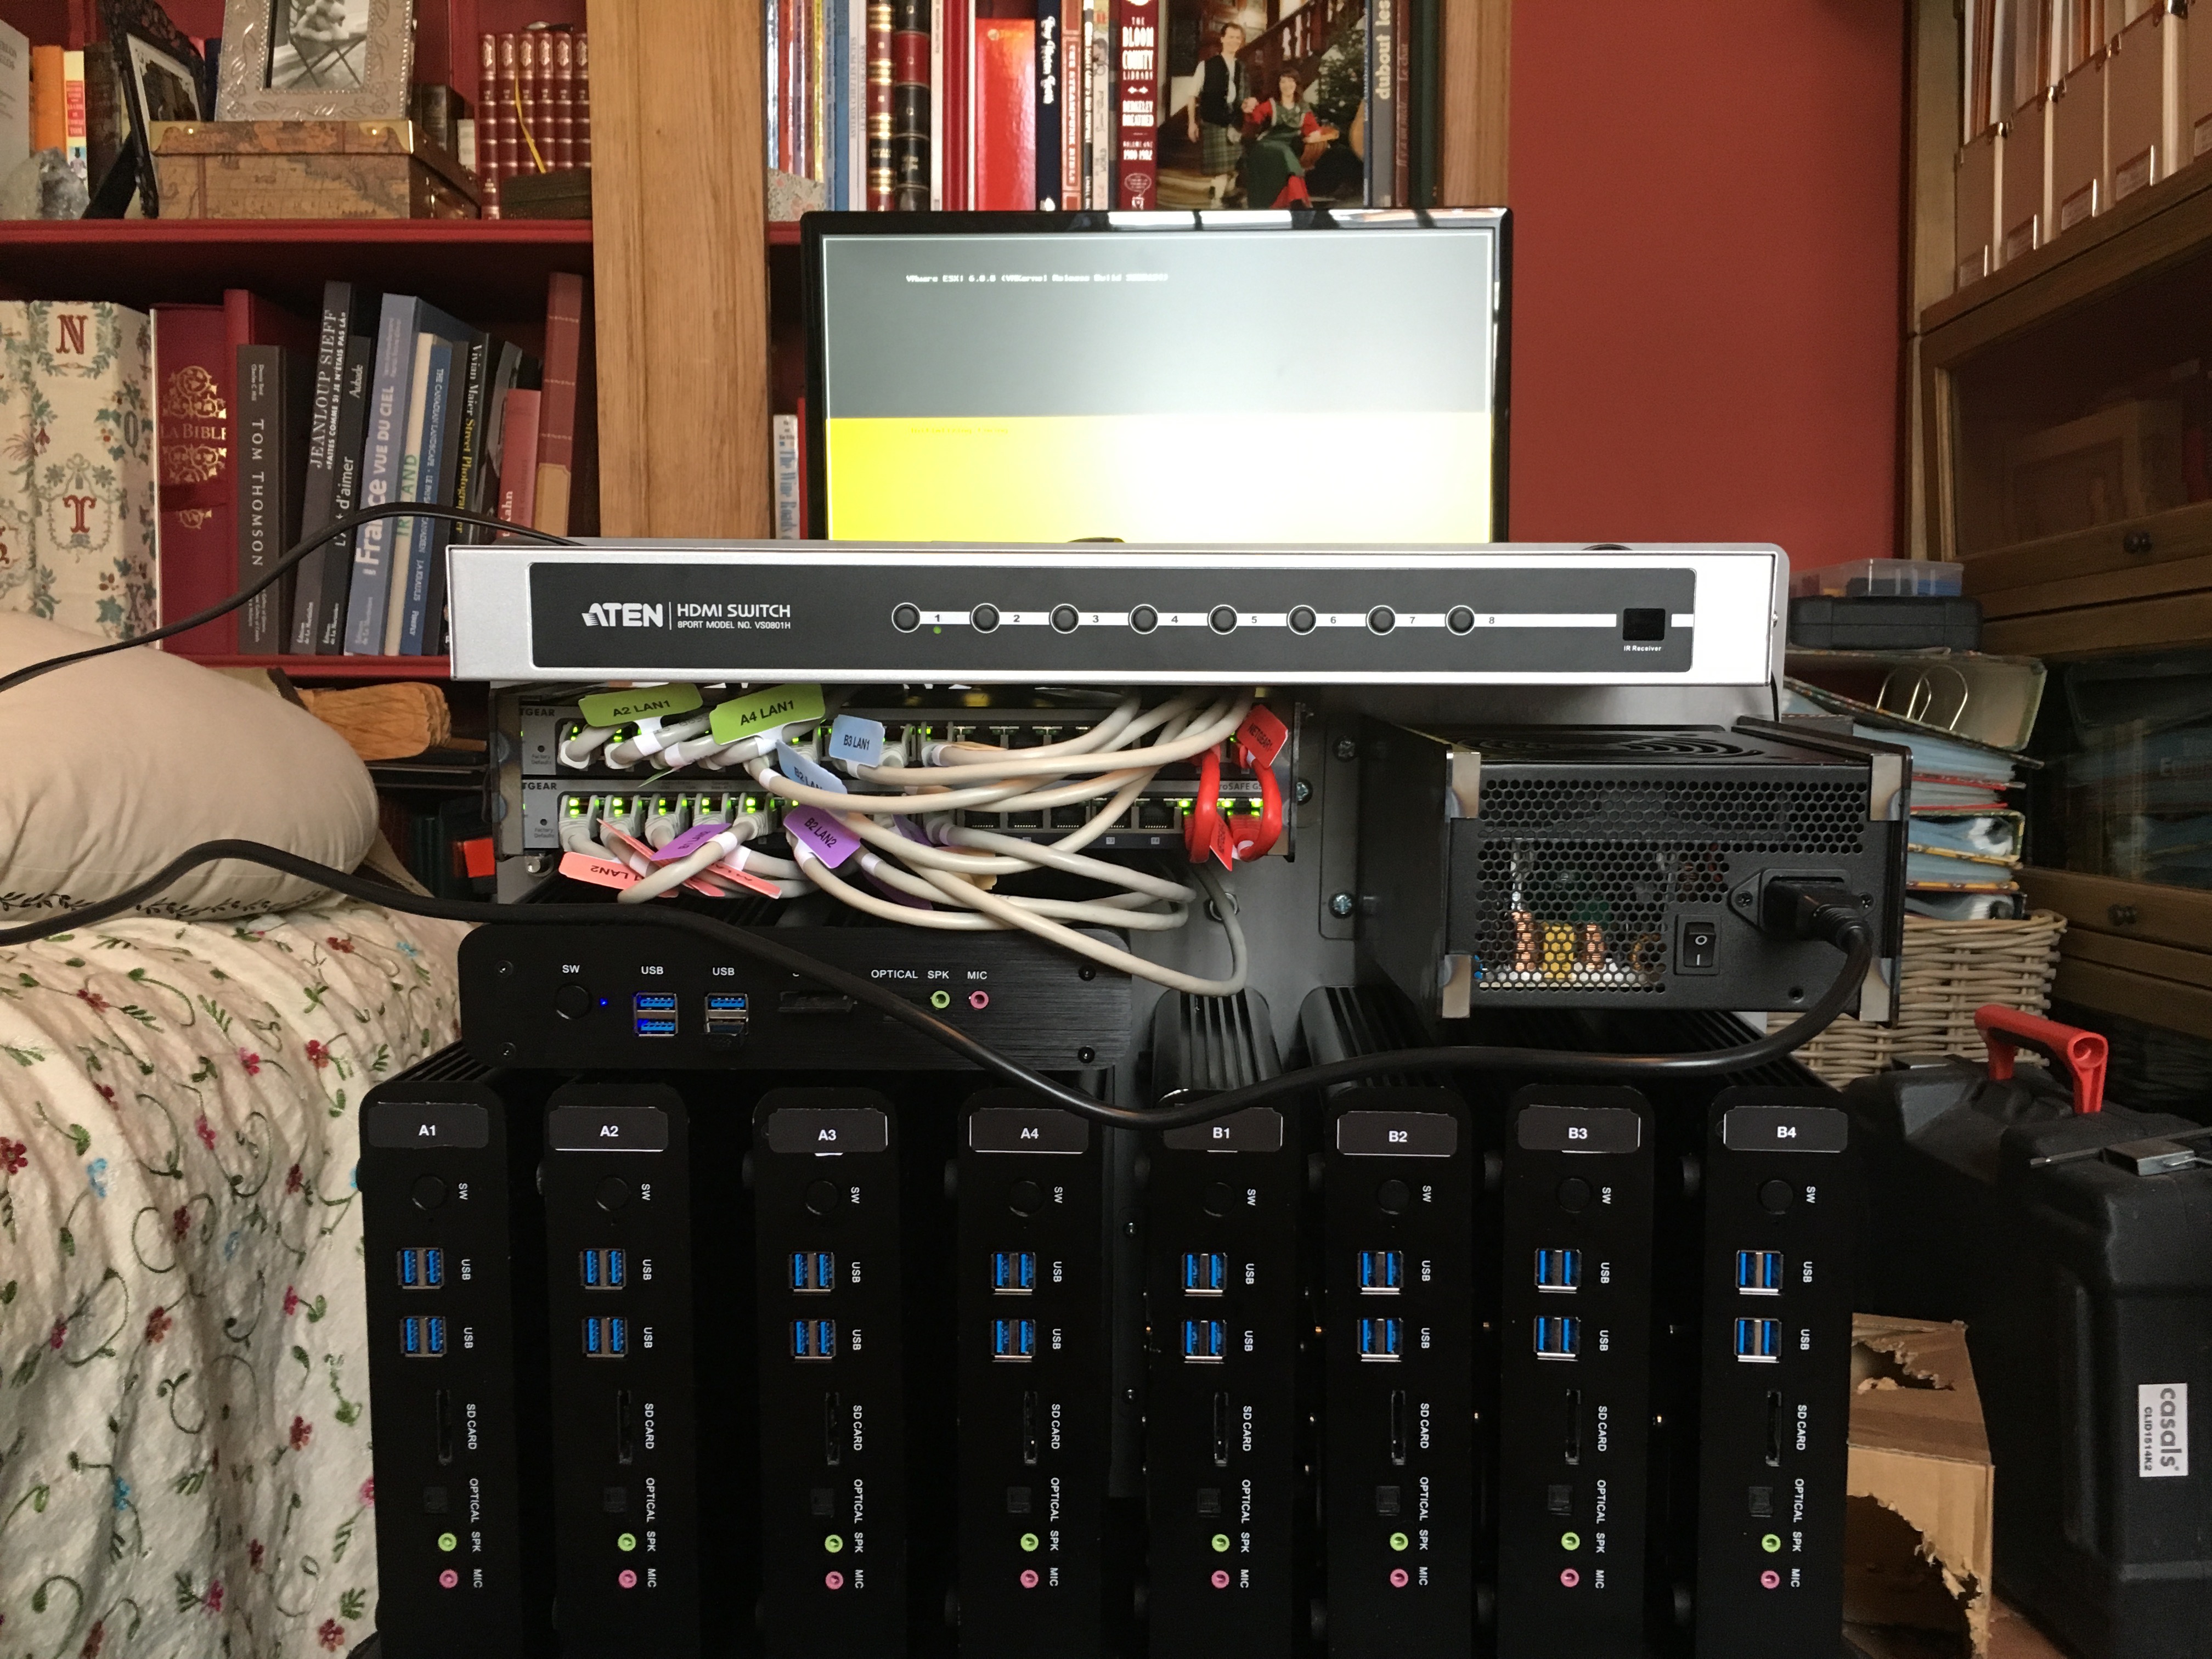
HDMI Switch
A poor man’s KVM, coupled with a Logitech radio keyboard and mouse I can get into individual machines as required coupled with a cheap Logitech wireless mouse and keyboard attached to the USB port. Generally speaking, I will only be using this when I’m tearing down and rebuilding the environment and need to force select the PXE boot on the BIOS.
Networking
I’m using the same basic structure as I use for many small independent sites, using pfSense as the router and firewall in a VM.
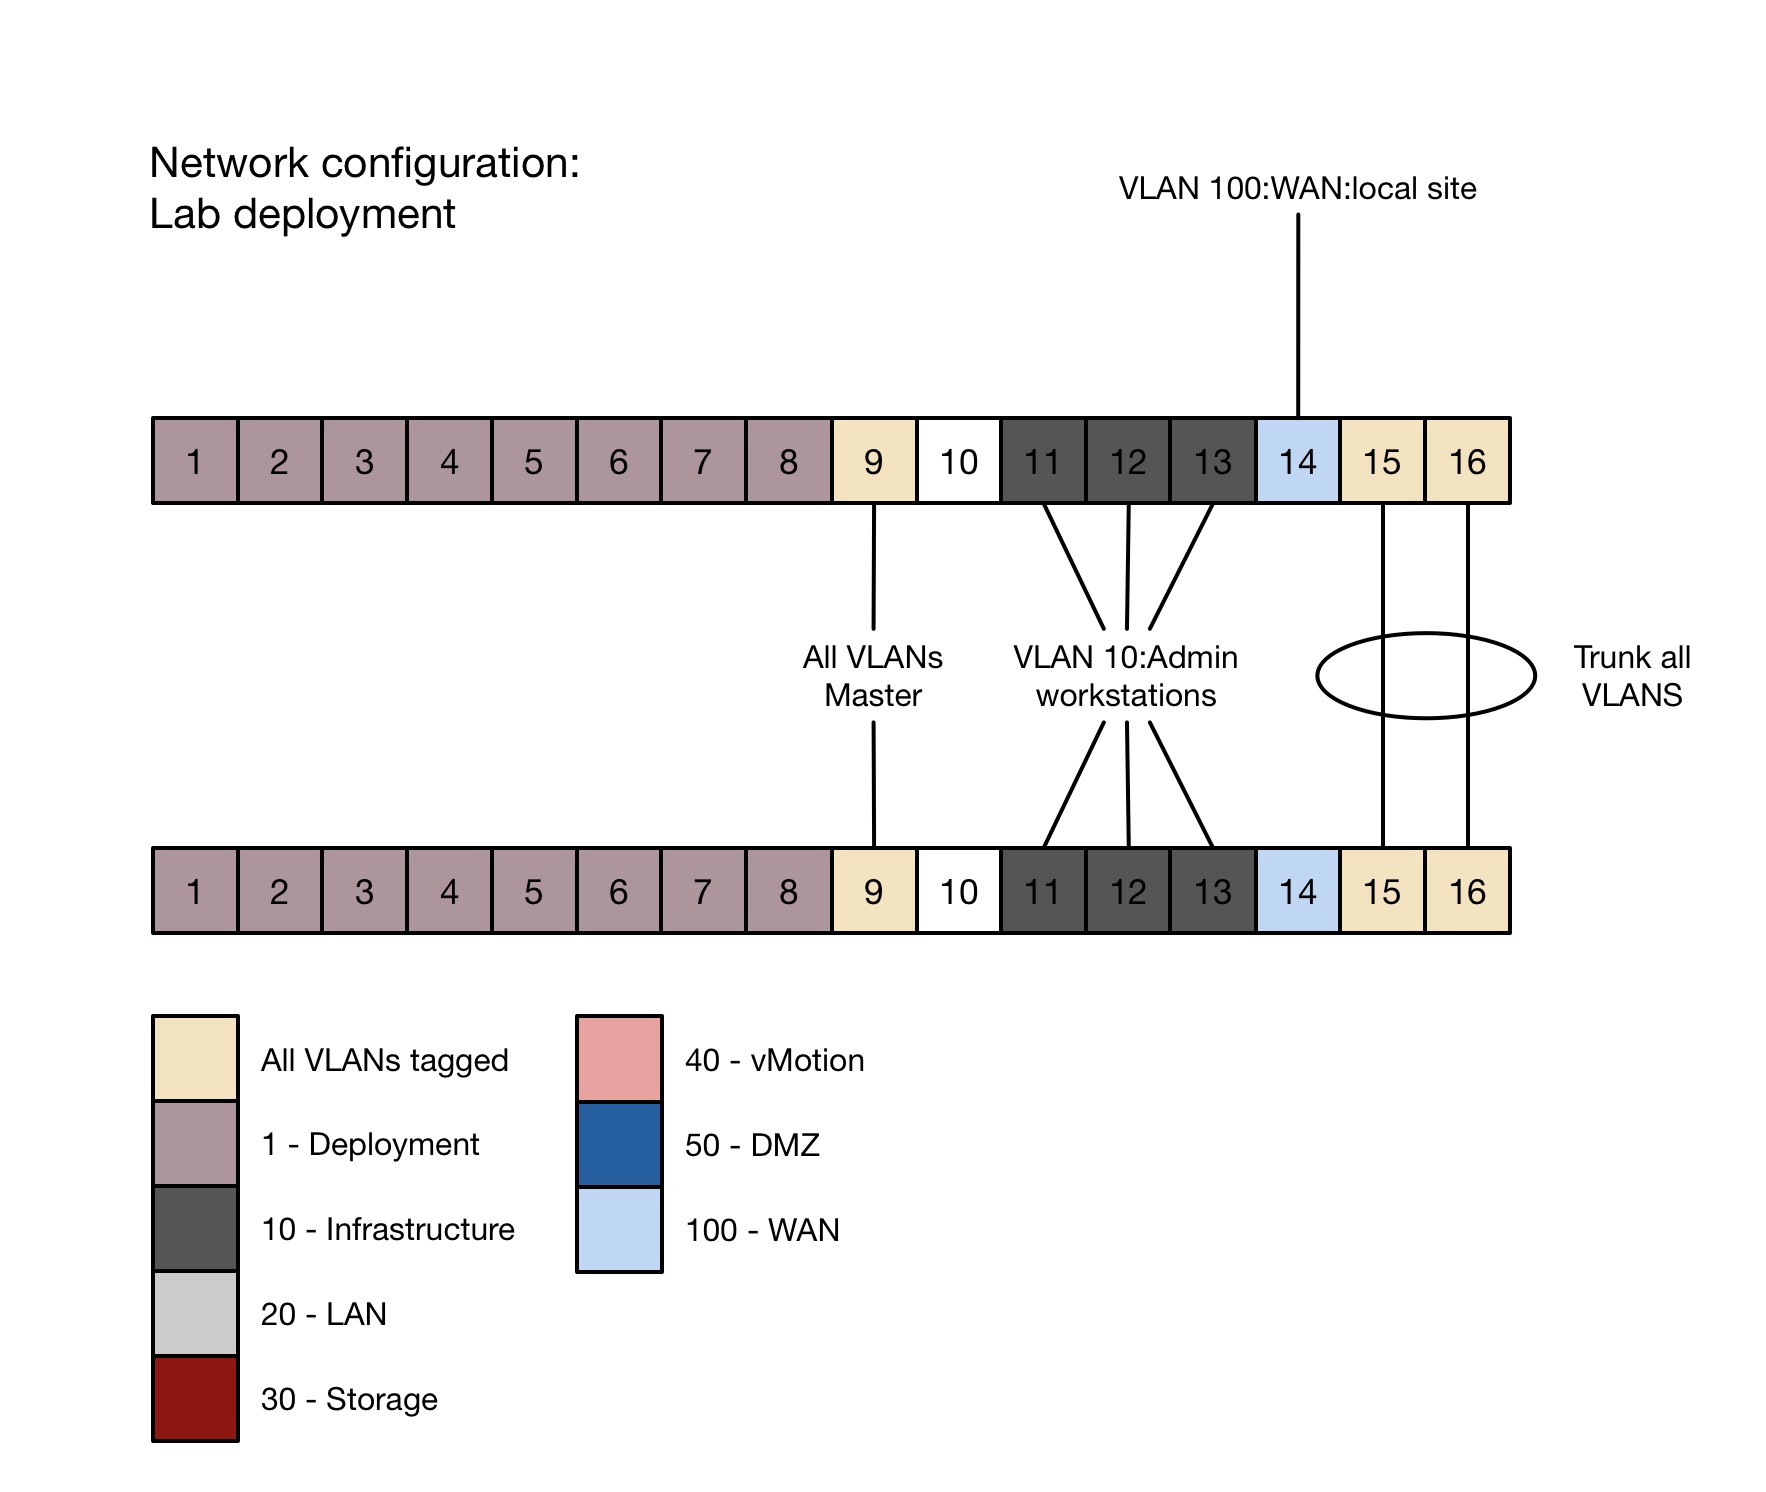
So inside the master ESXi, I have a single vSwitch with two uplinks to the two switches using VLAN tagging for all of the declared VLANs except for the default VLAN since these switches require that each port have a primary untagged VLAN. VLAN 100 is reserved for the pfSense WAN interface and this VLAN is set to the native VLAN to the ports 14 on the switches for connection to a local network. This lets the internal VMs talk to the outside world and have internet access for downloading images, packages etc.
All of the declared VLANs are connected to the pfSense VM as local networks to enable routing between them with the exception of the vMotion VLAN. I would like to have isolated the storage networks completely as well, but in order to have access to administrative interfaces I decided to leave this as a routed subnet as well. But I might start exploring some of the new USB GbE adaptors for adding administrative interfaces when doing bare metal storage clusters since there are still a few free ports on the switches.
For user access, I can connect directly to the ports 10-13 which are natively tagged to the internal infrastructure VLAN. This might be an issue for some environments like when I have 10 students that need to connect at once, so I tried to connect the internal wifi card to the pfSense VM, but the cards are a Broadcom model not supported by FreeBSD so for the moment, that solution won’t work. In the meantime, digging around in the parts bin I found a Ralink USB key which was being used with an ITUS Wifi Shield (may the project RIP). Attaching that key to the pfSense box, gives me the ability to use it to create a Wifi network so that I can connect and manage the environment over Wifi and most importantly in school or training setups, just let people connect directly via this interface. It’s not great since it’s a tiny antenna and only does 802.11b/g.
I ordered a Mini PCIe Atheros cards that comes with connectors for the external antennae and managed to get that installed and mapped using VMDirectIO to the pfSense machine as a second wifi access point. That worked much better in terms of coverage than the little Ralink, but once in the box, surrounded by cables, not so much. I’ve ordered a set of coax extension cables so that I can put the antennae on the top of the case and get them out of their electromagnetic cage.
Switch configuration
Depending on the environment I’m testing, I’m going to need to do different configuration to the ports I’m assigning to the servers. Netgear does include an option where you can save configurations, so I’ll be setting up the various configurations and storing them on the NAS to be able to quickly swap out configurations as required.
Final pics
Cables
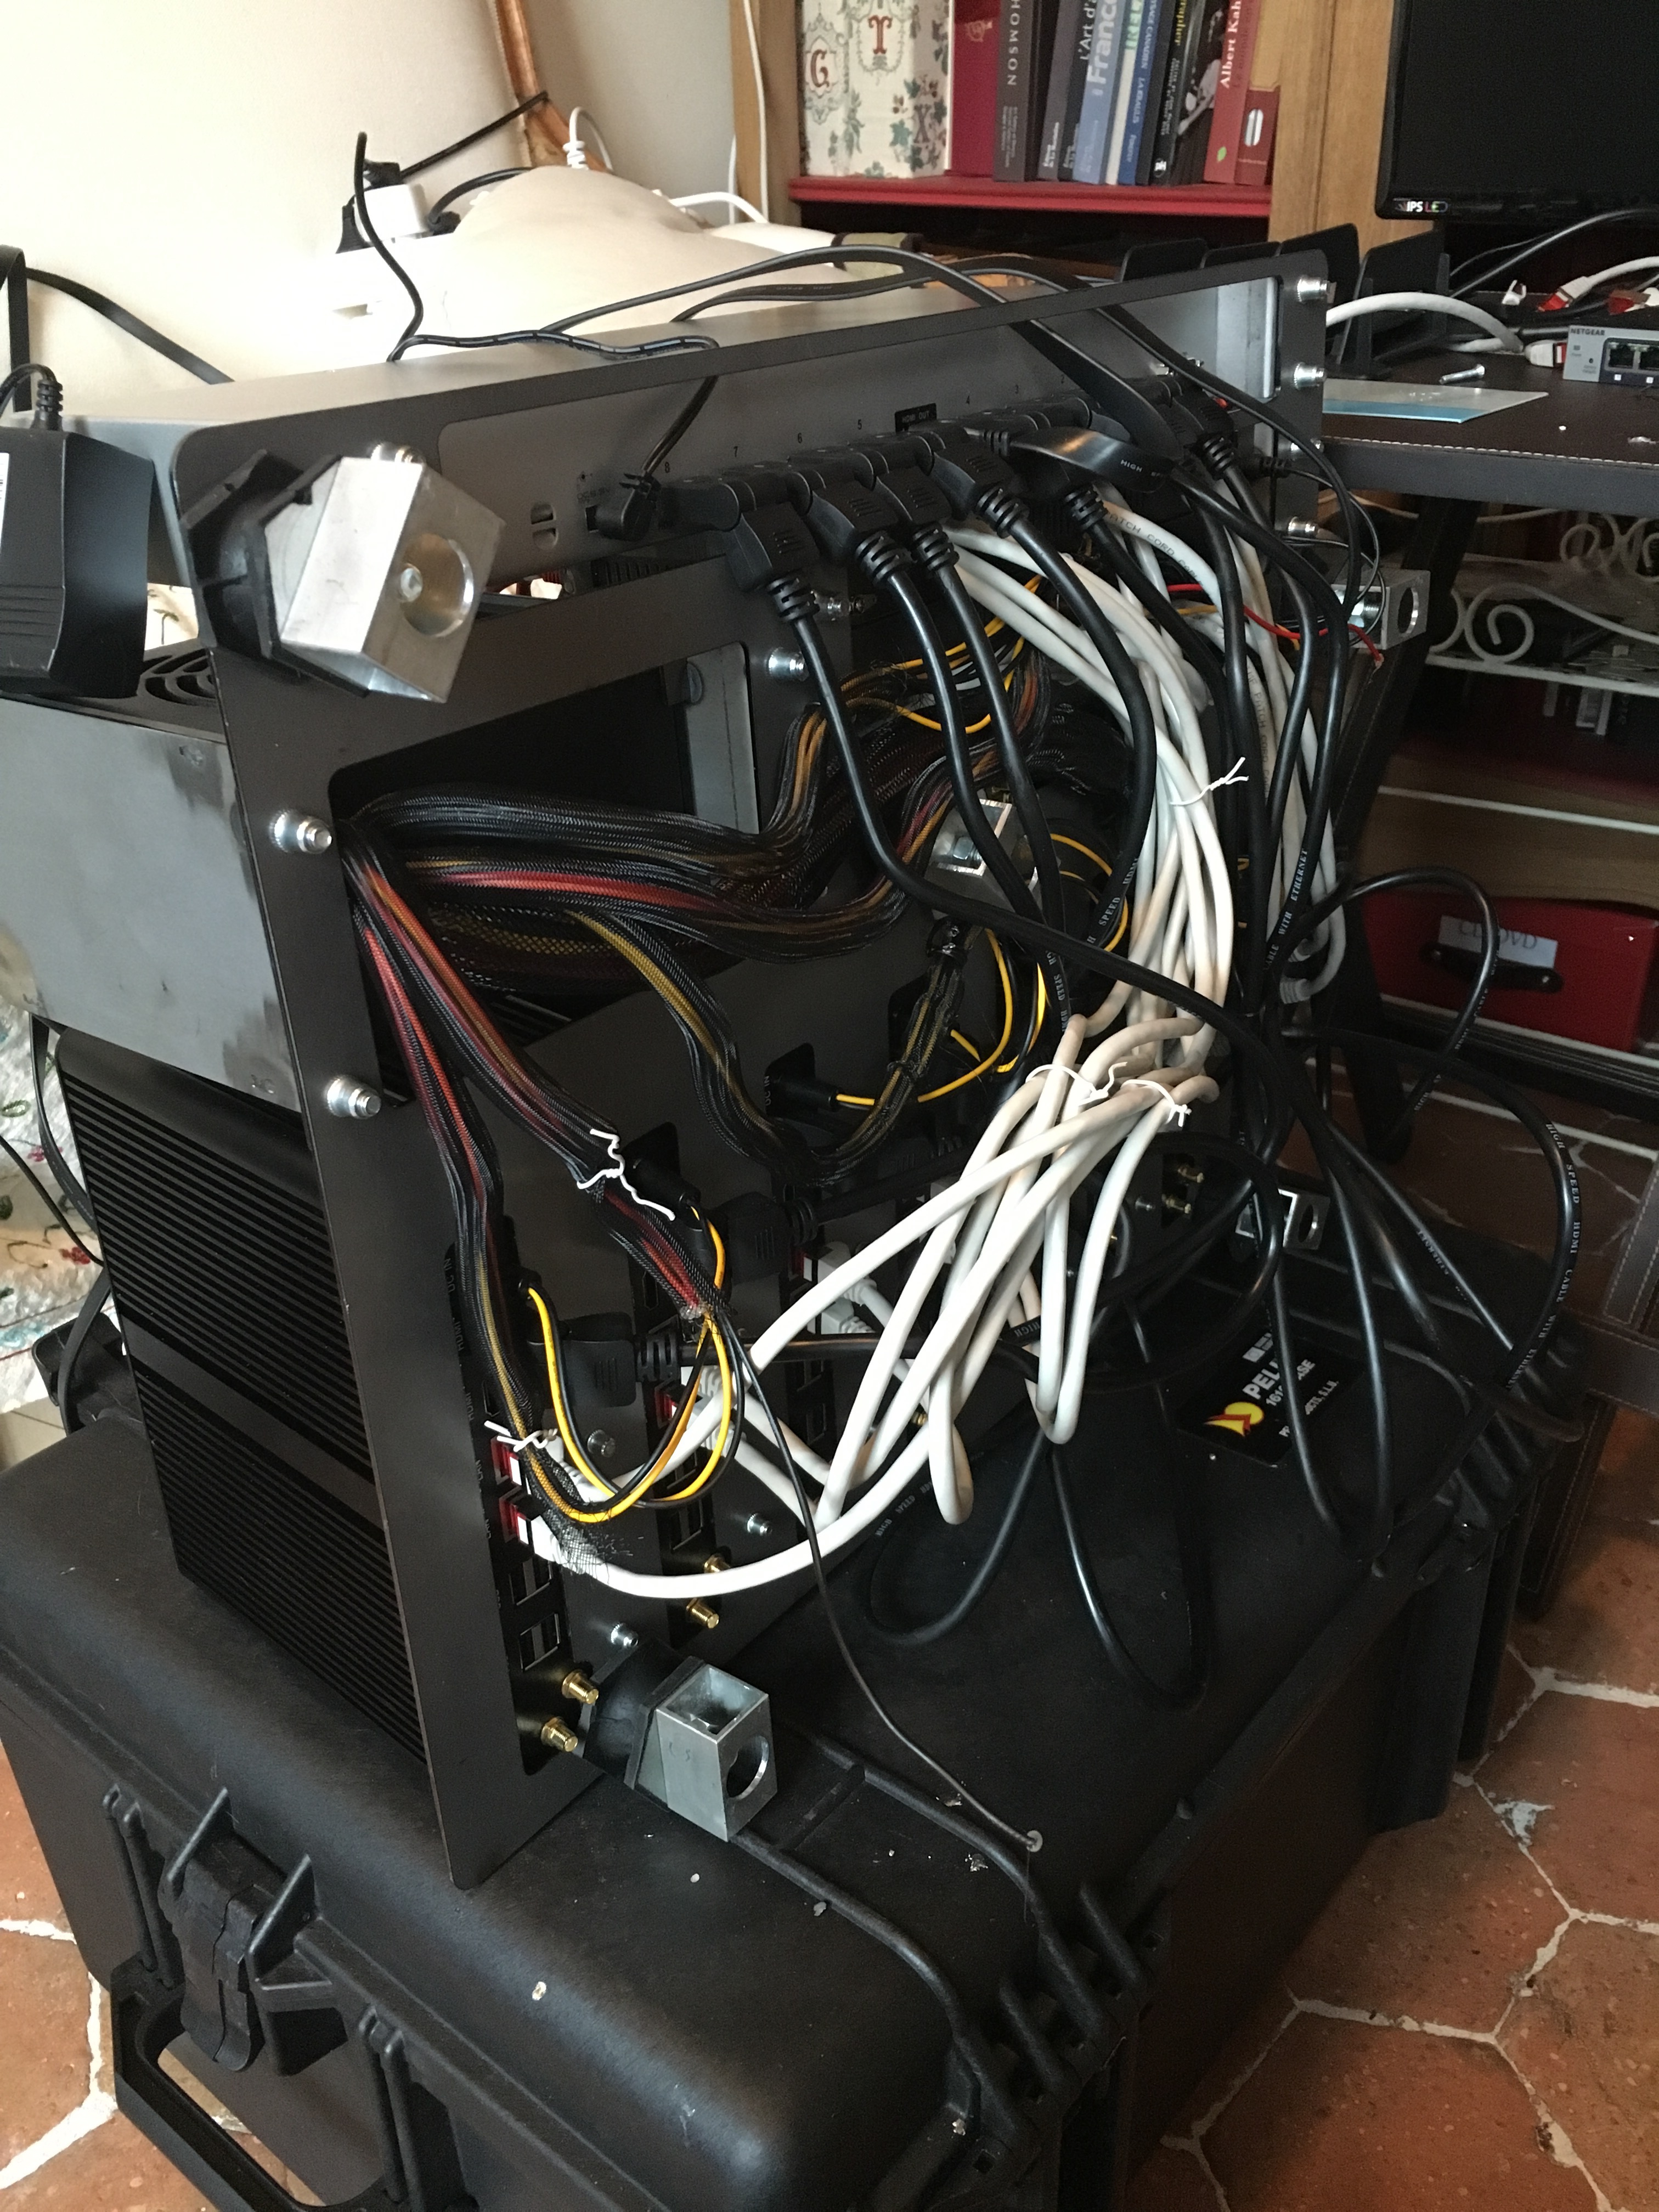
Before going in the Pelican
Final configuration

So that’s it for part one. Next up will be all of the details around the software and design for managing the lab itself.