Veeam has done some really good work on the implementation of hardened backup repositories to help protect against advanced ransomware attackers that go after backups as well as primary data.
In the wild I see a lot of smaller and mid-sized organisations using Synology or QNAP NAS boxes as the storage for their backup repositories as they are significantly less expensive than their “enterprise” counterparts and you can use disks from any supplier and not have to pay the exorbitant markup from <insert enterprise supplier here>. On top of that, the NAS suppliers are moving upmarket and now have very credible rack-mounted options that can handle a lot of disks and are available with 10GbE and 25GbE networking.
The scenarios that I see most often are :
-
use the NAS as it was originally designed and use SMB or NFS file shares to store backups.
-
use the NAS to share an iSCSI volume to a backup server
In the first case, SMB is the least efficient method for Veeam and also the least secure. Not recommended.
iSCSI offers some better options depending on how you connect it and to what. In many small environments that are already using some kind of Ethernet based storage, an iSCSI volume presented to the Veeam server in a VM, and formatted using ReFS is a common configuration.
But it has the problem that if the Veeam server is compromised so is the backup storage. This does protect against having your VMFS volumes encrypted, but if your Veeam server is joined to the domain, there’s a high likelihood it will get ransomwared along with the rest. Moral: Don’t join your Veeam server to the domain. Use local accounts with complex passwords for administration.
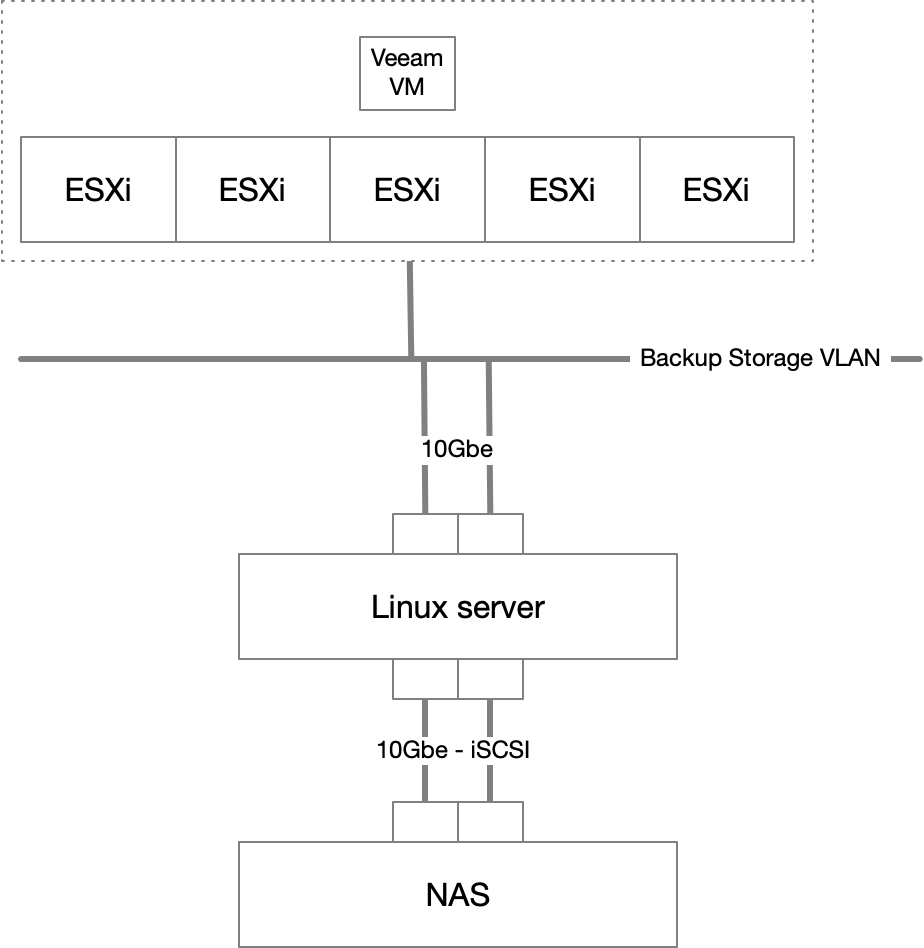
Then there is the possibility of presenting the iSCSI volume to a Linux VM which can be hardened. This is a better option, but still leaves open the problem that the VM is managed by vSphere and can be attacked from that layer as well.
If you have the budget, the best solution for using your NAS is to plug it directly into a network port on a physical server and use the iSCSI volume for the storage on a hardened repository turning it basically into inexpensive local storage. This is often the least expensive method of getting a lot of “local” storage on a server. In this case, you should be installing Linux and building a hardened repository according to the documentation.
But if you don’t have a server that you can dedicate as the backup repository, you can use the virtualisation option available on modern NAS boxes to host a Linux VM that will serve as the hardened repository.
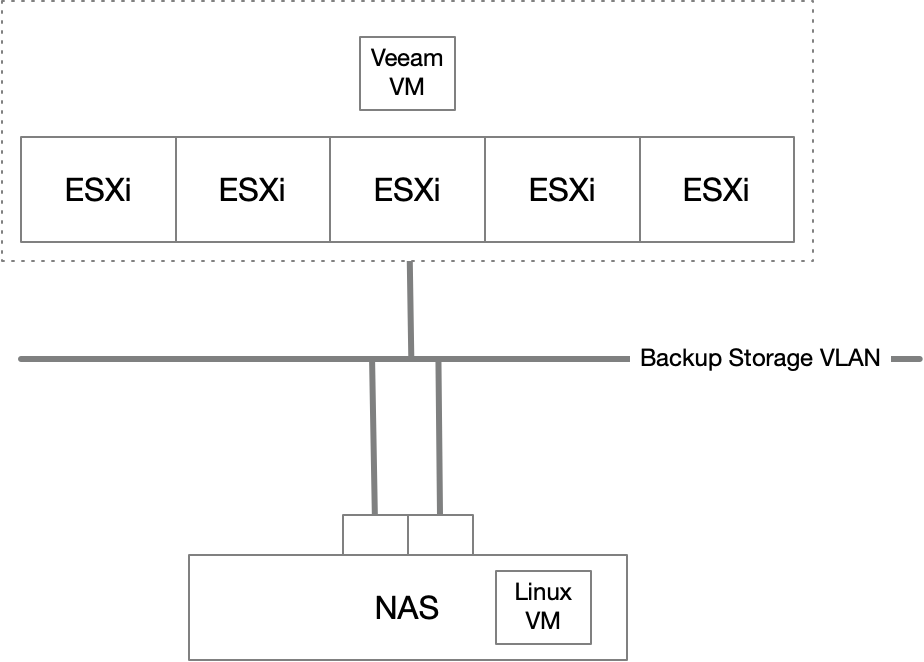
Note that since you’ll be running a full on Linux VM on the Synology, you’ll want to ensure that you upgrade the physical memory in the NAS and choose a NAS with sufficient CPU cores to handle the work of the repository VM. The amount of RAM and number of cores required for the VM will depend directly on the size of your setup and how many concurrent jobs you will be running as per the Veeam sizing guide.
Stages
Initial setup
Connect a regular GbE port to your management VLAN (you do have an isolated VLAN for management interfaces that can only be accessed by systems administrators, right?). Follow the standard setup on your Synology, creating a new administrator account with a complex password. Then setup MFA (you’ll have to setup email delivery to enable this).
The NAS should be dedicated to the task of hosting a hardened repository and should not have the QuickConnect service activated. Do not share the device location.
Turn off all of the file sharing services: SMB, NFS, rsync, FTP, …
Setup a bond (if required) with your 10GbE interfaces and activate the Open vSwitch (Control Panel > Network > Network Interface > Manage > open vSwitch Settings > Enable).
Storage
Create your storage pool according to your requirements (RAID 6 for more space or RAID 10 for better restore performance). Remember that restore performance will directly impact your RTO so needs to be accounted for in your recovery plans. A point of reference from recent experience: a 16 disk, RAID6 rack mounted Synology with a 10Gb connection can maintain a steady restore rate at about 400MB/s with peaks around 600MB/s. Which sounds pretty good until you get to the 8TB file server which will take >20 hours to restore (but that’s why Veeam built Instant VM Recovery).
A single pool configuration is probably the best since we’re not using the NAS for anything else. Then a single volume using BTRFS as the file system.
Repository VM
First step is installing the VMM (Virtual Machine Manager) package which is basically just a UI on top of the QEMU hypervisor.
After that it’s installing a supported Linux server distribution for which there are a lots of tutorials. Currently, I prefer Ubuntu 20.04 as it’s supported by Veeam as a hardened repository and supported by Canonical until April 2025 as an LTS release.
You’ll want to create two disks, one for the OS of about 20-30 GB and the second with most of the storage available (noting that the disks will be thin provisioned), and as much free CPU and RAM as the NAS has to spare.
You’ll want two virtual switches and two network cards - one connected to the management network for updates and the other on the backup storage VLAN.
Once the installation is finished, disable ipv6 on the VM. The Backup Service only listens on ipv4 anyway, and this is one less potential port of entry. Then go through and check if any additional services are still listening (netstat -ln) and either disable them or add appropriate firewall rules.
Veeam integration
Then it’s all onto following the instructions for setting up a hardened repository with the big drive formatted using XFS and using one-time credentials when registering the repository.
Last steps
Once the machine is integrated as a repository, you’ll want to disable SSH so that the only place it’s listening is on the Veeam protocol. You’ll need to reenable it temporarily from the console (via the DSM) if there are Veeam updates that need to be installed later.
sudo systemctl stop ssh

sudo systemctl disable ssh
Physically unplug the Synology from the management network. Yes, I’m serious. This gets rid of any possibility of compromise from the DSM side of the house from something with (relatively) wide network access. Plug it back in when there’s an update to be applied to the DSM or the VM and then unplug it again. If you don’t have easy physical access, you could also shutdown the port on the switch.
The only network connection that should be live on a daily basis is the VM talking to your Veeam servers.
Notes
Is this perfectly hardened? No. The NAS itself is still attackable from the Veeam server via the 169.254.x.y default address selected for when there is no DHCP response. I haven’t found a reliable method to completely disable IP on a Synology bond or an interface so that it’s only working as a virtual switch uplink. (Any hints appreciated on this one).
But it’s a small attack surface and your Veeam server should be monitored for anything that modifies its network stack so that adding an additional IP in this range should set off alarms everywhere.