The first part of this series was about getting the basics setup so you can more safely use a rented ESXi bare metal server on the internet. However, this may not cover all of your needs for making this part of your production environment so here’s a few additional pieces.
Site to site VPN connection
In the original article we were content with just having a VPN connection from your computer to manage the ESXi and the virtual machines that are hosted there. This is OK, but in many cases, you’ll probably want to just have access directly to the VMs without having to explicitly open a VPN connection every time and perhaps the VMs may need to be able to reach back to your local network to get some information from other machines. For this, we’re going to add a site-to-site VPN connection so that the hosted LAN subnet is reachable transparently from your local network.
I’m doing this with pfSense on both ends to make things easy.
On the hosted pfSense go to VPN > OpenVPN > Servers > Add.
I tend to name these with both end of the connection so it’s going to be office2ovh01:
-
Server mode: Peer to peer (Shared Key)
-
Device mode: tun - Layer 3 Tunnel Mode
-
Protocol: UDP in ipv4 only
-
Interface: WAN
-
Local Port: pick something other than 1194 which is already reserved for the client OpenVPN connection
-
Check Automatically generated a shared key
-
Enable Data Encryption Negotiation (optional since you control both ends, you can manually select the protocol you wish to use)
-
otherwise the defaults are fine
Tunnel Settings (sticking to IP v4 only):
-
IPv4 Tunnel Network: an unused subnet
-
IPv4 Remote Network(s): This will be the subnet at the other location eg. your office
-
Concurrent connections: 1
Otherwise, the defaults should be fine.
If you edit the VPN Server configuration now, there will be a 2048 bit key in the Share Key value. We need to copy this for the configuration on the client VPN connection.
At the other end with an another pfSense router, VPN > OpenVPN > Clients > Add. We use the same values, but with the additional fields:
-
Server host or address: the WAN IP address of the hosted pfSense
-
Server port: the value we chose for the server to listen on
Tunnel settings:
-
IPv4 Tunnel Network: the same subnet used on the server
-
IPv4 Remote Network(s): This will be the subnet on the hosted LAN segment (192.168.20.0/24 in the example)
-
Concurrent connections: 1
Instead of autogenerating a shared key, we uncheck this box and paste in the key generated on the other side.
Now the one thing that will be missing since we didn’t use the wizard is a firewall rule allowing connections on the port number that we chose. For this: Firewall > Rules > WAN and duplicate the existing OpenVPN rule, and modify the port number to custom and enter the port number that was used in the previous configuration.
If you have a fixed IP address at your other site, you can additionally restrict the access to be only from that address in the Source section which is strongly advised, but if your ISP doesn’t guarantee a fixed IP, this will cause the connection to drop if your router’s address changes.
Once the configuration is finished on both sides, it should connect automatically and you can check under Status > OpenVPN.
OVH Note: In my initial testing, I ran across a number of issues with the standard configuration, especially once I got to the later stage of running replication jobs that push a lot of traffic across the tunnel. It seems that OVH does quite a number of networking shenanigans about UDP traffic, probably as anti-DDOS mitigation and BitTorrent throttling. As a result, I had to switch these connections over to using TCP instead of UDP, which is generally frowned upon, but this is one of the rare cases where it’s probably the best choice at the moment. You’ll need to make a couple of changes to make this work. In the OpenVPN configuration on both sides, select TCP on IPv4 as the protocol, and update the firewall rule to allow for TCP instead of UDP.
Making our VMs available on the internet
The best way to do this is and keep things relatively secure and not have to buy lots of additional IP addresses is to use a reverse proxy. Nginx does a really good job of this and has the very useful features that it can map hostnames in URL requests to different internal IP addresses as well as tight integration with certbot from to handle all of your certificate management.
There are a ton of tutorials on the web so I won’t go over this in detail, but it’s another critical point in ensuring that your system is well protected.
Data Protection
Now we’ve done the basics to protect our VMs from the internet, but now all of our data is in a single place. You could use a regular backup product like Veeam, Nakivo or even Active Backup for Business from Synology or we could leverage a ZFS solution to add some smarts to the basic ESXi storage in order to replicate it elsewhere. It’s worth noting that running both a backup system and a replication copy is a good idea.
You can use something like TrueNAS for this kind of thing, which gets you a nice graphic interface on top ZFS and includes many nice affordances for setting up remote replication, but it comes at the price of requiring 8 GB of RAM. So it’s going to be a tradeoff of pretty UI vs RAM requirements. In my case, the new box has 64 GB of RAM, so I can afford it here as I have bunch of little VMs that aren’t too greedy about RAM. In other installations I use a barebones Ubuntu VM with 2-4GB of RAM, noting that ZFS replication is OS agnostic, so you can replicate from an Ubuntu server to a TrueNAS server and vice-versa.
If you go the roll-your-own approach with a Linux machine with ZFS, there are a number of tools to help with configuring and automating the replication such as zrepl, zfs-replicate or zettarepl. I’ve also got a set of scripts that you can wrap up in a bash script, but frankly the the other options are more mature.
So it’s on to uploading the TrueNAS ISO. In this case I’m using TrueNAS Core which is a little lighter weight than TrueNAS Scale and none of the new features are particularly useful since this is going to be a dedicated file server, not a generic host for VMs, HCI, Kubernetes and so on.
Passthrough disk
The basics of this approach are to install a VM with the OS on the standard datastore and then find some additional storage to assign to this VM as an additional drive. In a simple configuration this can just be creating a large virtual disk using up the rest of the available space on the existing VMFS datastore (leaving at least 10% for snapshots) or some other storage available on the server.
In many cases, the bare metal servers that are rented out often have two drives that are configured in a software RAID 1 for operating systems like Windows and Linux. However, ESXi has no such built in option for software RAID. So this means that you will usually have a second drive available that can be reserved for the storage drive for your storage VM. You can check this under Storage > Devices and if there are two disks, clicking on them will show the partition layout. The first one on my system is clearly the drive hosting the default VMFS datastore:
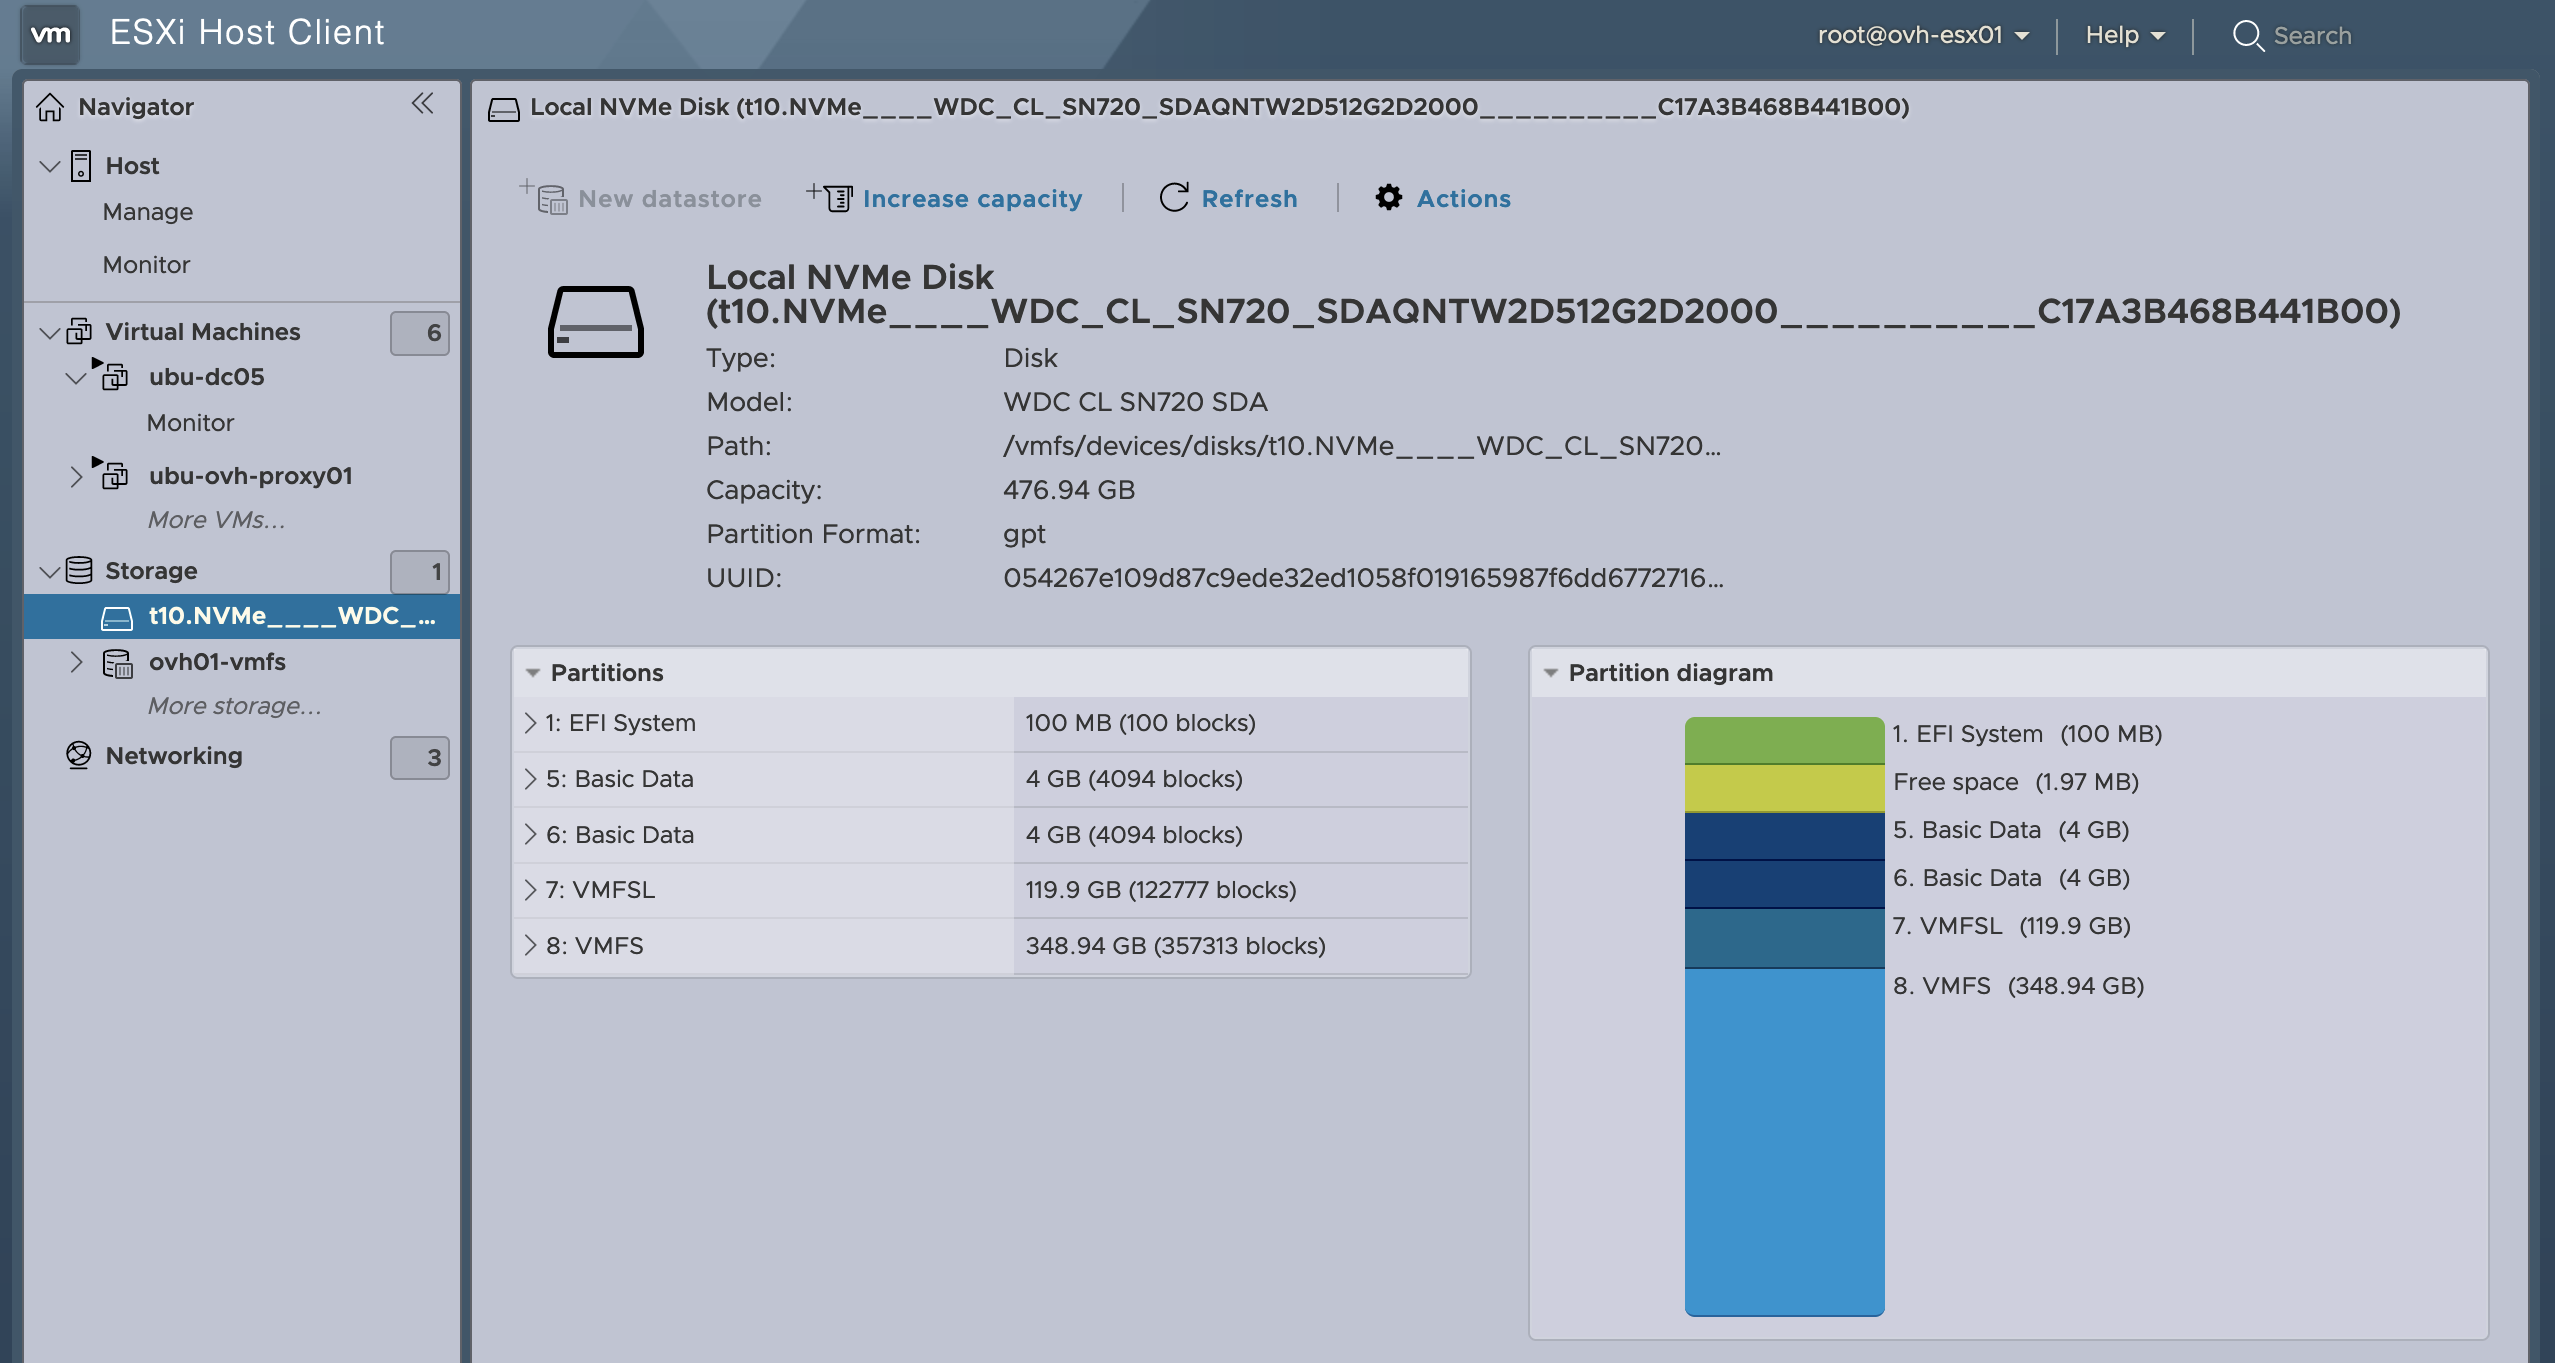
While the second one is empty:
![]()
Before we get to installing the VM though, we’re going to set things up to by reserving the second drive to be physically dedicated to the storage VM, rather than formatting it as VMFS and creating a virtual disk. We can set the drive to work in passthrough mode under Host > Manage > Hardware > PCI Devices where we find the two drives. Unless the standard installation is really strange, it should be the drive with the highest address:
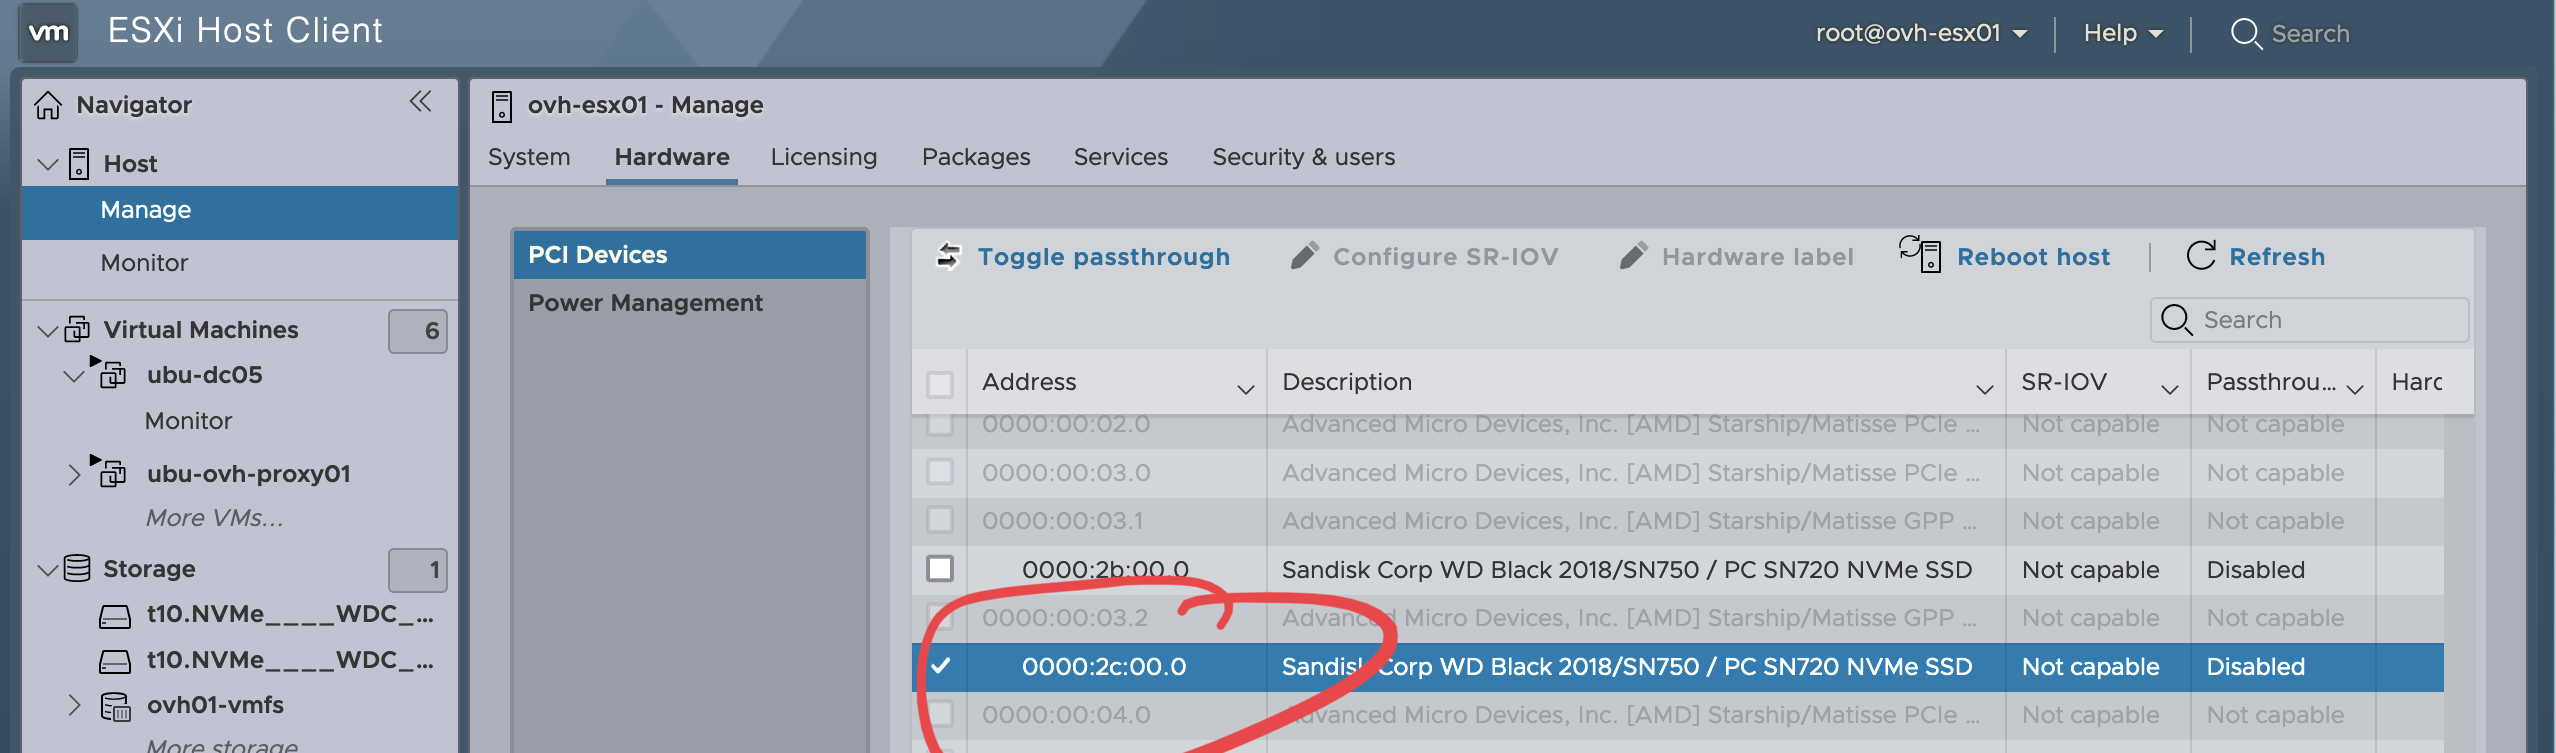
Hit the Toggle passthrough button at the top and it should be immediately available to assign to a VM. In some cases, it may require you to reboot the ESXi.
Note: This may not work on some configurations where a single SATA controller is responsible for both of the drives. In this case, you’ll need to create a VMFS datastore on the second disk and then create a large VMDK file. It’s not optimal from a performance perspective, but gets the job done for small environments. I had one running this way for over 5 years without any issues. NVMe devices are guaranteed to be autonomous, so that may factor into your server selection criteria in addition to the performance benefits over a SATA SSD.
Storage network
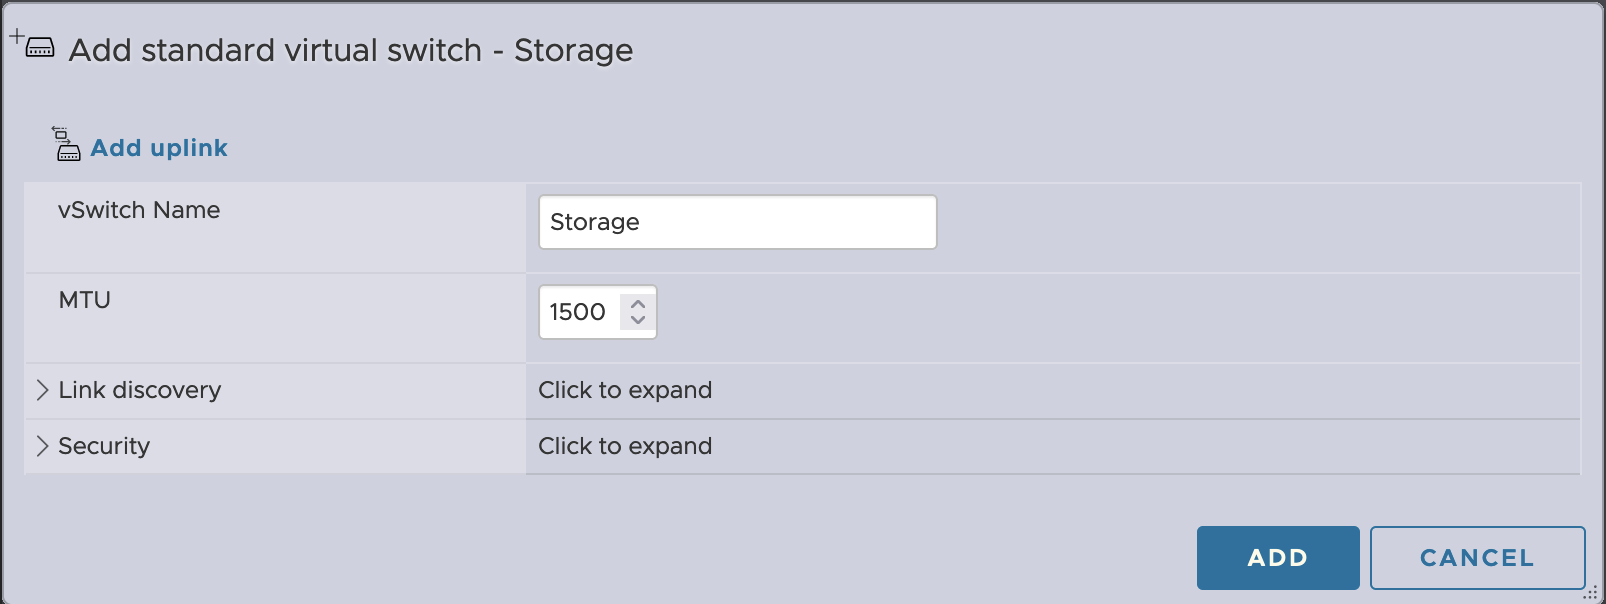
Then there are a few little best practices to follow that are not necessarily important in an all-in-one configuration, but I like to do them anyway. Specifically, ESXi storage traffic should be on an isolated network so it’s not competing with the VM traffic. So for this we’re going to create another vSwitch with no uplinks and call it Storage.
Networking > Virtual switches > Add standard virtual switch.
The create a port group named VM Storage. Networking > Port groups > Add port group.

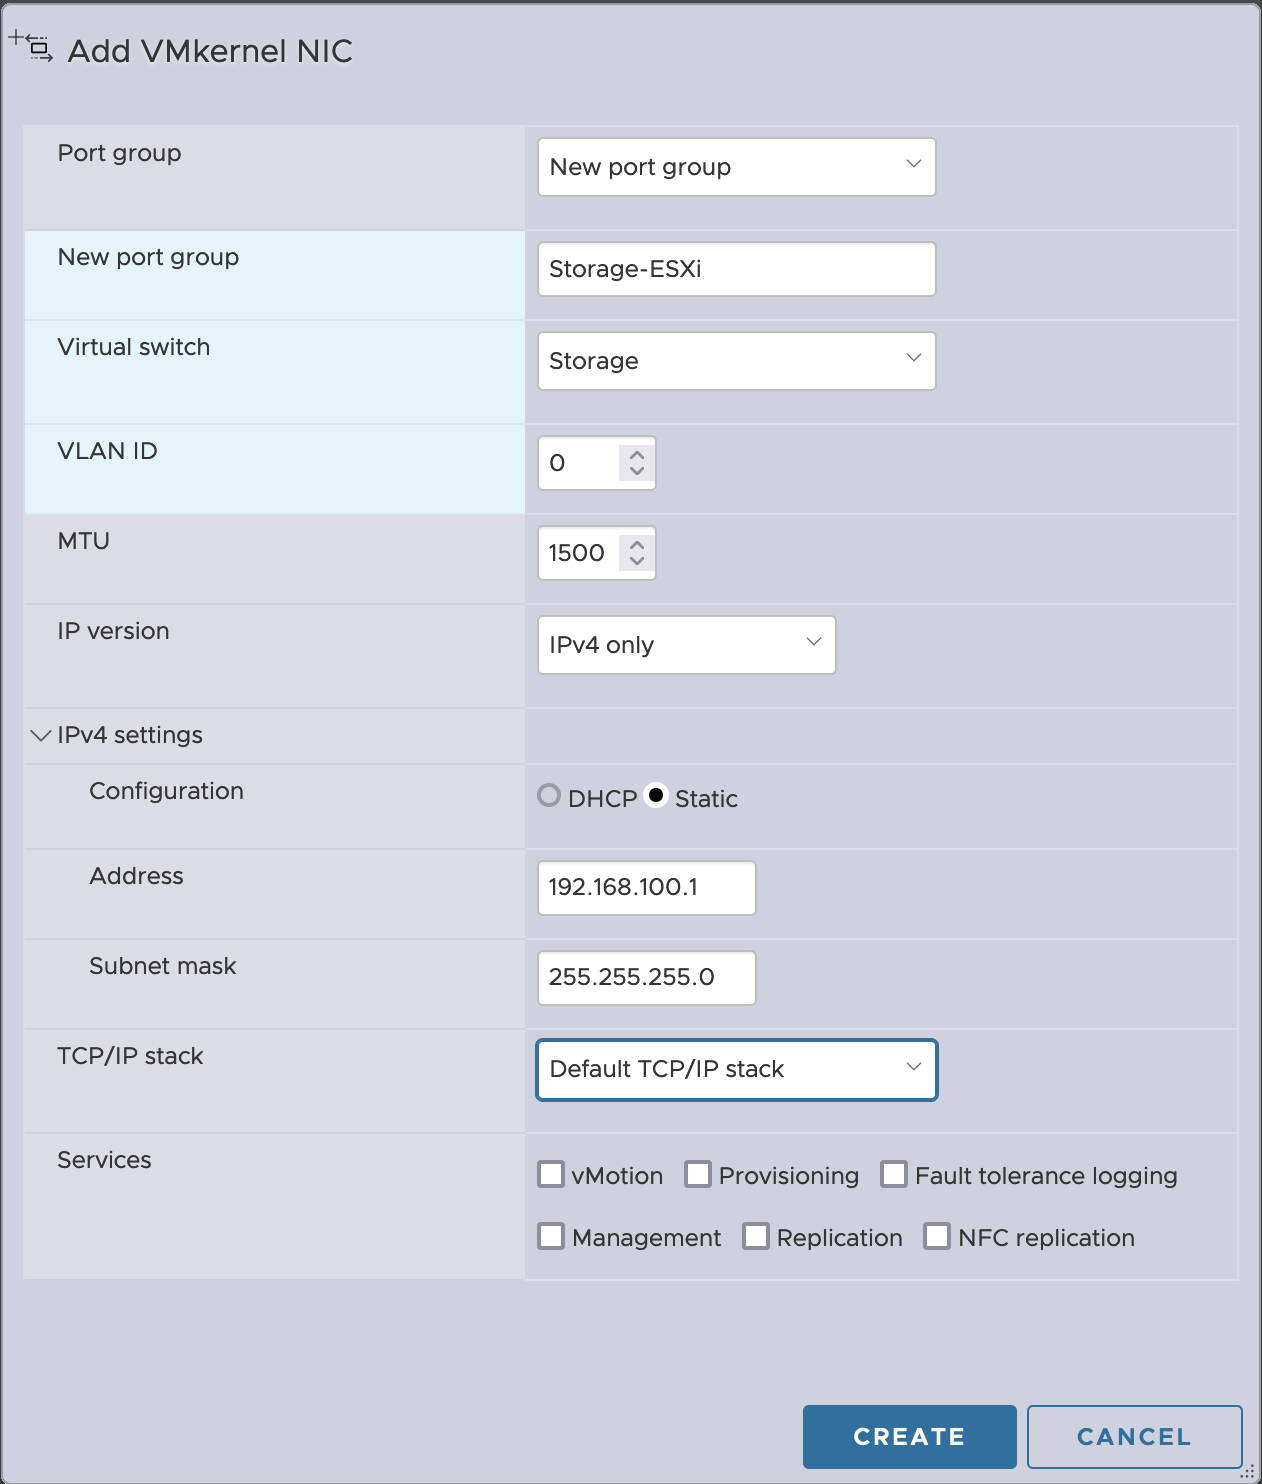
So now we have an interface for connecting the VM to a private network reserved for storage. But the ESXi needs an interface in this network too. Networking > VMkernel NICs > Add VMkernel NIC. We’ll want to set a static IP in a private subnet of your choice, 192.168.100.0/24 in this case.
Create the TrueNAS VM
Virtual Machines > Create/register VM :
-
Create Virtual Machine
-
Name : ovh-truenas01
Compatibility: default
Guest OS Family: Other
Guest OS version: FreeBSD 13 or later versions (64-bit)
-
Select storage: the default datastore
-
Customise settings:
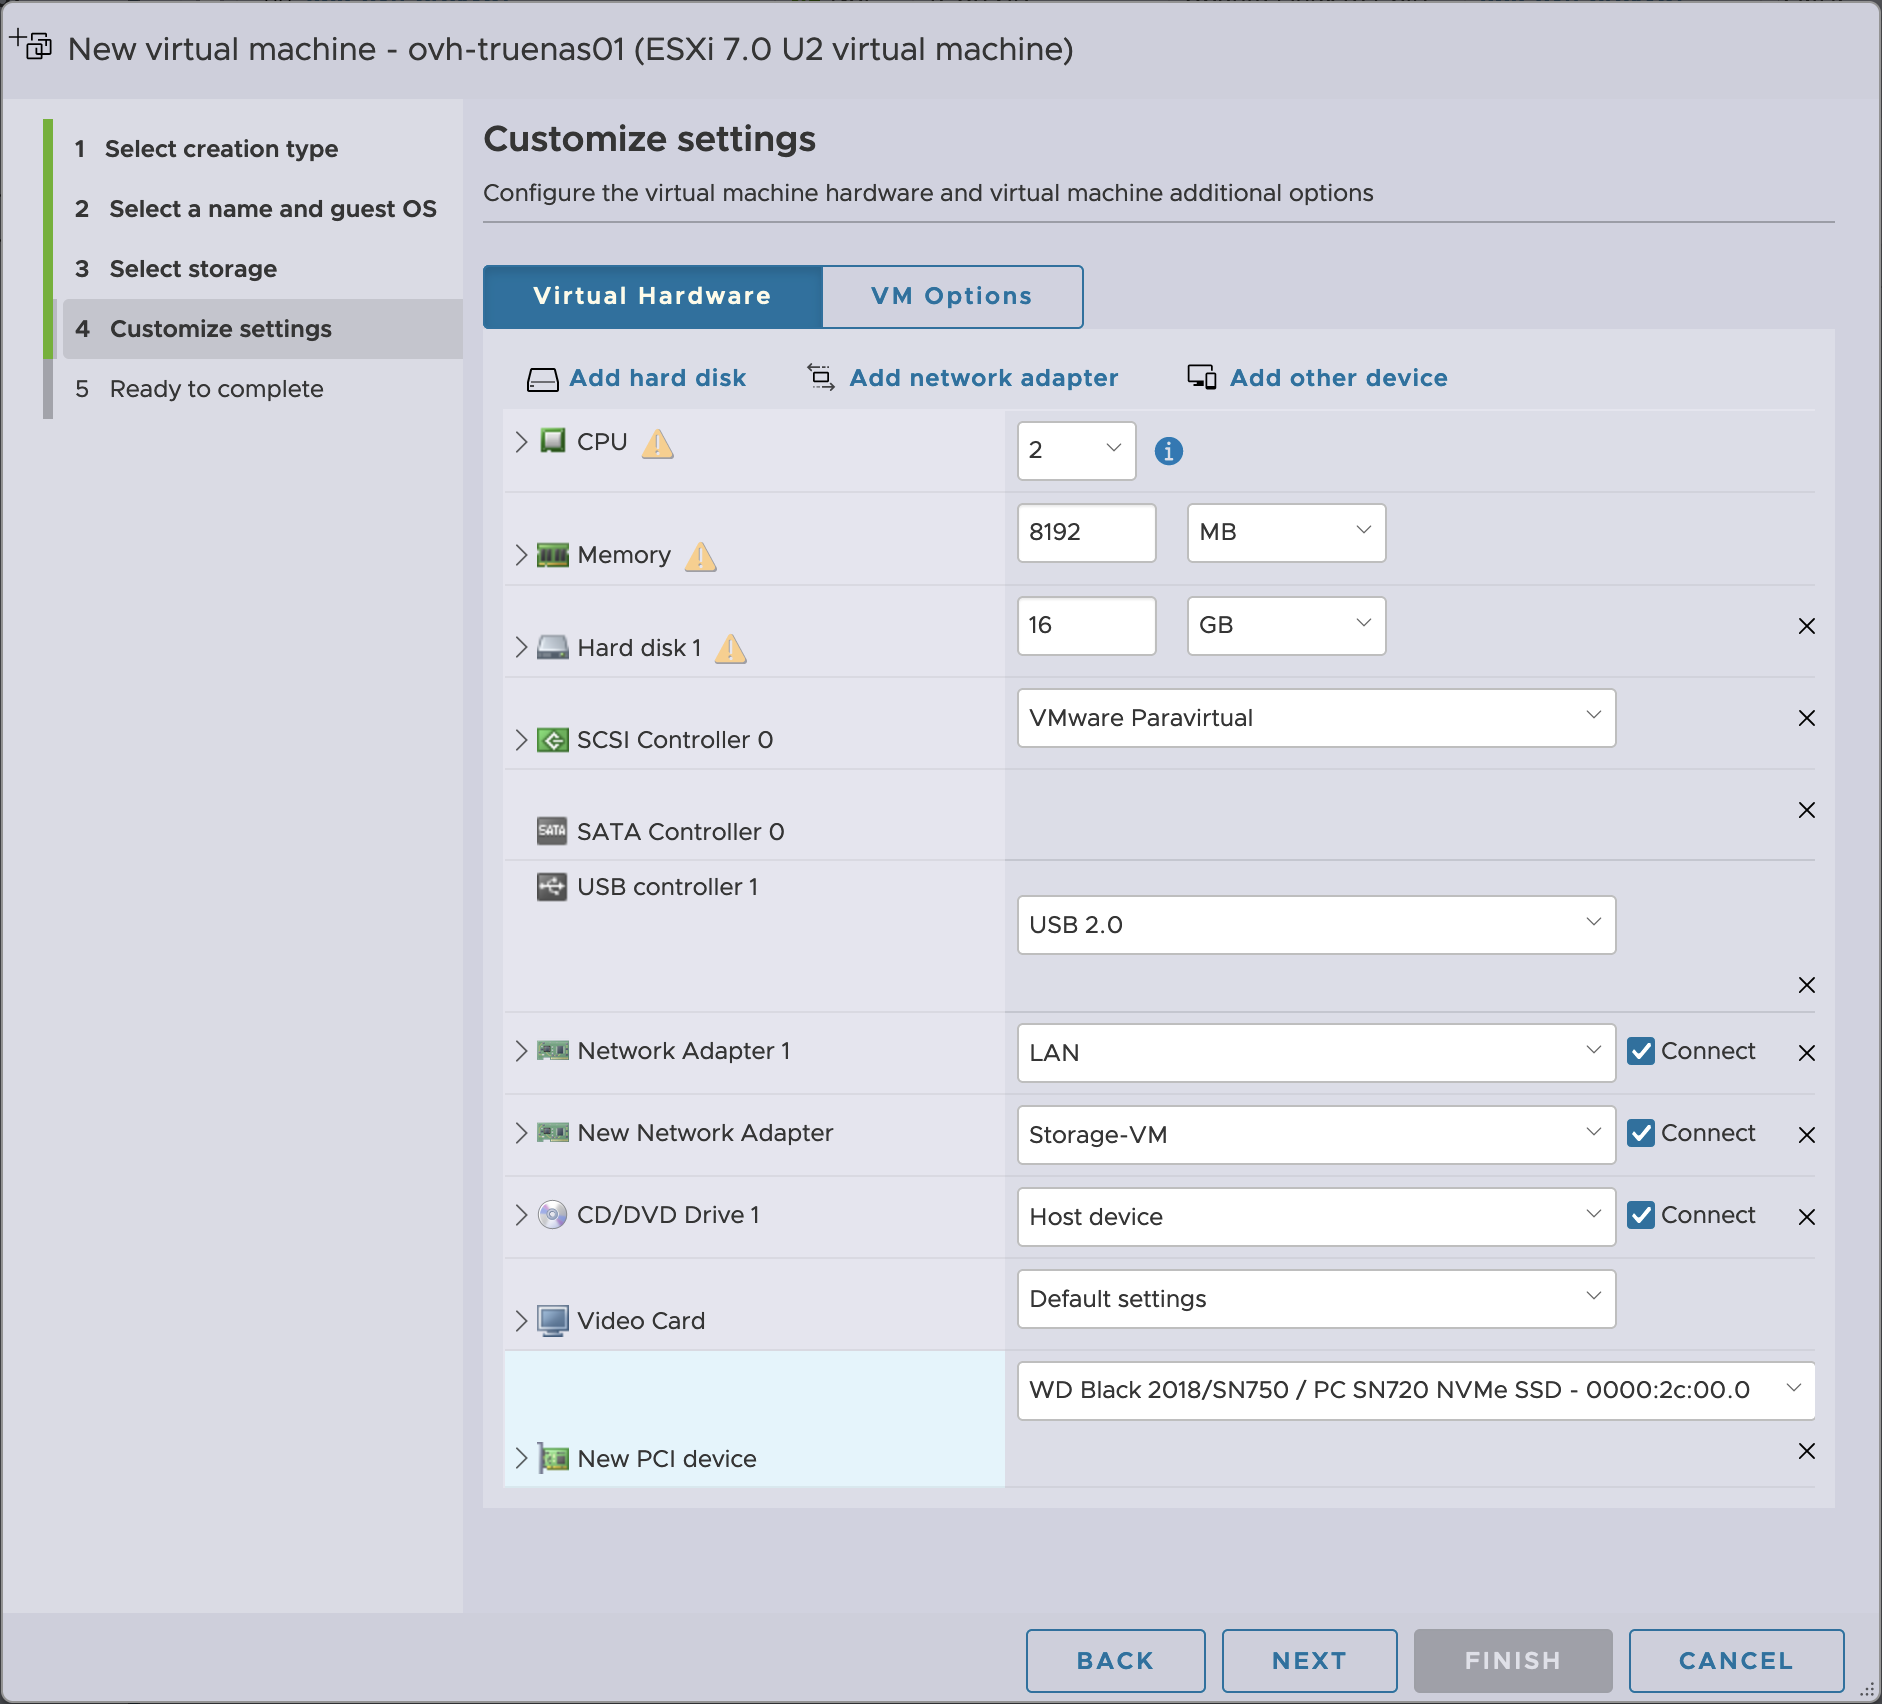
For the custom settings, you’ll want to attach the TrueNAS ISO image, and then use the Add other device > PCI Device which will automatically add the drive since it’s the only PCI device available for passthrough. We’ll also add a second network adapter that will be connected to the Storage-VM port group.
Before booting the VM, there’s a limitation on VMs that use passthrough devices and that’s that they need to have their memory reserved. So we’ll need to go back into the VM configuration, unroll the Memory tab and set the reservation to the 8 GB we have assigned to this machine.
Note: There appears to be a bug in the Host UI in the version of ESXi 7.0 that I’m using and the option to set the reservation is greyed out and inaccessible. If this is the case, you can set the required values manually by editing the VM under the VM Options tab > Advanced > Edit Configuration > Add Parameter to add the following entries:
`

Key: sched.mem.min      Value: 8192

Key: sched.mem.minSize  Value: 8192

Key: sched.mem.shares   Value: normal

Key: sched.mem.pin      Value: TRUE

`
Then it’s the standard installation process, making sure to install the OS onto the 16GB disk, and not the second drive. Once the VM is booted you can get the IP address by checking the console and use a browser to finish the configuration.
TrueNAS Configuration
First steps involve the networking. Under Networking > Global Configuration you’ll want to set:
-
hostname
-
domain
-
DNS servers
-
IPv4 default gateway
Under Networking > Interfaces > vmx0 > Edit, disable DHCP and set a static IP address for the management interface on the LAN subnet. After hitting Apply, you’ll need to confirm that you want to test the changes and then immediately connect to the new IP address so that you can confirm that it worked.
Then we need to edit the vmx1 interface that is connected to the Storage subnet, giving it an appropriate IP address in the subnet you defined for the ESXi interface with the same routine of Apply, Test Changes, and then Save Changes.
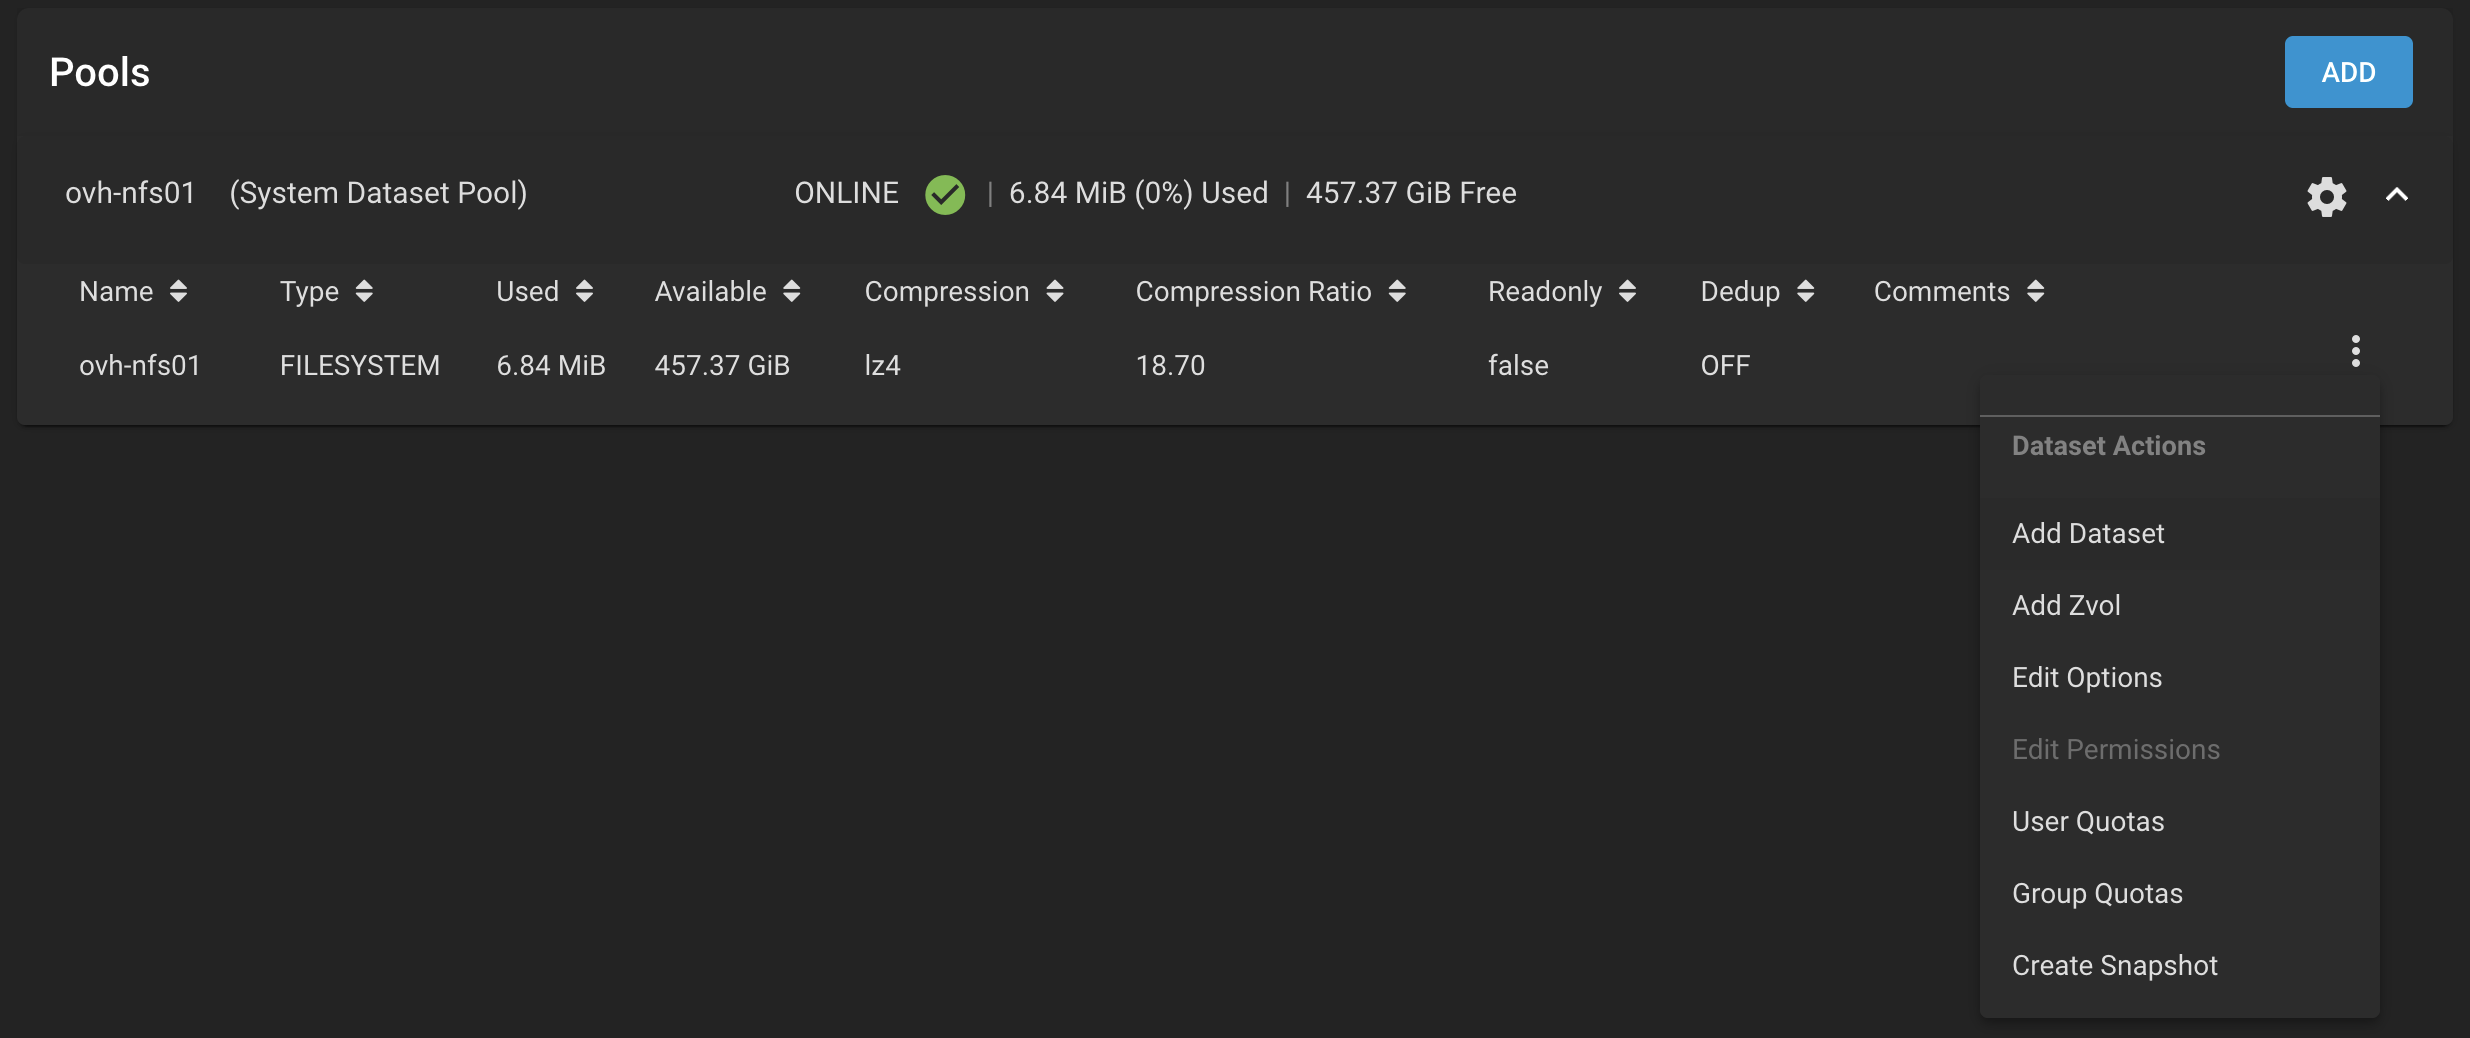
And finally onto the storage side of things. Under Storage > Pools > Add follow the wizard through following steps:
-
Create new pool
-
Give it a name (ovh-nfs01), select the disk that was passed through and click ADD VDEV or the arrow pointing to the right. Since this is a single disk, it can’t be protected by the ZFS RAID features so we’ll have to force the creation of a stripe vdev.
-
Finally Create the pool
Now it’s time to configure the volume to be presented to the ESXi server. You can choose either iSCSI or NFS. iSCSI tends to be better performing and more complicated to setup, but on the TrueNAS side, you just have an opaque blob of storage so you can’t go in directly and look at the files. NFS is generally a little simpler and you can more easily manipulate the files, so that’s what I tend to use in these cases.
The first step is going to be creating a file system in the pool to hold the VMs, This is hidden in the button with 3 vertical dots on the pool and select Add Dataset.
Well need to give it a name (ovh-vm01) and set Sync to disabled as otherwise the NFS performance is awful. Then we will share this filesystem over NFS under Sharing > Unix Shares (NFS) > Add. In the Paths section, we navigate our new file system so we get a path like: /mnt/ovh-nfs01/ovh-vm01. If we want to push the security up a notch, you can set the Authorised Hosts to the IP address that we gave to the ESXi VMkernel interface in the Storage subnet in the Advanced Options. This will offer the option to enable the NFS Service.
We also need to update the permissions to allow the ESXi root connection to work properly. I tend to just open the shell and use chmod:
`chmod -R a+rwx /mnt/ovh-nfs01/ovh-vm01
`
Back to the ESXi, we’re going to mount the NFS datastore under Storage > Datastore > New Datastore.
-
Mount NFS Datastore
-
Name: ovh-vm01
NFS server: IP address of the TrueNAS server on the storage subnet
NFS share: the full path of the filesystem, starting with /mnt (/mnt/ovh-nfs01/ovh-vm01)
NFS version: 3 will do fine
Note: In the “I’m completely baffled” category, this fails for no apparent reason on the machine I’m using at the moment. None of the usual troubleshooting suspects for NFS issues seem to be in play. If this happens you should be able to fall back on the ESXi command-line with:
esxcli storage nfs add --host=192.168.100.2 --share=/mnt/ovh-nfs01/ovh-vm01 --volume-name=ovh-vm01
Which works fine. 🤷♂️
Replication
In my case, I already have another TrueNAS server at the office, so I’m going to replicate the ovh-vm01 filesystem over to it on an hourly basis. On the TrueNAS VM this is configured under Tasks > Replication Tasks > Add.
There’s a lot to fill in here to get this working. On the left side, we select Source Location > On this System and unroll the folder and select ovh-vm01.
On the right, the destination is On a Different System and we create a new SSH Connection. We can use the Semi-automatic option if the destination is another TrueNAS Core system, with the URL for the other machine, the root account and password, and then generating a private key pair for the session. For internal replication I tend to disable the Cipher since this is internal traffic only.
Note: If you have configured MFA on the destination machine you will have to disable it temporarily to create the initial connection. You can reenable it afterwards.
For the destination path, I pick a pool and then add “/ovh-vm01” to the end to create a new filesystem to hold the copy. Then it’s about choosing a schedule (I use hourly) and a retention rule on the destination. I’ve got a lot more space at the office so I bump this up to four weeks. By default the local retention is 2 weeks and can be modified in the automatically created Periodic Snapshot Tasks.
So now even if the datacenter burns down you have an up to date copy of your VMs that you can quickly put into production locally or upload to another datacenter or service provider.