There’s been a lot of news lately about the ESXiArgs ransomware attacks on ESXi servers that could have been avoided. As with any product, it’s important to ensure that you keep up to date with all of the patches and upgrades, but since ESXi is a virtualisation system and rebooting it to apply a patch also means taking all of your virtual machines offline, people often put this off too long.
So at a strict minimum your configuration should be set up in such a way that the ESXi management interface isn’t directly connected to the internet so that the basic attacks will bounce off of a firewall first. This does require a little bit of planning and configuration, but is easily within the capacity of anyone that’s running ESXi on a hosted instance.
The thing to remember is that ESXi was designed to be installed on a trusted network so that only authorised people can even get access to the management interface to attempt to login. In companies that are serious about security this means going as far as restricting network access to authorised administrator computers. The complete opposite of leaving this interface out on the internet.
We’ve seen many instances of people doing similar things with networking equipment, even firewalls and other security devices where they put the management interface on the Internet instead of on the “safe” side of the firewall which leads to bad things happening. VMware does it’s best to fix bugs and security flaws, but putting the door to your kingdom directly on the internet is just a Bad Idea™.
I’m going to walk through the process using an OVH Cloud Rise server as it turns out I’m needing a little more RAM capacity than my old Mac Mini running ESXi in a colo and I no longer need to be running MacOS VMs so I can go back to a standard server for this role.
An important point about the OVH offerings: they have an introductory level offering named “kimsufi”, but it has a limitation that you can’t buy additional IP addresses for these machines. I went with the Rise option because it makes the whole process considerably easier.
Inputs
-
1 OVH Rise Server
-
1 additional IP Address
-
pfSense ISO image
-
Desktop OS ISO image
Basic setup
I used the OVH management panel to install ESXi on the new server (version 7.0j, so patched against the current ESXiArgs vulnerability).
Once the installation was finished, OVH sent me an email to get the password they assigned to the server. Then onto connecting the ESXi web interface (using the IP address from the OVH console).
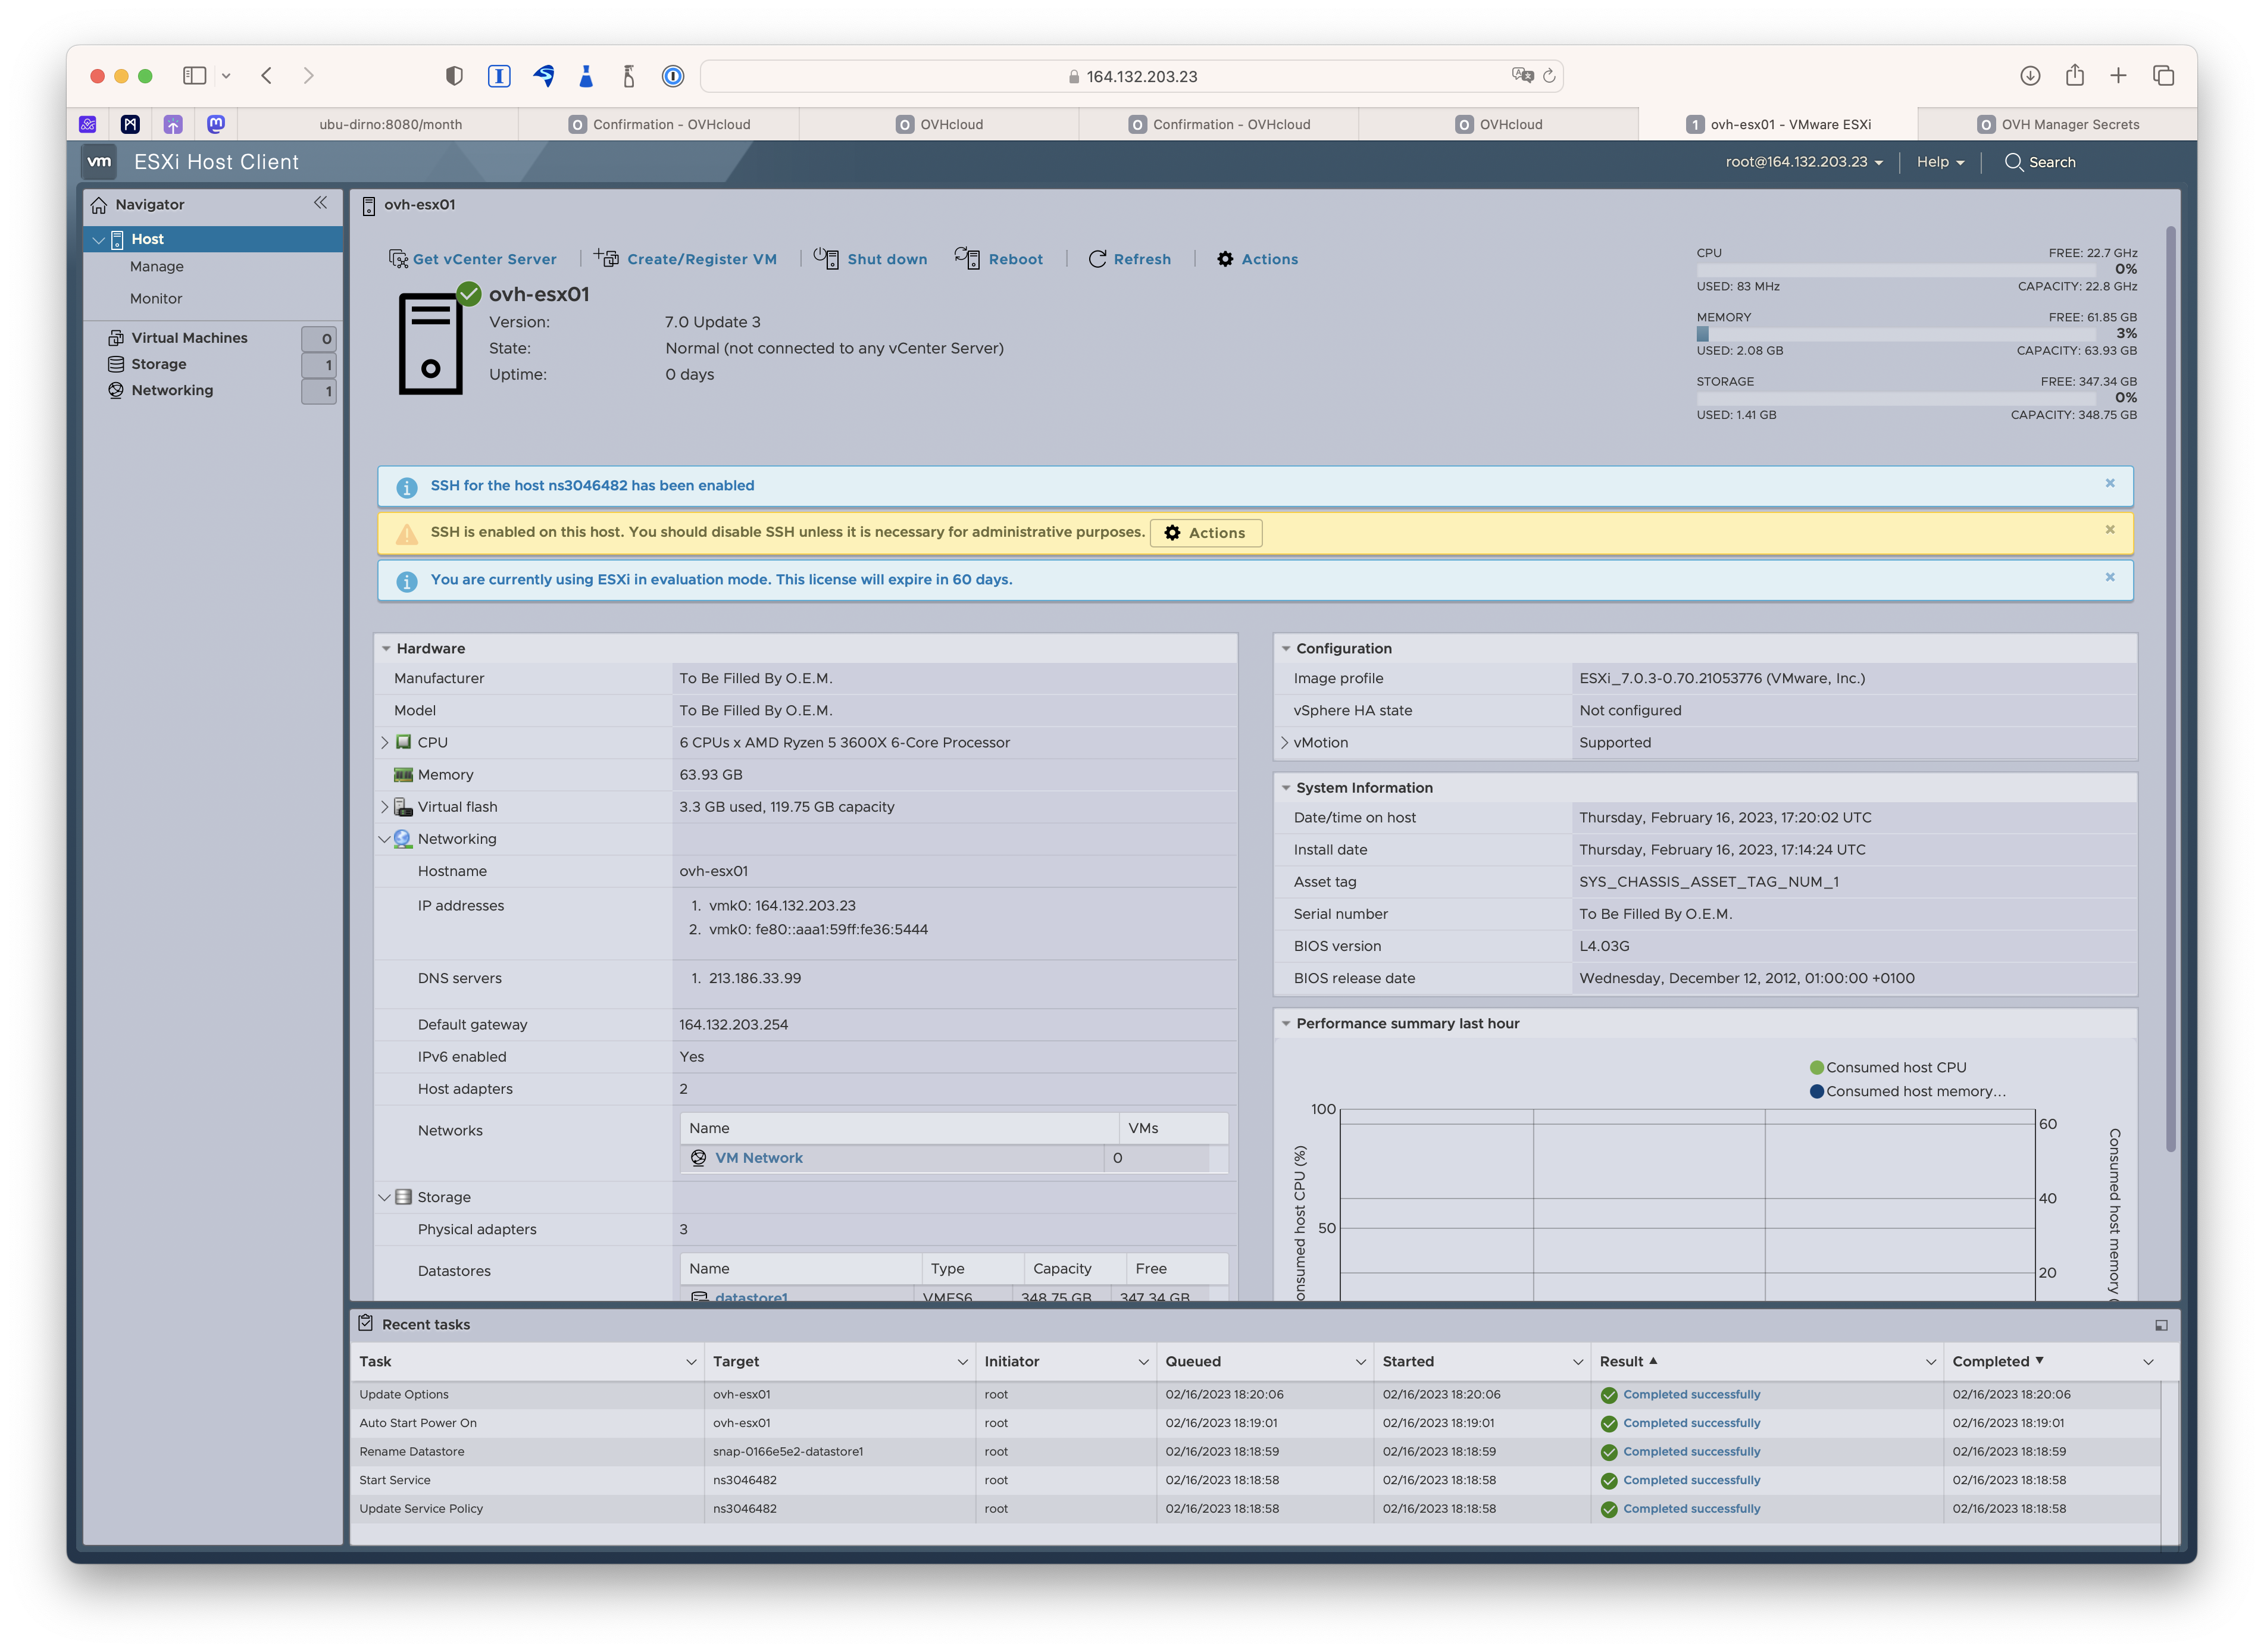
First off, I notice that SSH is enabled, and there’s no good reason to have it running at this stage (or in most cases) and especially since ESXi doesn’t ship with something like fail2ban, you really don’t want this hanging out on the internet, despite the very good random password generated by OVH.
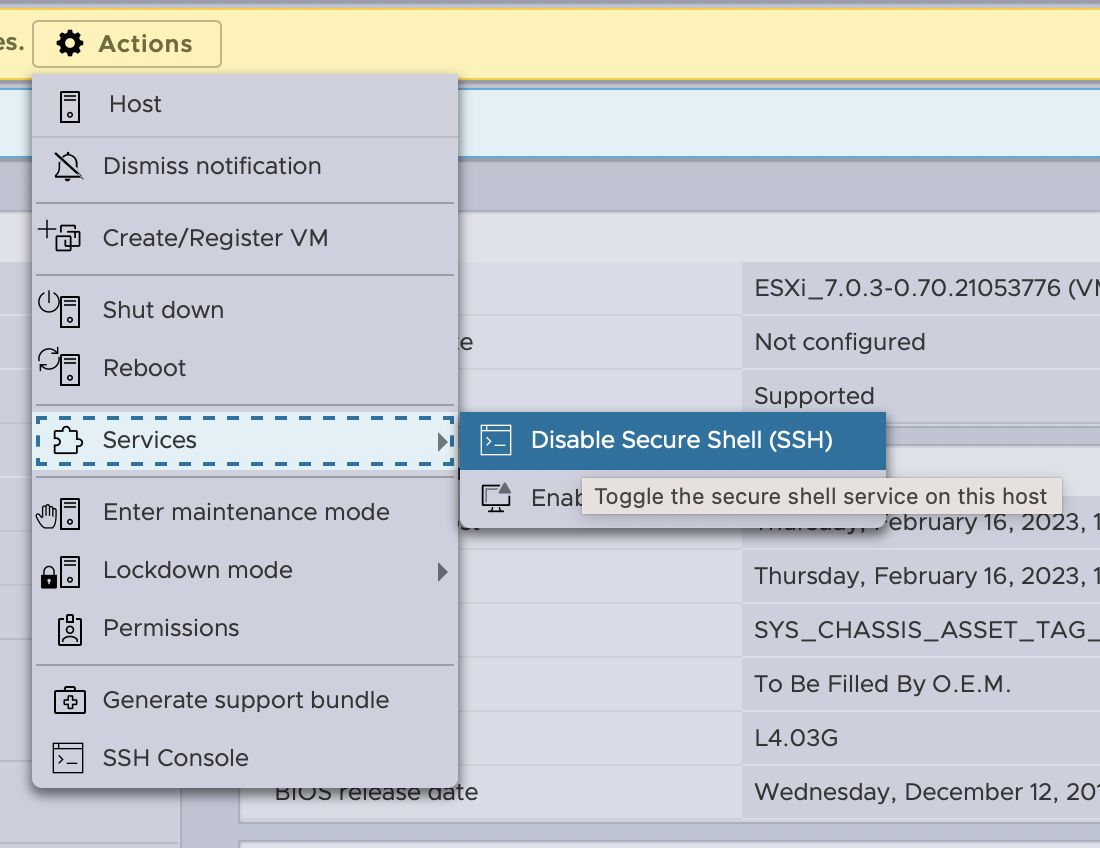
Conveniently in the latest version, there’s an action button that lets you disable SSH quickly and easily.
Configure the ESXi networking
Out of the box, this server has two physical NICs, but only one is enabled. I think that the other one is for adding services like additional storage via iSCSI or NFS on their internal network, but for the moment all we need is the first one. It is the uplink for the default vSwitch (vSwitch0) which is connected to the internet.
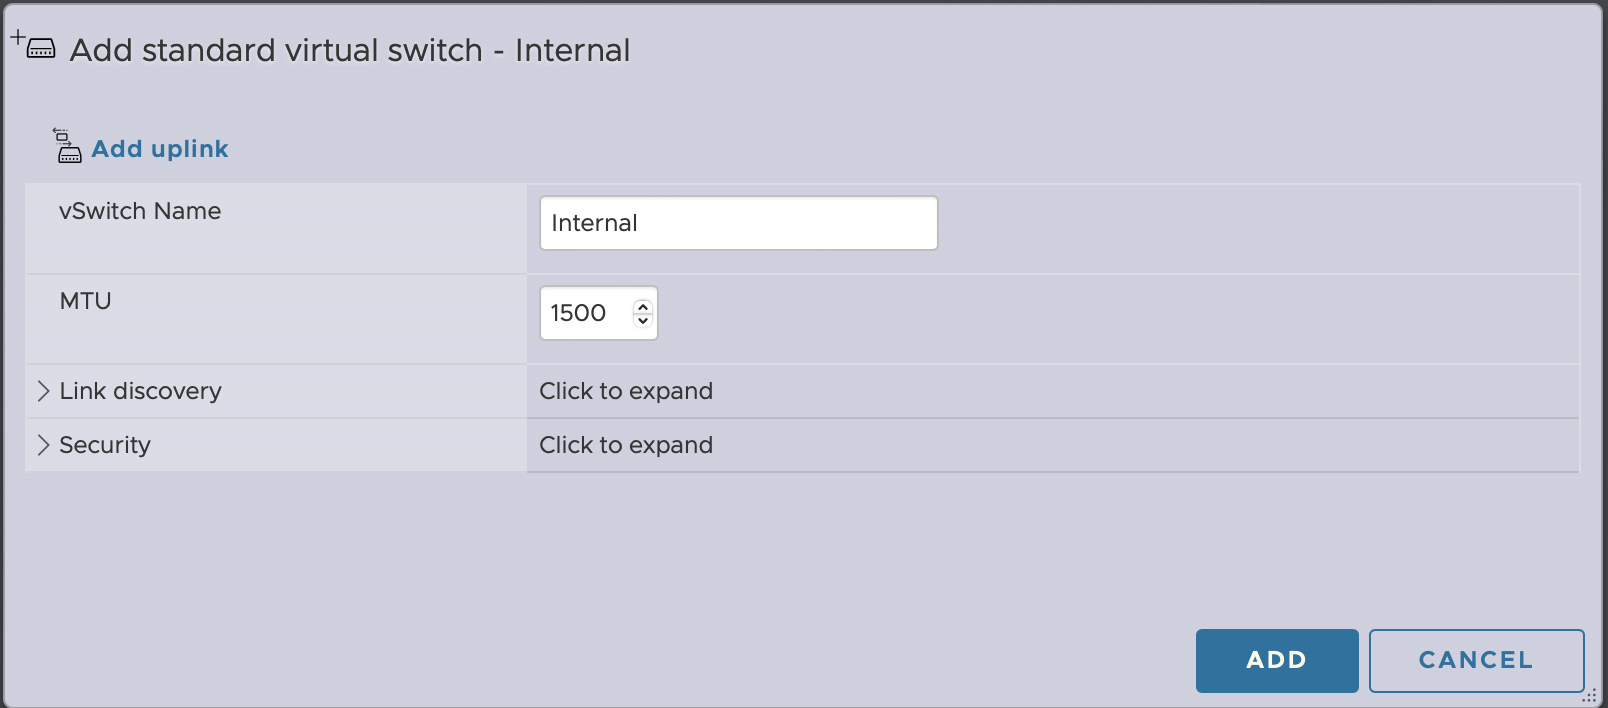
So I’m going to create a new vSwitch where my VMs will be connected and once we’re finished, the primary ESXi management interface as well.
Networking > Virtual Switches > Add Standard Virtual Switch. In this case, it presented me with the second NIC as an uplink, but since all of the traffic will be going through the firewall, I delete this uplink from the configuration.
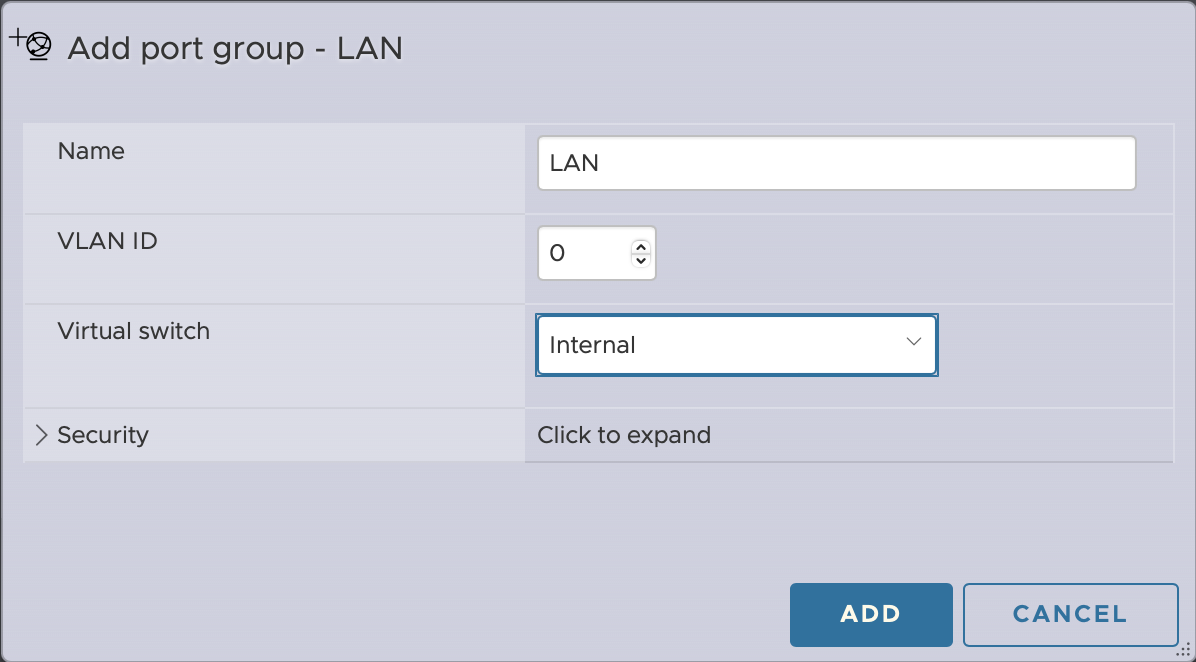
Then to create a port group where I can connect VMs (Networking > Port Groups > Add port group)
Installing the firewall
I’m going to use pfSense , but there are a number of other equivalent options, open-source and paid. I head to the pfSense site to grab the latest version (version 2.6.0 at the moment), ungzip the ISO image (gzip -d) and upload it to the ESXi datastore (Storage > datastore1 > Datastore Browser).
Now to create the VM where I will install pfSense (Virtual Machines > Create/Register VM) :
-
Create Virtual Machine
-
Name : gw-ovh-esx01
Compatibility: default
Guest OS Family: Other
Guest OS version: FreeBSD 12 (64-bit)
-
Select storage: the default datastore
-
Customise settings:
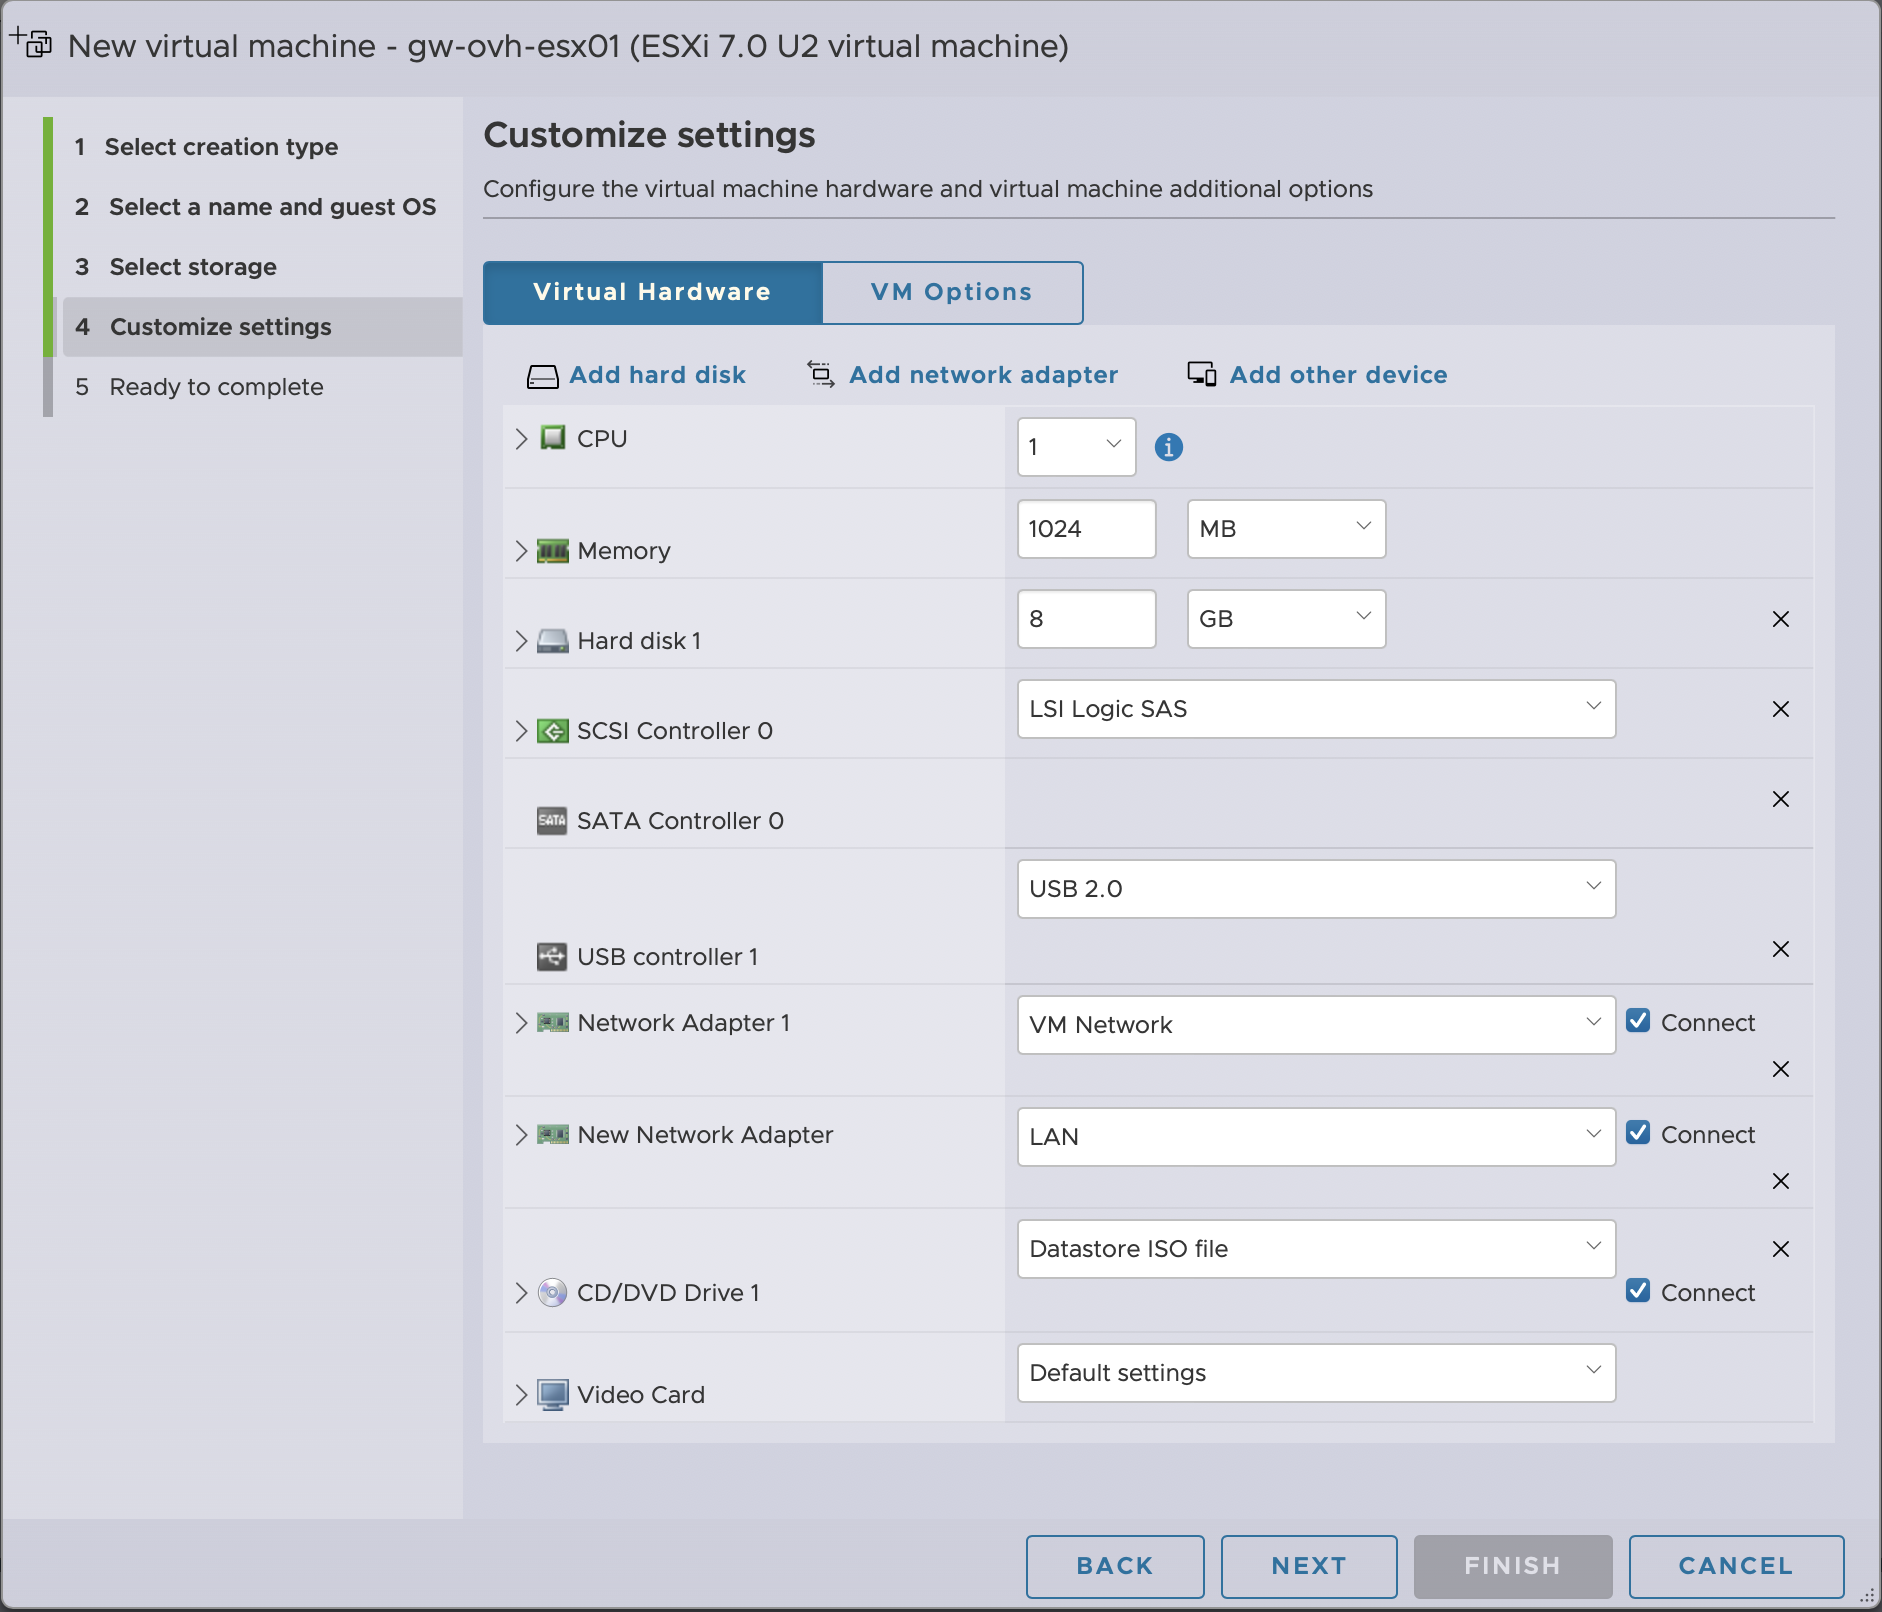
For a little firewall, the defaults provided should be fine. Maybe add a second vCPU if you’re going to be using IPSec. The important change is to add a second network card so that the first one is connected to the default VM Network port group and the second to the internal LAN port group. Then of course, connect the pfSense ISO image to the CD drive.
Boot the VM to start the pfSense installation as per the regular documentation.
Once the installation is finished, during the first boot, you’ll have to tell pfSense which network card corresponds to which part of the network. Normally, this means that vmx0 is the internet and vmx1 is the LAN.
Now we have the bare bones of the structure required.
Side note specificity OVH
In many hosting providers, when you request additional IP addresses they will be in the same subnet as your host and you can simply use them directly in the following steps. Additional IP addresses from OVH can be picked from a separate pool of addresses and thus aren’t in the same subnet and this requires some additional tweaking.
The steps involve associating the IP address to a MAC address and then configuring the pfSense firewall to use this MAC address as the WAN ethernet card. (Ref OVH IP Bridge)
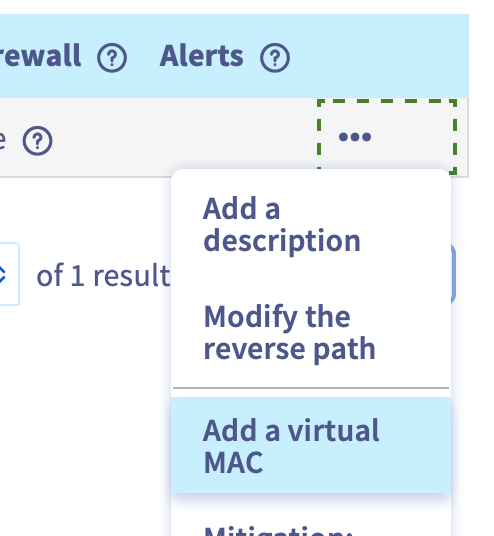
In the OVH Additional IP address there’s an option in the advanced features to create a MAC address associated with the IP.
Once you have the new MAC address, you’ll need to replace the auto-generated MAC address associated with the network card attached to the internet-facing port group.
Select VM > Edit Settings > Unroll Network Adaptor 1 > MAC address : Manual and enter the new MAC address. There’s one additional step later in the configuration stage to account for this configuration.
Set pfSense to autoboot
Setting the VM to autoboot is critical for future situations when the ESXi might need to be rebooted like when we apply a patch for example. In these cases, we need to have the pfSense VM running so that we can connect to the VPN after the reboot because the next steps are going to cut off the ESXi from the internet.
Now there’s a bit of a trap here. We’ve configured the autostart for the VM, but we haven’t activated the autostart service for the ESXi itself. This is found in Host > Manage > System > Autostart where you can hit the edit button and enable the service.
Configuring the firewall
At the moment, we have a bit of a problem. The firewall needs to be configured, but even if we assign the secondary IP to the WAN interface via the VM console, it’s a firewall and blocks everything coming in from that direction (as it should).
So we need a machine that is on the inside (attached to the LAN segment) to finish off the configuration. You can use anything that has a graphical browser (I guess you could do this in Lynx, but that seems like that’s making things excessively difficult).
So back to the ESXi Datastore browser to upload an ISO of your preferred desktop OS and create an appropriate VM that is connected to the LAN port group.
By default pfSense will create a DHCP server in the subnet 192.168.1.0/24 on the LAN interface so your administrative VM should have been assigned an IP that will allow it to talk to the pfSense server at 192.168.1.1.
From a browser in this VM the next step is to continue the configuration of pfSense (default password admin:pfsense) which will bring up the configuration wizard.
On the General Information stage, assign a hostname and a domain. I use my internal domain since that’s how I’ll be connecting in the future. For the moment, I set the DNS to public services (Cloudflare, Google, QuadDNS, …). The override DNS option is moot since I won’t be getting assigned a WAN IP via DHCP .
I leave the ntp server pool at the default and select the time zone.
Then it’s onto the WAN interface configuration. At this stage, it’s time to use that extra IP address I purchased, so the configuration mode is going to be Static, and refer to the OVH setting for the host for the gateway IP to use.
Note : If your additional IP is in a different range from the host IP address as with OVH Additional IPs, you’ll need to do another modification under System > Routing > Gateways > Edit WAN Gateway, then on the edit page, Display Advanced > Use non-local gateway.
The next stage is to set the internal LAN interface. You can leave the default 192.168.1.0/24, but if this subnet exists elsewhere in your network, you’ll want to select another unused subnet. I’m going to use 192.168.20.0/24.
Finally we set the admin password to something complex and store it in your password manager (you do have a password manager, right?).
You’ll need to refresh the DHCP assigned IP address of your virtual admin machine (or just reboot the VM).
We are running pfSense inside a VM and it’s a really good idea to install the Open-VM-tools package. System > Package Manager > Available packages > Open-VM-tools.
At this stage, your VM should now be able to browse the internet, passing through the Internal vSwitch to talk to pfSense as its router who then is connected to the internet via the physical uplink on vSwitch0.
So now we have a way to deploy virtual machines on the system, connected to a private network, but we still have another problem to solve:
- how to protect the ESXi management interface?
New management interface
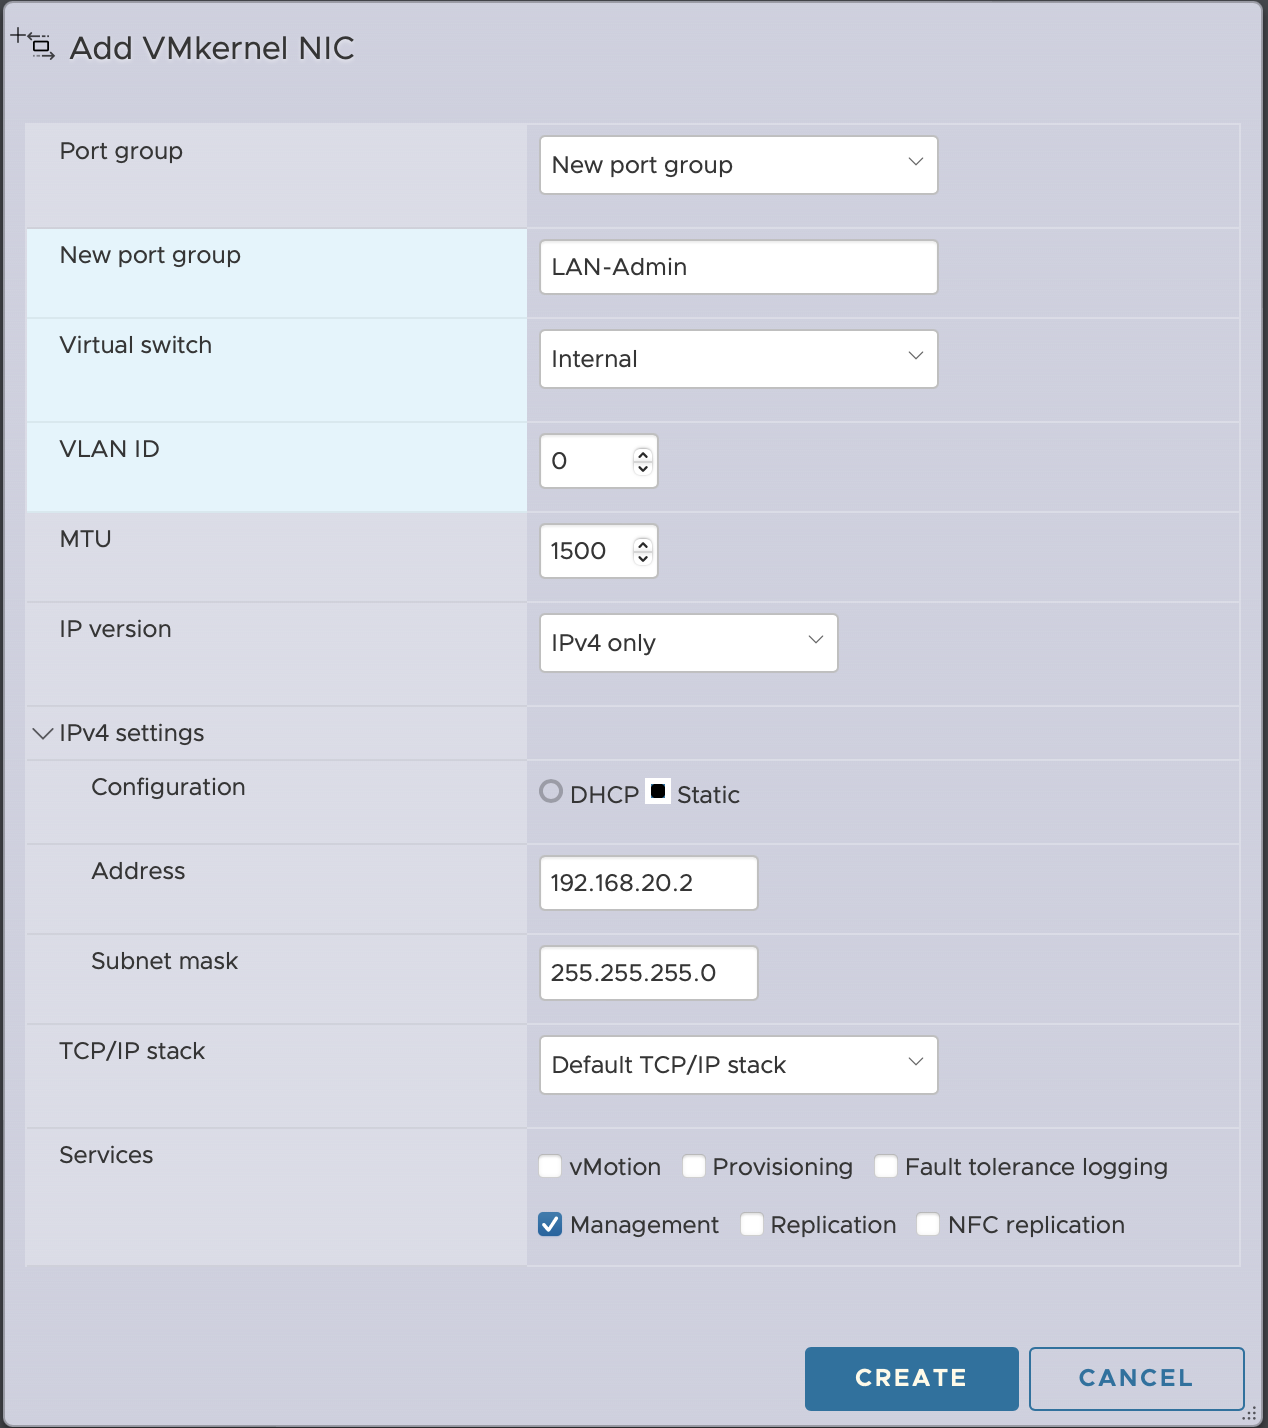
To isolate the management of the ESXi from the internet facing connection means that we’ll need another interface on the private network. To add this, from the ESXi web UI, navigate to Networking > VMkernel NICs > Add VMkernel NIC.
We attach this vmKernel interface to a new port group on the Internal vSwitch, and assign a static IP in the subnet we created (192.168.20.2 in my case). Check the Management option and Create. Note: Don’t connect to the existing LAN port group as VMkernel port groups cannot be shared with VMs - you’ll need to create a new one.
Now we have a new address where we can connect to the ESXi and access the management interface. Test this from the VM we used to configure pfSense to ensure everything is working properly.
One step closer to being able to remove the internet facing management interface on the ESXi. If I disable it now, I’m going to have some problems since I will lose access to the console of my admin VM on the internal network. So we need a way to connect to this network from the outside.
VPN connection
I’m going to be using OpenVPN which uses certificates for part of the authentication chain, so the first thing the pfSense server will need is its own Certificate Authority. The creating of the CA is included in the wizard for setting up OpenVPN, so I’m just going to use the wizard (VPN > OpenVPN > Wizards).
There are other more interesting VPN options out there (Zerotier, Wireguard, etc.), but this is an out of the box vanilla configuration.
It’s going to use the local user accounts for authentication. Then it will create a local certificate authority to generate the certificates used to secure the connexions. Then it will ask to create a certificate for the server, and then we’re onto the actual configuration.
We can use all of the default values proposed, and the only fields we need to enter are :
-
Tunnel network: A network range that is not used elsewhere. I tend to use a matching range to the local LAN segment from the 172.16 private network space so I’m using 172.16.20.0/24
-
Local network: whatever you setup for the LAN subnet. 192.168.20.0/24 on my installation here.
-
Concurrent connections: how many VPN connections can you have at once. This depends on how you intend to use it, but I generally set it low, between 3 & 5 as this will eventually just be an emergency backup connection.
Then we check the option to create the firewall rule to pass VPN traffic and allow clients to send all of their traffic if they want to.
And we’re done!
VPN Client
The next step is creating the configuration files for the client to use to open the connection. So I’m going to need a user account with a certificate: System > User Manager > Add. Fill in the fields and “Click to create a user certificate”. And give the certificate a name (I tend to use <user>-openvpn).
The easiest method for creating the user’s OpenVPN configuration files is a plugin package named openvpn-client-export which can be installed under System > Packages > Available Packages.
With that installed when we return to VPN > OpenVPN, there’s a couple of new tabs including Client export. The default settings should be fine at the moment and at the bottom there will be a section for each user that has a certificate that can be used for authentication. On the right are the various formats available for the different OpenVPN clients. Personally, I recommend Viscosity as it’s reliable, inexpensive and cross-platform.
With the configuration file downloaded locally in the VM, you’ll need to use your cloud file transfer service of choice to get it off on this VM to your machine so that you can import it into your OpenVPN client and connect into the private network.
Once you have a VPN connection from your computer, you’ll be able to go the pfSense web UI on the internal IP, but you’ll find that when you try to connect to the new ESXi management interface it doesn’t work. This is because the default gateway of the ESXi TCP/IP stack is still set to the external card so when an access comes in from anywhere other than the internal subnet, the responses aren’t routed properly back to the source.
Reconfigure the ESXi Management interface
To correct the routing problem and forcing the outbound routing to go through the pfSense VM, we need to change the default route which is done under Networking > Default TCP/IP Stack. In the routing section, we set the IPv4 gateway to the pfSense internal IP (192.168.20.1 in my case).
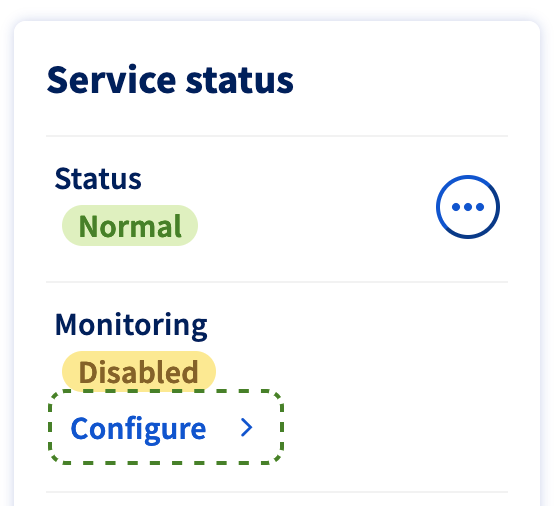
Note OVH: OVH has an automated monitoring system that will try and “fix” things if your machine goes offline or becomes unreachable. This will generally reboot the ESXi server and try and recreate the original networking configuration, so before moving onto the next step, ensure that the monitoring is set to disabled.
Now from a computer connected over the VPN connection we can connect to the management interface at 192.168.20.2. so we are the stage where we can remove the original VMkernel interface. So under Networking > VMkernel NICs > vmk0 > Actions > Remove.
At this point, your server is no longer accessible directly from the internet and thus protected from drive-by attacks on the management interface. You are still responsible for ensuring that people can’t get into your VMs and use them as a launchpad for attacking the ESXi, but at least you are no longer the lowest hanging fruit out there for attackers that are browsing Shodan for exposed servers.
Next up: Advanced options