Note: this is going to be a long one as it’s the accumulated stream of notes on the project over close to a year of reflection and iterations.
It’s been about 4 years since I built my original Mobile Lab so it’s time for some updates.
The original lab has been (sadly) mostly decommissioned for parts as the 16GB RAM ceiling on the Mini PCs was a real problem with the newer technologies where some VMs require 16 GB just for their base configuration. Never fear though, most of those Mini PCs have found new homes as Linux servers, FreeNAS servers, pfSense routers and similar roles. In the interim I did build a 1.1 variant using Gigabyte NUC based servers in the same basic design, but in order to get redundant networking, I had to use various USB adapters which work fine most of the time, but when the environment was being stressed had a tendency to fall over.
The other choices in the original design were part of the trade-offs of the time. My original goals included keeping it as silent as possible since it would be frequently used in a classroom setting where I didn’t want to have to be yelling over the fans. This worked beautifully, but the trade off was weight. The whole lab came in at about 37 kg which put it above the airline baggage weight limits, and trailing this around in the Paris Metro system was… challenging.
One other aspect that I’m less focused on now are the bare metal multiple site configurations. It’s gotten to the point where between nested virtualization and virtual network appliances that I can simulate all of that in a purely virtual way now. But if I’m going to be tearing up and down complex environments, the old GbE networking isn’t going to cut it any more as that was clearly one of the bottlenecks when trying to do stuff like deploy multiple multi-GB images.
The other use case that came up a lot more than expected was working with a partner who used the lab for doing VDI hands-on training courses where the 16Gb RAM limit plus the ethernet speed limitation severely limited the usefulness of the platform so clearly I need to move to 10GbE. In 2016, this was way out of my budget, but in 2019/2020, 10GbE has become much more affordable and available in smaller form factors from vendors like Netgear, Buffalo and Mikrotik.
With this in mind, the updated criteria now downplay the noise issue (more on that later), while trying to take advantage of advances in compute and storage density along with high speed networking that is now accessible at home lab budgets.
Mobility remains a priority and with the previous experience, this highlights the issues of size and weight.
Compute
So the first step in the process was choosing the basic computing platform with those criteria in mind. At first glance the NUC and related variants seem attractive, but even with the newly discovered ability to push them up to 64Gb RAM per machine is attractive, it’s still less than a “real” server. I was targeting 512 Gb of RAM for the cluster in order to be able to offer multiple complete environments for many students.
I was looking at 6-8 NUCs to get up to 384-512Gb of RAM. It’s at this point that the Supermicro SYS-E200-8D started looking very interesting. It has the onboard 10GbE (granted in RJ45 rather than SFP+) as well as a proper IPMI management interface.
Given that there are no NUC variants with on-board 10GbE (note this all started prior to the release of the new NUC form factors) I’m needed at least as many cubic centimetres to go up to 8 NUCs vs 4 200D’s plus all of the extra power cabling, external 10GbE adapters and mounting brackets. In a constrained space like a mobile case, I have learned that extra cables quickly become a design problem.
I did briefly consider going back to the Mac Mini as a possible solution, since the latest generation offers on-board 10GbE as an option with the Aquantia chipset, but there are still too many other constraints around running ESXi on these boxes to make it viable and they share the NUC limitation of 64 Gb RAM.
I had a brief fever dream where I considered just sticking a single Mac Pro into the Pelican case and outfitting it with 1Tb of RAM and all of the required storage, but a quick trip to the configurator showed this to be… less than economically viable…
.png)
With that in mind I settled on the SuperMicro SYS-E200-8D. Enough RAM density to cover currently anticipated use cases with room to spare, plus dual on-board 10GbE to minimize cabling complexity and as a bonus, they can be driven by an external 12V power supply which lowers the cabling complexity even more letting me continue to use some kind of central PSU for the whole setup. With the IPMI interface I could also skip the requirement to find space for a KVM and a screen.
As per my original lab design, there is an machine designated LabMaster that hosts the overall management toolkit, including the vCenter for the actual servers (yes I know that I can bootstrap a vSAN with vCenter, but this just makes things easier), a pfSense router, plus a FreeNAS node for images etc., across Lab resets.
Side note on noise
Having watched many videos about people’s observations about the amount of noise these servers generate, I decided by default to just replace the two included fans with Noctua ones and add a third one in the available slot. The result is amazing. The entire lab makes less appreciable noise than one of the NUCs in the office that spins up it fan regularly.
This is important for when I’m using this at the office where it might be right next to me as well as when I’m using it in a classroom setting.
Networking
One complicated aspect of designing a mobile lab is just how far to take the networking. If I want to cheap out, I could just setup each node with a single 10GbE interface which would work, but I’d have to silence a whole slew of alarms and complaints on the system. So decided to build this like a proper system with redundant connections, but I’m going to content myself with 2 10GbE and not bother with the GbE NICs for isolating management traffic since that starts getting a little excessive.
Given that the SuperMicro servers use copper 10GbE, I would have preferred a native RJ45 switch, but the combination of small and affordable don’t cross over. All of the fully copper switches from Netgear for example have the easy trade-off : 10GbE or small form factor. There was one switch that tempted me, the XSM4316S, which is a small design with 8 RJ45 and 8 SFP+ 10GbE ports, but it’s priced out of my range at close to 1800 € TTC where the two Mikrotik CRS309-1G-8S+IN switches were only 446 € TTC so even though I have to spend some more on the (relatively) expensive Mikrotik RJ45 SFP+ modules it’s still less expensive. Plus even in labs, I like the architectural rigor of having two switches.
Using RJ45 SFP+ transceivers does come with some additional issues, specifically dealing with heat. Mikrotik has some sensible guidance on the subject that used for deciding how to connect the various components..
Despite this being a small setup, the port count gets high really quickly:
-
4 Servers with 2 10GbE interfaces
-
Interconnection between the switches
-
4 IPMI ports
-
NUC master node
-
Local admin port
-
External LAN port
So quickly off the top of my head, I’m already at 17 ports, which is a very annoying number.
After playing with the CRS309-1G-8S+IN I can confirm that the GbE “Management” port is not isolated in any way and participates fully in the network fabric. So I have in fact two 9 port switches and contrary to the usual switch use case, my “uplinks” will be the slow ports instead of the fast ones. The GbE port on the NUC is the uplink used for external connectivity as required and will be attached to the virtual router.
Side notes on the switches
Even after following the recommendations of spacing the ports that will be using 10GbE RJ45 SFP+ modules, they get really hot. Under load, the 10GbE modules can easily hit 100°C. That’s why there’s a USB powered fan on top of the switches. It’s not great airflow, but sufficient.
Case design
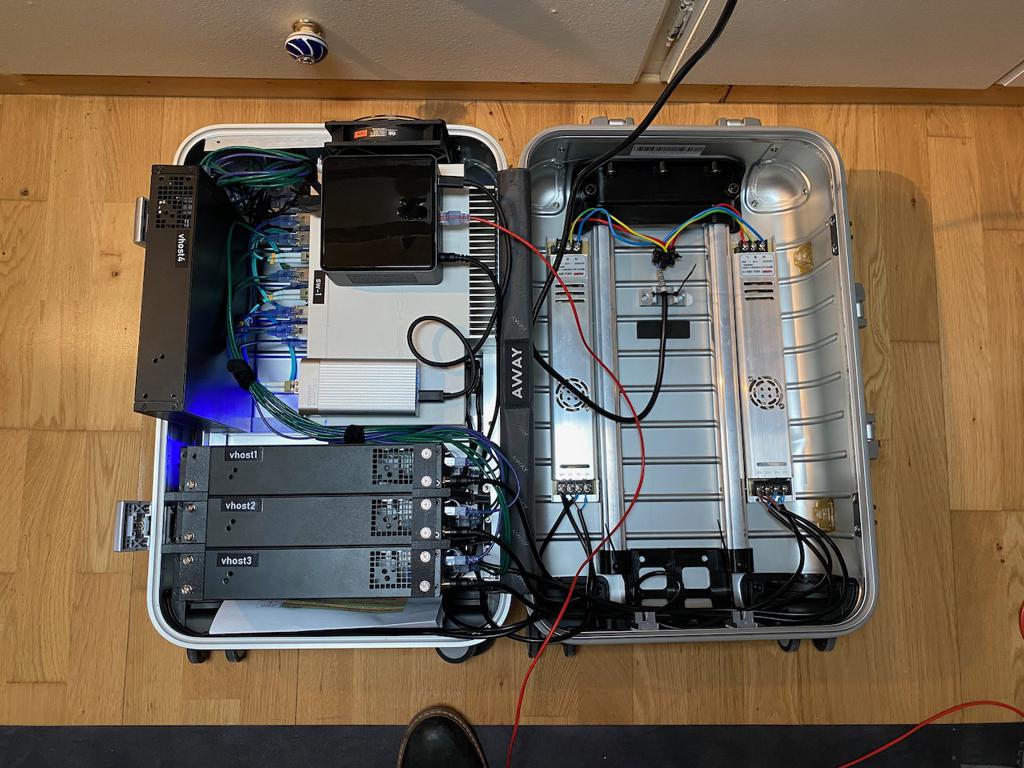
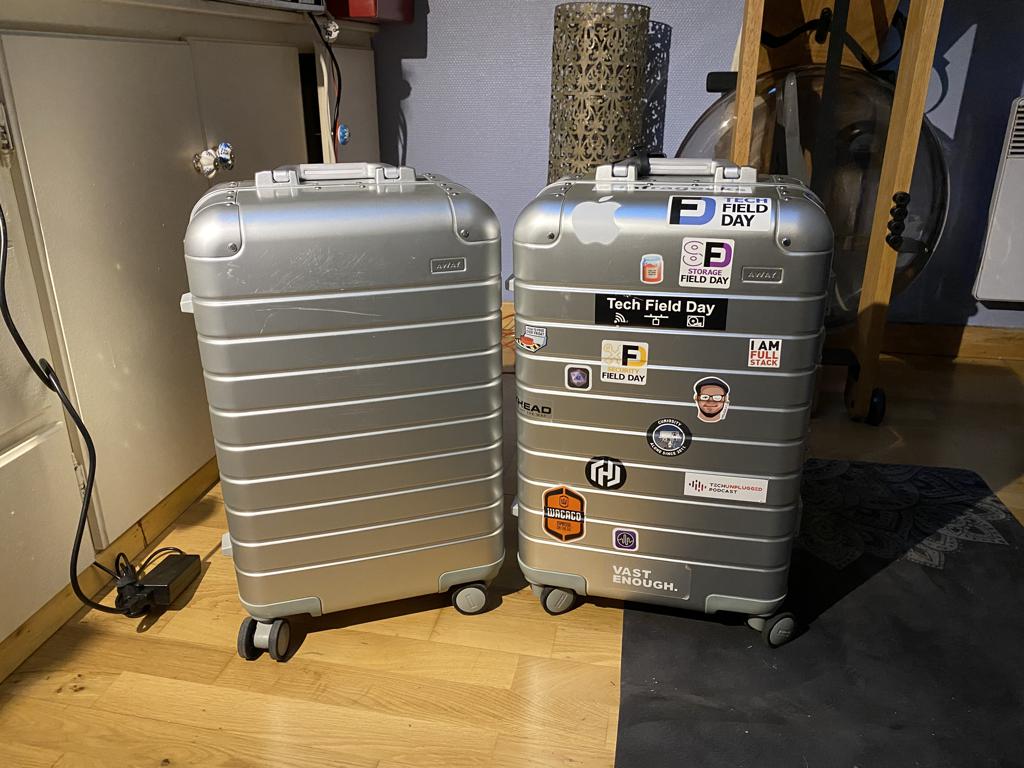
I had in mind moving to something that looked a little cooler and didn’t scream ‘technical equipment’ in the way that the Pelican case does. I have always liked the look of aluminum suitcases and based my initial placement designs on the dimensions of the AWAY suitcases. So I now have two of the Away Aluminum Bigger Carry-On’s, one for the lab and one for me.
That said, this is right on the very limit of the required space. The internal dimensions of the suitcase make it impossible to have a nice symmetric design which meant having to get a little creative in the placement of the various components.
One discovery while working the design was the existence of ultra-flat 12V power supplies sold for use in industrial LED lighting systems. This replaced the regular PC PSU used in the original Mobile Lab.
Assembly
Due to various timing constraints, the actual core pieces of the Lab were assembled and used as a regular home lab on a shelf for a number of months before I found the time and energy to move forward on putting it all into the suitcase.
From a design perspective, I wanted to build this one all on my own if possible, so I started exploring some related design ideas that I’d seen for people building portable HAM Radio sets and things like that. In this space, riveted aluminum frames are a very popular method of constructing custom frames. I briefly thought about doing this in a really Steampunk style with brass frames and rivets, but the aluminum brackets were available at the local hardware store so practicality won.
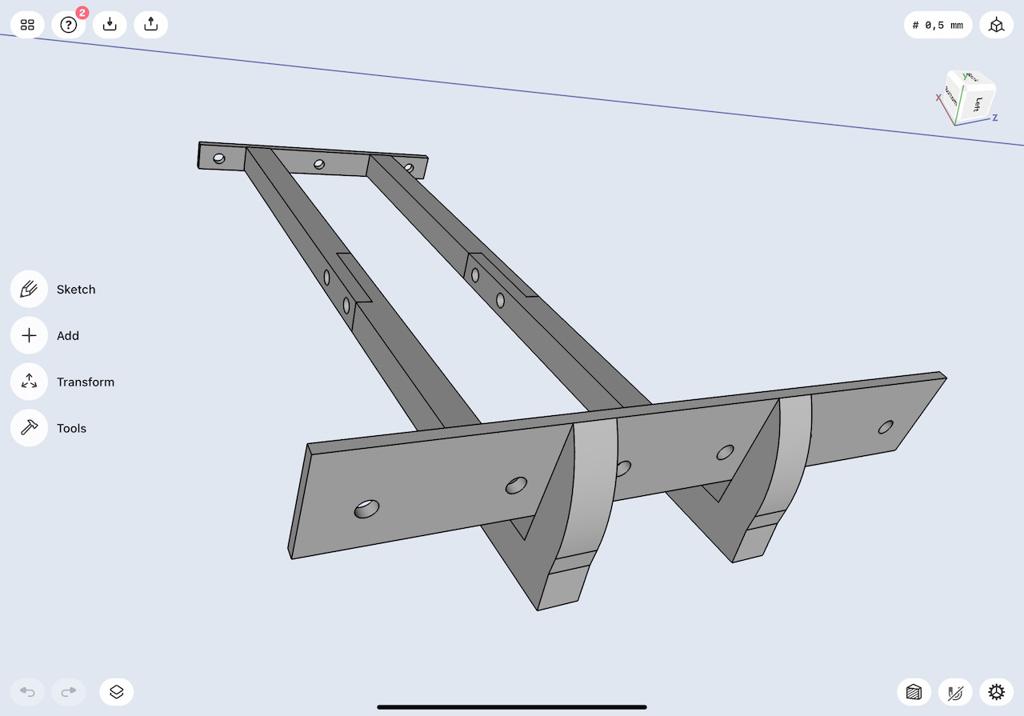
Then there were a number of issues in mounting the servers internally that turned out to be difficult to accomplish with riveted aluminum (at least with the available tools and my lack of skill). So this ended up being the needle that broke the camel’s back and projected me into the world of 3D printers in order to build a few custom pieces to hold everything together.
The switches are attached together using the original L brackets with the wing cut off, but I may go back and print custom pieces so there are fewer rough edges for me to cut my fingers on.
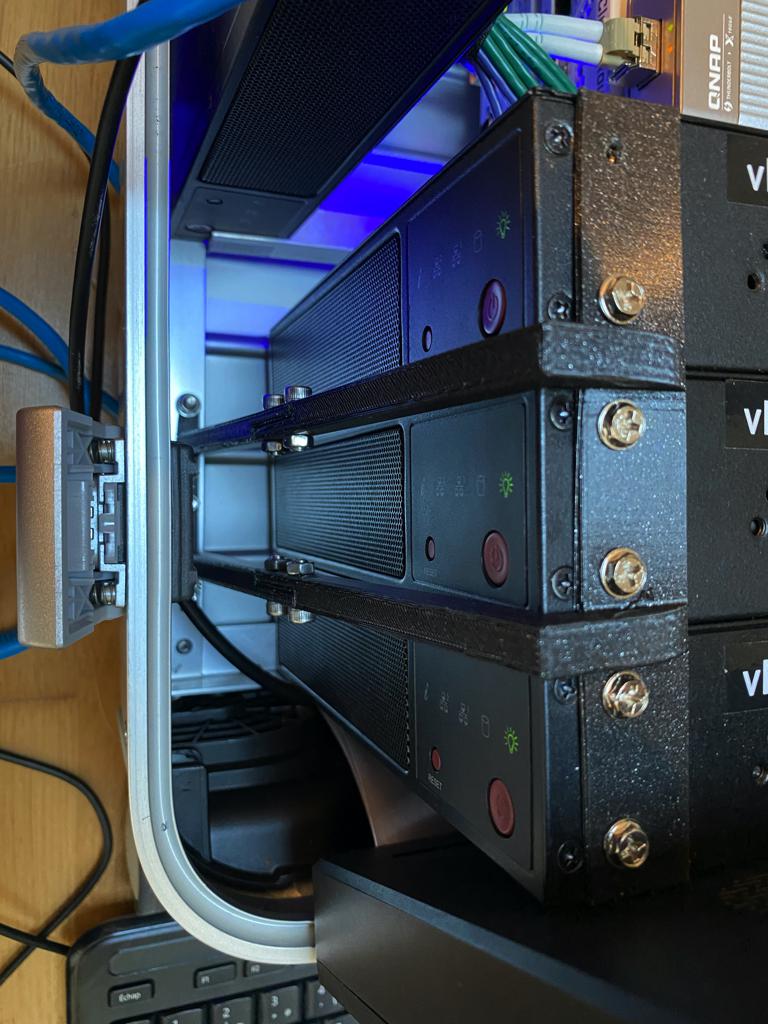
The major issue was that the three servers on the bottom have one edge in the aluminum L rail, but I needed a way to stabilise them so that they would not shift around, even when I open the case or extract the lab from the case. The 3D printer I acquired (Prusa Mini) has a decent but not huge print area. So I designed the struts to hold the servers and then cut it into two pieces and attached them with little M4 bolts.
For some of the other smaller pieces like the power supplies, NUC and QNAP Ethernet card, they are just attached with 3M Command Strips which have proven to be very robust.
Side note on 3D printers
These things are just way too much fun.
Sourcing & BOM
The servers were from a local SuperMicro reseller, the RAM from AliExpress, the PSU’s from Alibaba and the rest from Amazon.
Prices here are noted with VAT included where applicable and rounded.
Case:
- AWAY Travel Aluminum Bigger Carry-on: 525 €
Servers:
-
SuperMicro 1170 € x4 = 4680 €
-
RAM 32Gb DIMM 140 € x16 = 2240 €
-
Samsung 970 EVO Plus NVMe M.2 (250 Go) 67 € x 4 = 268 €
-
Crucial P1 CT1000P1SSD8 NVMe M.2 1To 93 € x4 = 372 €
-
PCIe to M.2 adapter 7 € x4 = 28 €
-
Noctua NF-A4x20 PWM 15 € x 12 =
-
-
Intel NUC Kit NUC8i7BEH 445 €
-
RAM: Scavenged from another NUC
-
Samsung SSD SATA 860 EVO M.2 (1 TB) 155 €
-
Micron 2.5” SSD 1Tb: Scavenged
-
QNAP Thunderbolt3 10GbE SFP+ 193 €
-
Networking:
-
MikroTik CRS309-1G-8S+IN 223 € x2 = 446 €
-
10GTek SFP+ 10Gbase-SR 25 € x3 = 75 €
-
Mikrotik S+RJ10 SFP+ 65 € x8 = 520 €
-
Mikrotik S+RJ01 SFP+ 22 € x4 = 88 €
-
AC Infinity Multifan S3 120 mm 15 €
-
Probably another 75€ in cables
Power:
- HRU Series 300W Led Power Supply 25A 12V 10 € x 2 = 20 €
For a total of about 9800€ out of pocket.